Last week. Simon Long from Raspberry Pi released a new version of Raspbian with several new features. The most visible of these is the new-look desktop skin, named PIXEL (Pi Improved Xwindows Environment, Lightweight).
PIXEL splash screen
There’s a lot of user interface (UI) tweaks both functional and visual…
- new splash screen on boot
- stunning background images added
- a whole new set of icons
- larger ‘drag handles’ for resizing windows (that’s bugged me for years)
- windows now have rounded corners
- new font rendering package for better typography
I think the new look is a big improvement and I love it. ‘Grabbing’ the corner of a window to resize it has always been a bit harder than it should have been, so I’m delighted about the larger drag handles too.
So What Else is New?
Other tweaks include using Chromium as default browser and realvnc is pre-installed. I’m delighted by the addition of Chromium as it means I can use a Pi3B for G+ hangouts which I use a lot when I should be working for communicating and collaborating with people. I can now do this in the workshop whilst monitoring twitter and QC testing Pro Hats – all using the same Pi3.
Testing Pro Hats while chatting to friends on G+ hangouts and monitoring twitter all on the same Pi running #pixel pic.twitter.com/Gml099NvpO
— RasPi.TV (@RasPiTV) September 28, 2016
I Want to Tweak PIXEL
But we all like to personalise our computing, so what if you want to tweak it for yourself? How would you manage that? Below are a few tips I’ve collected showing ways you can tweak or customise your PIXEL/Raspbian.
Don’t Want a Splash Screen?
If you prefer the retro look of the boot messages racing by, rather than the splash screen, there are two ways to achieve this…
- Using raspi-config application, choose “boot to CLI” instead of “boot to desktop”
- Delete “quiet splash” from
/boot/cmdline.txt
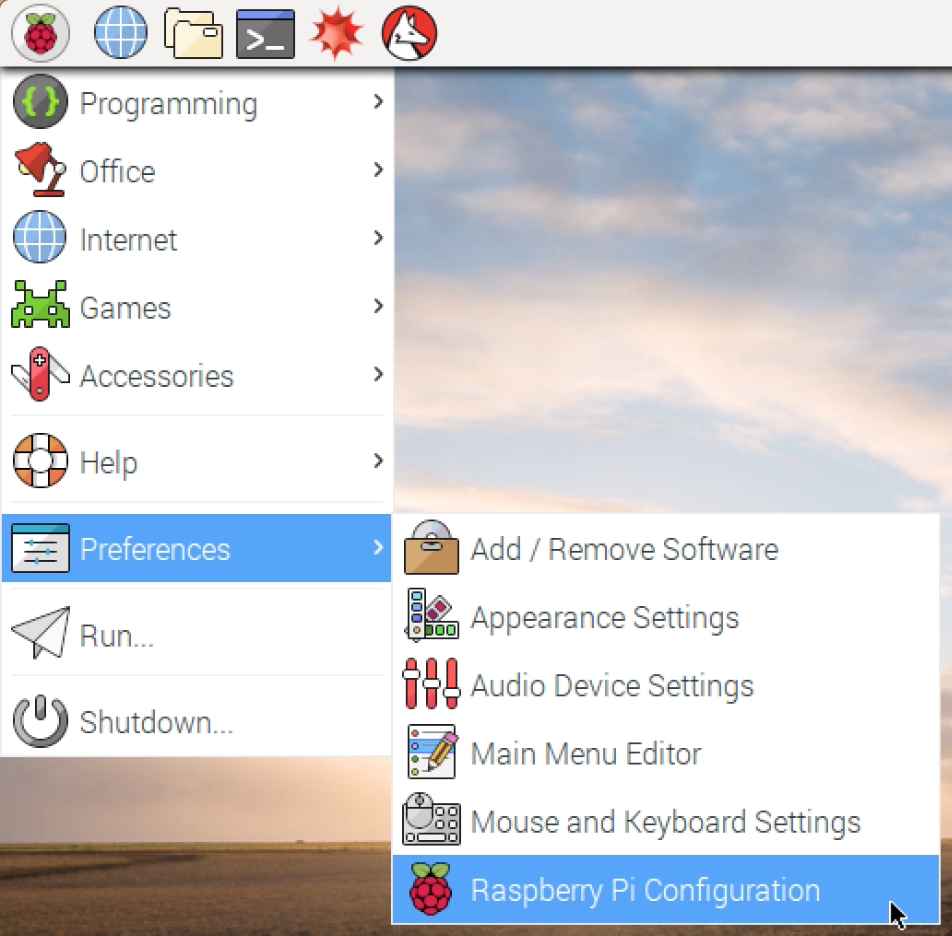
Opening raspi-config
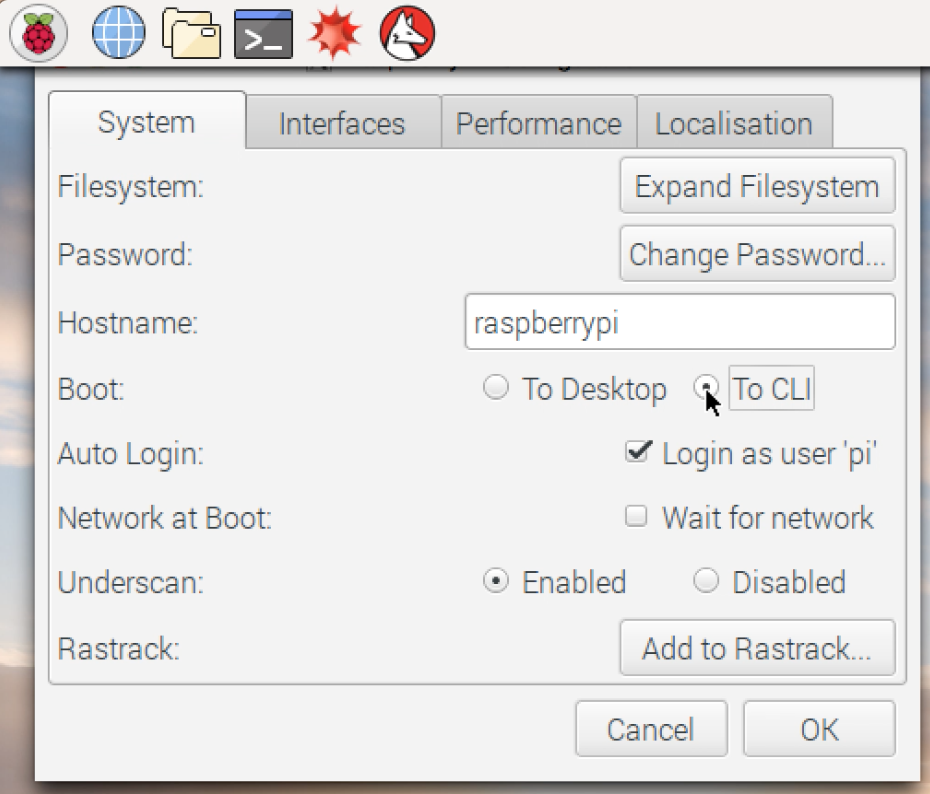
Select “To CLI”
If you boot to CLI (command line interface) and then want the desktop, you’ll need to type startx to run it.
sudo nano /boot/cmdline.txt
remove quiet splash

Removing “quiet splash” disables splash screen
Save and exit (CTRL+X, y, ENTER)
Want to Change the Splash Graphic?
This is quite easy. All you have to do is replace /usr/share/plymouth/themes/pix/splash.png with your chosen graphic. It must be called splash.png though.
Supposing your required splash graphic is /home/pi/raspitv.png you would move (mv) it like this…
First let’s back up the old one in case we want to revert…
sudo cp /usr/share/plymouth/themes/pix/splash.png /usr/share/plymouth/themes/pix/oldsplash.png
Then move the new graphic…
sudo mv /home/pi/raspitv.png /usr/share/plymouth/themes/pix/splash.png
sudo is required because the target directory is owned by the root user.
So then the default splash becomes your own customised version…
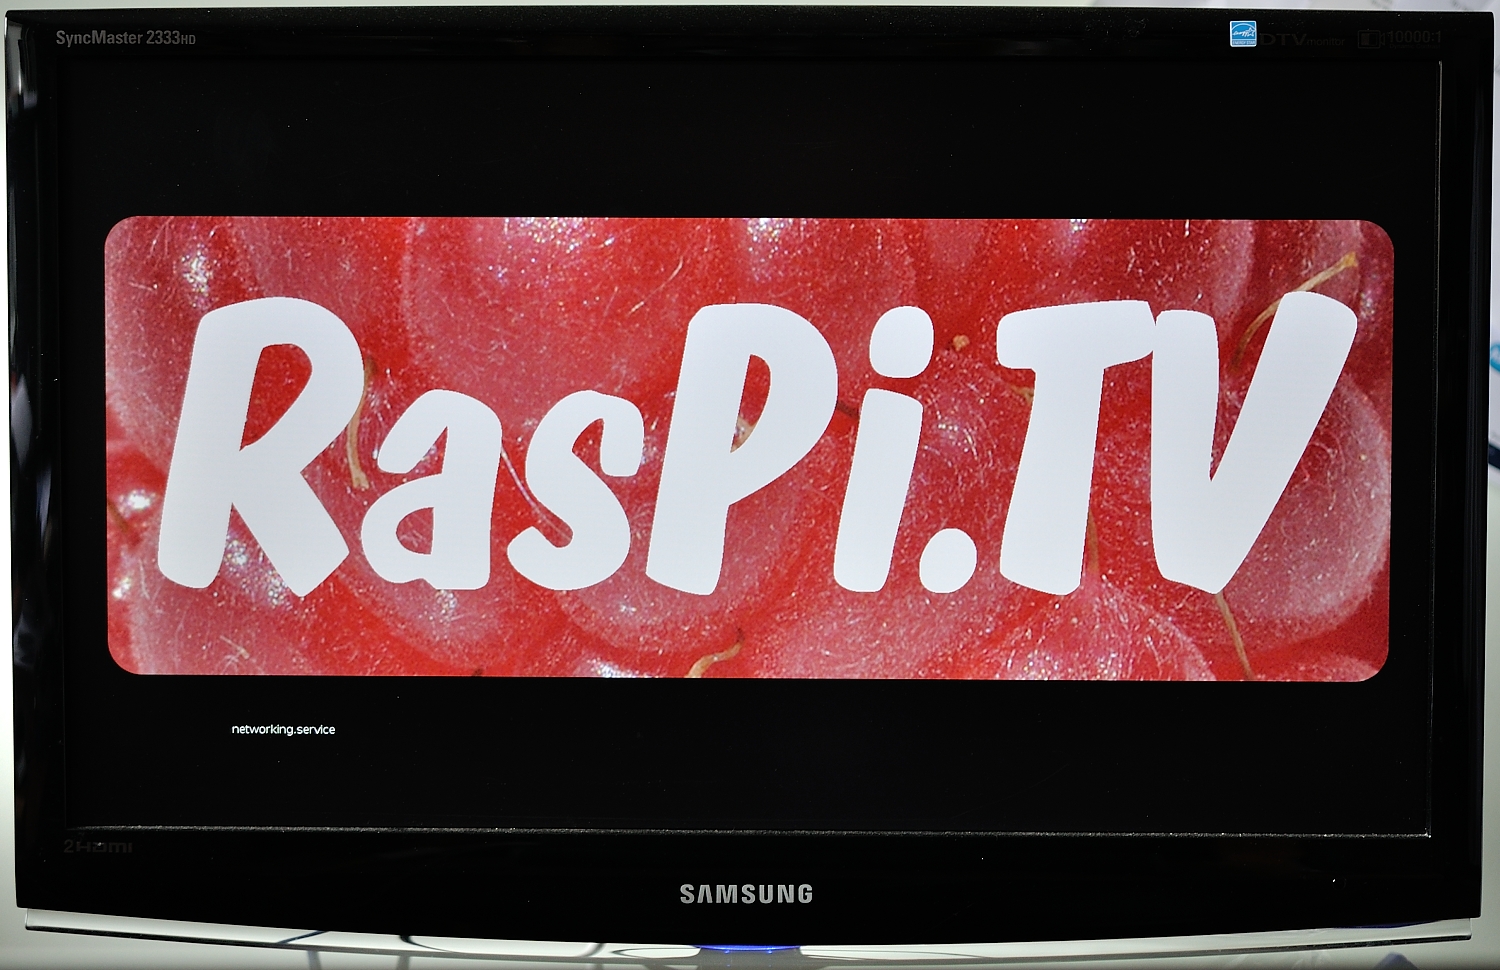
RasPi.TV splash screen
NOTE: If you do a dist-upgrade your splash file will be overwritten with the new official PIXEL one showing the new version.
How to Disable Tooltips
If you hover over objects in the user interface, you see pop-out bubbles (‘callouts’) explaining what they are/do.
Here’s a tooltip (callout)
If you no longer wish to see these, or find they get in your way, you can switch them off by adding a new line…
gtk-enable-tooltips = 0
…right at the beginning of the file ~/.themes/PiX/gtk-2.0/gtkrc
nano ~/.themes/PiX/gtk-2.0/gtkrc
add
gtk-enable-tooltips = 0
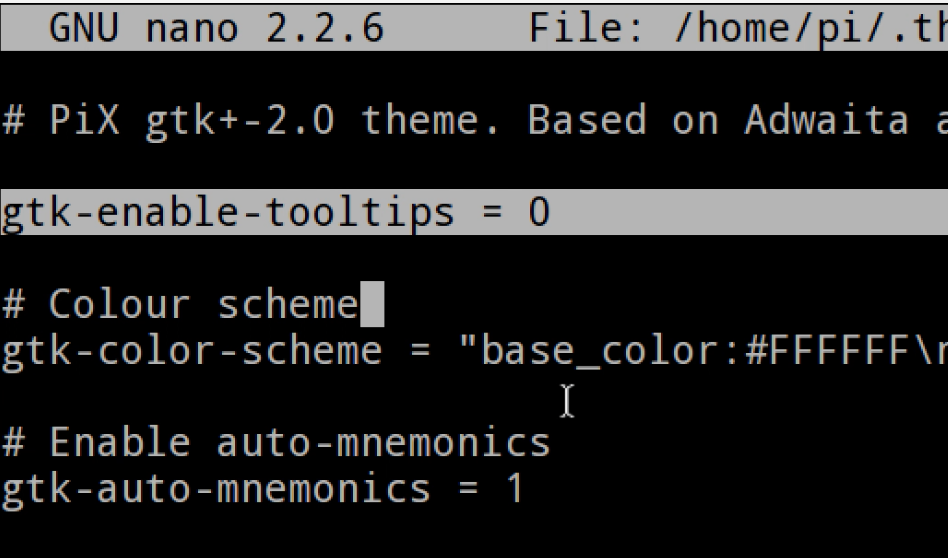
Disable tooltips
Then next time you restart LXDE the tooltips should be disabled.
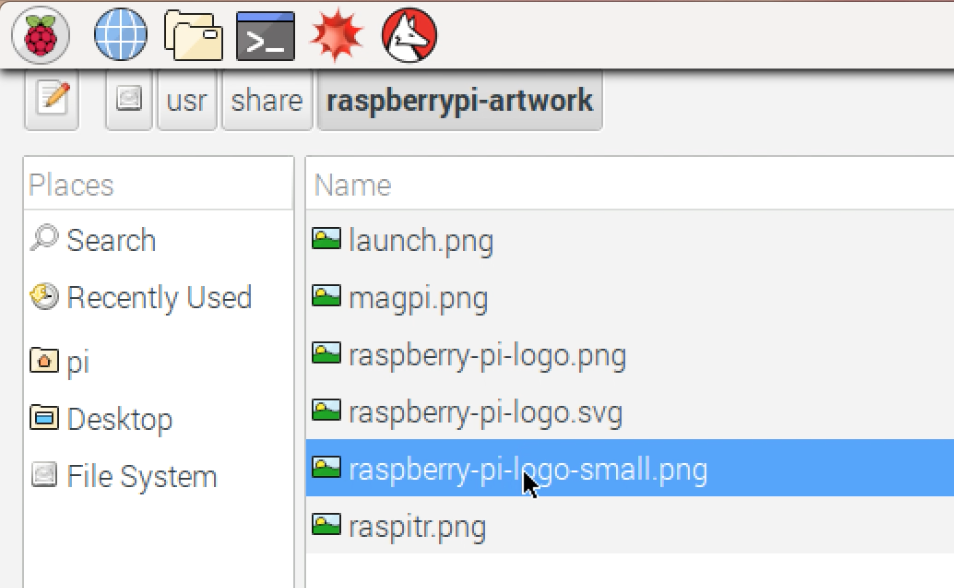
I Miss the Raspberry Pi Desktop Logo. Can I Reinstate it?
Yes. You can select it with the Appearance Settings application – it lives here…
/usr/share/raspberrypi-artwork/raspberry-pi-logo-small.png

Appearance settings
Selecting the Pi logo graphic
Then be sure to change “fill screen with image” to “centre image on screen” or the Pi logo will be huge.

Centre image on screen
Where are the New Icons Stored?
All the new icons are here if you need access to them for your own documentation or apps…
/usr/share/icons/PiX
New icons’ hiding place
Enjoy Tweaking
Hopefully you found these ‘PIXEL tips’ useful. Enjoy tweaking your PIXELs. If you have any more tips, feel free to share them below in the comments.
Nice post, i thought of changing the splash screen and after reading this i did. Easy to do when you know where to look :D
great tips, nice desk,,wonder whats behind the paper towel you don’t want people to see,,,lol
Those two squares of paper towel are covering two 12V halogen lamps which illuminate my face when I’m shooting videos. The light is a bit harsh without a diffuser, so I have a piece of paper towel on each acting as diffuser. So probably not as exciting as you imagined it might be. :)
thanks, and i thought they were peep holes to the interweb:)
Wow! Hi-tech solutions like this are just brilliant! Let you in on a secret – before Post-It notes we used sticky tape and paper to attach info to our VDUs. Same with keyboard short cuts – Word Perfect.
You need to find a good name and patent it fast. Alex’s Low-Tech Rero Light Diffusers. They might catch on 😂
Thanks for all this new info, Alex, very useful.
I’m glad to see another “cluttered” work area, like my own, but am hard pressed to understand how you will incorporate the deer horn into a future project.
Hi Tony
The deer antler was used in a knife-making project. It’s not really very Pi-relevant, but a few people expressed interest on twitter so I blogged it over at my personal blog http://alexeames.com/blog/2016/09/making-a-knife-from-laurin-6cm-stainless-silver-sixpence-red-deer-antler-conifer/
I make knives as a hobby when I get fed up of looking at screens :)
Very interesting blog. You are a man of many talents! Very nice knives.
My version of Pixel (and subsequent upgrades) are missing the navigation bar at the top and Chromium did not install. I had to install it manually. I also get an error message when I try and configure WiFi (“Invalid desktop entry file…”). Anybody got an idea?
RPi 2B+, 32GB SD card, Internet USB dongle and Logitech USB dongle… 2A Power supply.
I successfully added an icon to the desktop that runs a script to announce the current time in audio. Can someone tell me how to add that icon to the taskbar instead?
Off the top of my head, can you just drag it there? Or can you right-click the task bar to access a menu?
Does anyone know how to turn off the rounded corners on application windows?
“gtk-enable-tooltips” can be either “TRUE or “FALSE”
Good tips, but changing splash.png did not work for me on Pixel :(
Hello, since I have a small laptop screen (Motorola Atrix) I prefer “medium” size for the menu bar, then I can set this from Desktop Preferences… but now, every time I maximize a window or application, there’s a small gap reducing my maximum, apparently due to the previous “large” size of the menu bar… still hovering. How to solve this? Many thanks! :)
Best place to ask that will be https://www.raspberrypi.org/forums/viewforum.php?f=66
;-)
How do i make a custom resolution for PIXEL? I’m using a 3.5 in touch screen, and go everything tweaked up they way I like, but it’s still displaying in 720×480 I need 480X320.
Sounds like you’ll need to experiment with https://www.raspberrypi.org/documentation/configuration/config-txt/video.md
Do you have any idea how to make Pixel not show window contents when dragging or resizing. I would prefer if I could get it to just show a sizing rectangle and redraw when I have finished the operation. This progressive redraw looks terrible and hurts my head.
Some browser for raspbian pixel 1.3, that you can see videos of youtube and also other pages without being blocked
I edited the splash screen with costum graphic and loading bar. And also removed the messages (We need a silent boot).
Change splash.png as already mentioned.
Edit /usr/share/plymouth/themes/pix/pix.script
add ”
#—————————————– Progress Bar ——————————–
progress_box.image = Image(“progress_box.png”);
progress_box.sprite = Sprite(progress_box.image);
progress_box.x = Window.GetX() + Window.GetWidth() / 2 – progress_box.image.GetWidth() / 2;
progress_box.y = Window.GetY() + Window.GetHeight() / 2 – progress_box.image.GetHeight() / 2;
progress_box.sprite.SetPosition(progress_box.x, progress_box.y, 0);
progress_bar.original_image = Image(“progress_bar.png”);
progress_bar.sprite = Sprite();
progress_bar.x = Window.GetX() + Window.GetWidth() / 2 – progress_bar.original_image.GetWidth() / 2;
progress_bar.y = Window.GetY() + Window.GetHeight() / 2 – progress_box.image.GetHeight() / 2 + (progress_box.image.GetHeight() – progress_bar.original_image.GetHeight()) / 2;
progress_bar.sprite.SetPosition(progress_bar.x, progress_bar.y, 1);
fun progress_callback (duration, progress)
{
if (progress_bar.image.GetWidth () != Math.Int (progress_bar.original_image.GetWidth () * progress))
{
progress_bar.image = progress_bar.original_image.Scale(progress_bar.original_image.GetWidth(progress_bar.original_image) * progress, progress_bar.original_image.GetHeight());
progress_bar.sprite.SetImage (progress_bar.image);
}
}
Plymouth.SetBootProgressFunction(progress_callback);
#—————————————– Quit ——————————–
” before the line with “if (Plymouth.GetMode() != “shutdown”)”
then copied progress_bar.png and progress_box.png from /usr/share/plymouth/themes/script/ to /usr/share/plymouth/themes/pix/
I removed also the “fun display_message_callback” function and whats related to it for a more silent boot.
you can also switch to other splash screens by using “sudo plymouth-set-default-theme -l” to get a list of themes and then “sudo plymouth-set-default-theme -R THEME”