My V2 Gertboard showed up today. I promised some photos yesterday, so here they are, along with some first impressions…

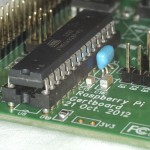
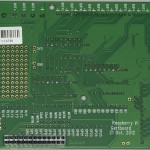
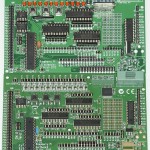
V2 Assembled Gertboard
Main visible differences from V1 are:
- CE and FCC marks
- Different fuse holder
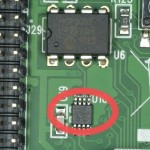
- Different motor controller chip – surface mount
- All ICs are soldered directly to the board apart from the ATMega, which is socketed
- leds are surface mount
- there are pull-up resistors on the buffers
- the buttons are surface mount
- the DAC chip is teeny weeny and surface mount
- the regulator is surface mount
- The jumpers with grippy extension are very practical
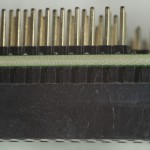
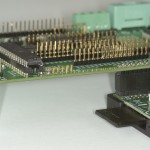
- But the biggest change of all is the socket on the bottom that mounts the Gertboard directly onto the Pi – with feet to support it

The new connector
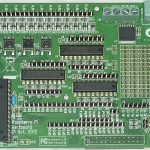
The board is identical in size to V1. Overall it looks like the product has been well optimised for manufacturing. There are no components on the reverse side except the mounting socket.
What no ribbon cable?
People are already talking in the forums about ribbon cables and adaptors to go with it. You can never meet everone’s requirements simultaneously. Eliminating a ribbon cable from the equation simplifies it and also makes it slightly more ‘donkey-proof’. I think this is a good thing – particularly when you bear in mind the intended target audience for the product – schools. :)
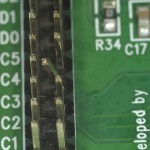
I didn’t notice, until I was processing the photos, that one of the pins on header J25 (at PC3) is bent :( I’ll try and bend it back, but it’s only a GND pin, so not really a dealbreaker – since there’s 24 GND pins on that header alone. Doubt I’ll ever need them all at once, even if it breaks off. (Update: it bent back fine:) ).

Bent GND pin (you can’t get the staff these days you know) ;)
And no initial impressions review would be complete without a side by side comparison of the two boards. So here you are…

V1 and V2 Gertboards side by side (V1 top)
Which one do I prefer? I hear you ask.
No competition. Rev 1. It’s mine. I made it. My precious. ;) No doubt Rev 2 will sell a bucket load more and is way more practical for schools. But my Rev 1 board is a part of me in a way that the Rev 2 never can be, unless…
…I start soldering bits onto it. :) Nah. Even then it wouldn’t be the same.
Don’t let that put you off though. The Rev 2 Gertboard is just as good as Rev 1 – it’s a sentimental attachment, that’s all.
Here’s the gallery with the rest of the photos…
-
- V2 Gertboard
-
- The new DAC chip
-
- The new connector
-
- V2 Assembled Gertboard
-
- The back
-
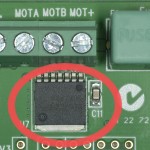
- The new motor controller chip
-
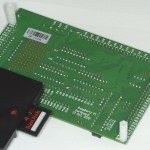
- View from underneath
-
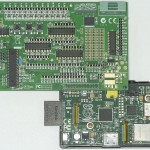
- Gertboard mounted on the Pi
-
- V1 and V2 Gertboards side by side (V1 top)
-
- Bent GND pin (you can’t get the staff these days you know) ;)
-

- Super dooper jumpers
-
- Gertboard on Pi – how it sits with its feet
How are the LED’s – they strike me as not as easy to see as the ones in the ‘home made’ version….
They’re a lot smaller, but they’re quite bright. They’re also on all the time unless you pull them down.
Great review, thank you…
I’ve need of a second one so will be buying one of the new boards.
Looks very nice but I like how on my Ver 1, I can easily replace a chip
should one get damaged.
Out of interest, are any of the “do not use” GPIO port pins brought through
on that new header socket on the Ver2 ?
Be nice if they were completely isolated given who will be using my second board :sweat:
Keep up the good work
Regards Philip
Aren’t all the DNCs grounded anyway? I thought they’d decided that permanently now and for ever. :-D
As far as I can tell, the pinouts broken out are the same as Rev 1 GB.
You’ll need a Dremel to remove a chip. Cut through the pins, remove chip and then desolder them individually.
The ATMega is socketed. It would have been silly not to be, since you can use the Gertboard as an Arduino programmer.
It really does a bit of work on replacement parts and soldering directly to the board. Then, I have not yet found any Gerdboard 2 version wiring diagrams. Where can I find it
I have already changed the 3002AD circuit, because A1 input did not work.
Now to the motor circuit is not working. Removing it is already tricky.
If I had even a circuit diagram so I could change even if the second driver to replace the motor drive circuit. I tested the 6 volt motor and transformer max current is 1A. Maybe we should add a wiring diagram boot interference cancellation capacitors.
Then, when it is connected to the 3.3V jumper J7. And all the LEDs light up.
Did I might have something to read in between the instructions?
Okay, this is just a development tool. And cost less than the already replaced parts individually.
BR
R
There is a link to the schematics in the Raspberry Pi forums Gertboard section
http://www.raspberrypi.org/phpBB3/viewtopic.php?p=273794#p273794
It’s a good place to ask questions too. :)
Thanks for you advice :-D
BR
R
I am still struggling to make my Rev 2 Gertboard work but 3 things do strike me. The direct mounting is a good idea but as I use a Pibow case, a cable really would be useful. Strange that the new mounting position precludes the use of the plastic leg closest to it. Finally, it seems a bit naf that they do not supply a couple of additional links so a full LED test could be run. Still these are niggling points and hopefully I will be much happier when my board can perform all of the tests you have written. :-))
John
I agree 10 wires for 12 leds does not compute for me either. I bought extras plus some male-female ones too. You can never have too many wires :)
For future use, the best way to straighten a bent pin is to use a wirewrapping tool if you have one. They slide nicely over the pins without slipping off like pliers and give you the leverage to do an easy straighten. If you don’t have one, ask an engineer over 40 year old.
Can’t say I agree with the direct mount situation. The Pi is better in a case so you need an extender to connect it but then the whole affair is not mechanically sound and I am sure will give more problems than enough. Keyed connectors would have made the connection issue foolproof and the Gboard could have been mounted on a solid but of case or wood. :no:
My Rev 1 Gertboard is mounted on a nice bit of mahogony (offcut from an old shelf). There are always compromises and you’ll never be able to please everybody. :) It’s not compulsory to use the feet if you prefer wood. But at least this way there are less parts to lose.
With time and use, the thing which I don’t like about Rev 2 GB is the fact that the leds stay on by default. But I bet there’s people that prefer it that way.