Jun 252019
 
How much power does the Pi4B use? Power Measurements

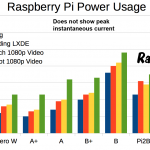
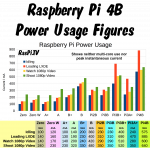
Each time a new Pi comes out, I usually publish some power consumption figures, mainly for those people who want to estimate battery durations. So my tests are quite simple. Procedure With just an HDMI screen and a USB keyboard/mouse dongle connected, the Pi current usage was measured using my non-invasive UNI-T clamp meter and a slightly mutilated Anker USB-C lead (to be able to clamp round just the red +ve wire I have to open it up) connected to the Tronsmart 3A power supply I’ve been happily using with my Pi4B. In the past […more…]

Mar 262019
 
Development of a new product - RasPiO Breadboard Pi Bridge (BBPi)

Today I launched the RasPiO Breadboard Pi Bridge (BBPi for short). It’s a PCB that breaks out all the GPIO ports of a Raspberry Pi in order on a half-size breadboard, complete with a Perspex platform to hold it all nicely together. It’s a clean, robust and elegant solution for simple electronics tinkering with Pi. This is what it looks like… If you want to snag one of the last 26 (at the time of publication) early-bird offers, use the code EARLY at the checkout, but be quick. Development Process I thought it would be […more…]

Dec 212018
 
Making a fairly simple bike dashcam with Raspberry Pi – “Live project blog” pt5 Road Testing

The installation ‘proper’ was finished in the previous post (part 4), so I grabbed a small ‘weather window’ and went out for a 16 mile ride on one of my regular routes to test out the system. It was very windy and rather cloudy but I was very keen to see how the bike dashcam would perform in a real-life situation. What can I say? It worked perfectly as an electronic rear-view ‘mirror’ all the way round. With the Perspex ‘wedge shim’ it was pointed at exactly the right angle. I could see whether there […more…]

Dec 192018
 
Making a fairly simple bike dashcam with Raspberry Pi – “Live project blog” pt4

In part 3 the hardware and software were all working and attached temporarily to the bike. So now it was time to have a quick test ride up and down the street. Having shot some trial footage, I realised immediately that I needed to change the angle to point the camera down more. Once that was done by shoving a piece of foam in between the saddlebag and Pi (at the top) it became usable. The 4.2″ screen is a decent size and is easy to see while riding. You can clearly see what’s behind […more…]

Dec 182018
 
Making a fairly simple bike dashcam with Raspberry Pi - "Live project blog" pt3

In part 2 we got as far as a proof of concept, but I decided I didn’t like the screen I had because the touch overlay made it reflecty and ‘ghosty’. But I can’t find a decent small HDMI screen without a touch overlay. Another revelation followed… What About Composite? MAJOR CHANGE OF DIRECTION #2 I remembered I’d used a small composite screen with RasPiCamcorder 2. But I couldn’t find it. I vaguely remember I might have broken it somehow, but I bought another one on Amazon for £12.99 (it’s 480 x 272 pixels). And […more…]

Dec 172018
 
Making a fairly simple bike dashcam with Raspberry Pi - "Live project blog" pt2

In part 1, I covered the initial concept’s ‘evening 1 musings’. Now it’s time to get going on the project and see if we can make it work… Getting Access Point Running on 3A+ I went through this procedure… Set up wireless access point on Raspbian Stretch stopping at the part “Add routing and masquerade” as it seemed unnecessary (there is no ethernet port on a Pi3A+). Then I could log into the 3A+ from my mac. I connected up the screen and tested it with the camera. The AP seemed OK with the screen […more…]

Dec 142018
 
Making a fairly simple bike dashcam with Raspberry Pi - "Live project blog" pt1

Anyone who follows me on twitter can’t fail to have noticed some cycling related comments recently. Yes, cycling is the current interest. I’ve ridden about 1100 miles in the last 6 months and have learned enough to bore you to death with talk of heart zones and various items of clothing you can buy to make winter rides more bearable. But I won’t! Although I will say that I’m reliably informed by close friends that simultaneously wearing both my balaclava in ‘full ninja’ mode AND my cycle helmet cover makes me look like a ‘tit’. […more…]

Jun 012018
 
New RasPiO Portsplus 3 fits all 40-pin Pi - Launch offer FREE + shipping

Shortly after the Raspberry Pi 3B+ came out, I realised that the PoE pins prevent the RasPiO Portsplus from fitting on the GPIO header. Here you go: https://t.co/Vq2HP9zLW2. I had to Dremel the end off to accommodate the PoE pins. I'm not sure if @RasPiTV has plans to amend it. — Raspberry Pi (@Raspberry_Pi) March 28, 2018 So I redesigned it so it now fits on ALL 40-pin Raspberry Pis. The video tells the story… What is Portsplus 3? It’s a small PCB which can slip over the header of a Raspberry Pi so that […more…]

Mar 152018
 
How Much Power Does Raspberry Pi 3B+ Use? Power Measurements

Since the original Pi came out I’ve been interested in how much power it consumes. It’s become something of a launch week tradition to publish a new chart and some data. So much so that several people ask for it on launch day. This time the first was within 7 minutes of launch, which is a new record… Did you test the energy consumption? — El Datavizzardo (@datavizzard) March 14, 2018 Why? The main reason I do this is that, if you are running a Pi on batteries, you need to be able to know […more…]

Feb 122018
 
Using Wemos D1 mini to control a brushless motor with ESC and servo signals

I’ve recently become interested in making “machines” of various sorts. I was sorting through some of my RC (radio control) plane “stash” the other day and came across various brushless motors and electronic speed controllers (ESC) like these. In RC, Brushless ESCs are usually connected to a radio receiver which generates servo control pulses. So this morning I thought it would be fun to try and get a Wemos D1 mini controlling a brushless motor. I’ve done similar before. I can remember, back in the dark ages of 2013, using a Guzunty Pi to generate […more…]