
In a recent post, I showed you how to hack the HDMIPi power switch so that you can turn the screen on and off from the Pi.
But no sooner had I done that than my friend Peter Onion, wondering if there was a way to detect if the LCD is on or off in case it gets “out of sync”, tweeted this…
@RasPiTV Is there a switched 3v3 supply to the LCD pannel ? Wire that to a GPIO input pin ? Or can you test monitor "on" via hdmi ?
— Peter Onion (@PeterOnion) January 14, 2015
…and that was all I needed. Well. That and a multimeter. I started carefully probing the various 3-legged semi-conductors on the HDMIPi board. I thought it would take a long time to find what I was looking for, but it only took about 10 minutes. I found a transistor where one leg reads 0V when the HDMIPi LCD is on and 3V3 when it’s off. Perfect!
Oh Dear – It’s Really Small
The only problem is it’s really small…
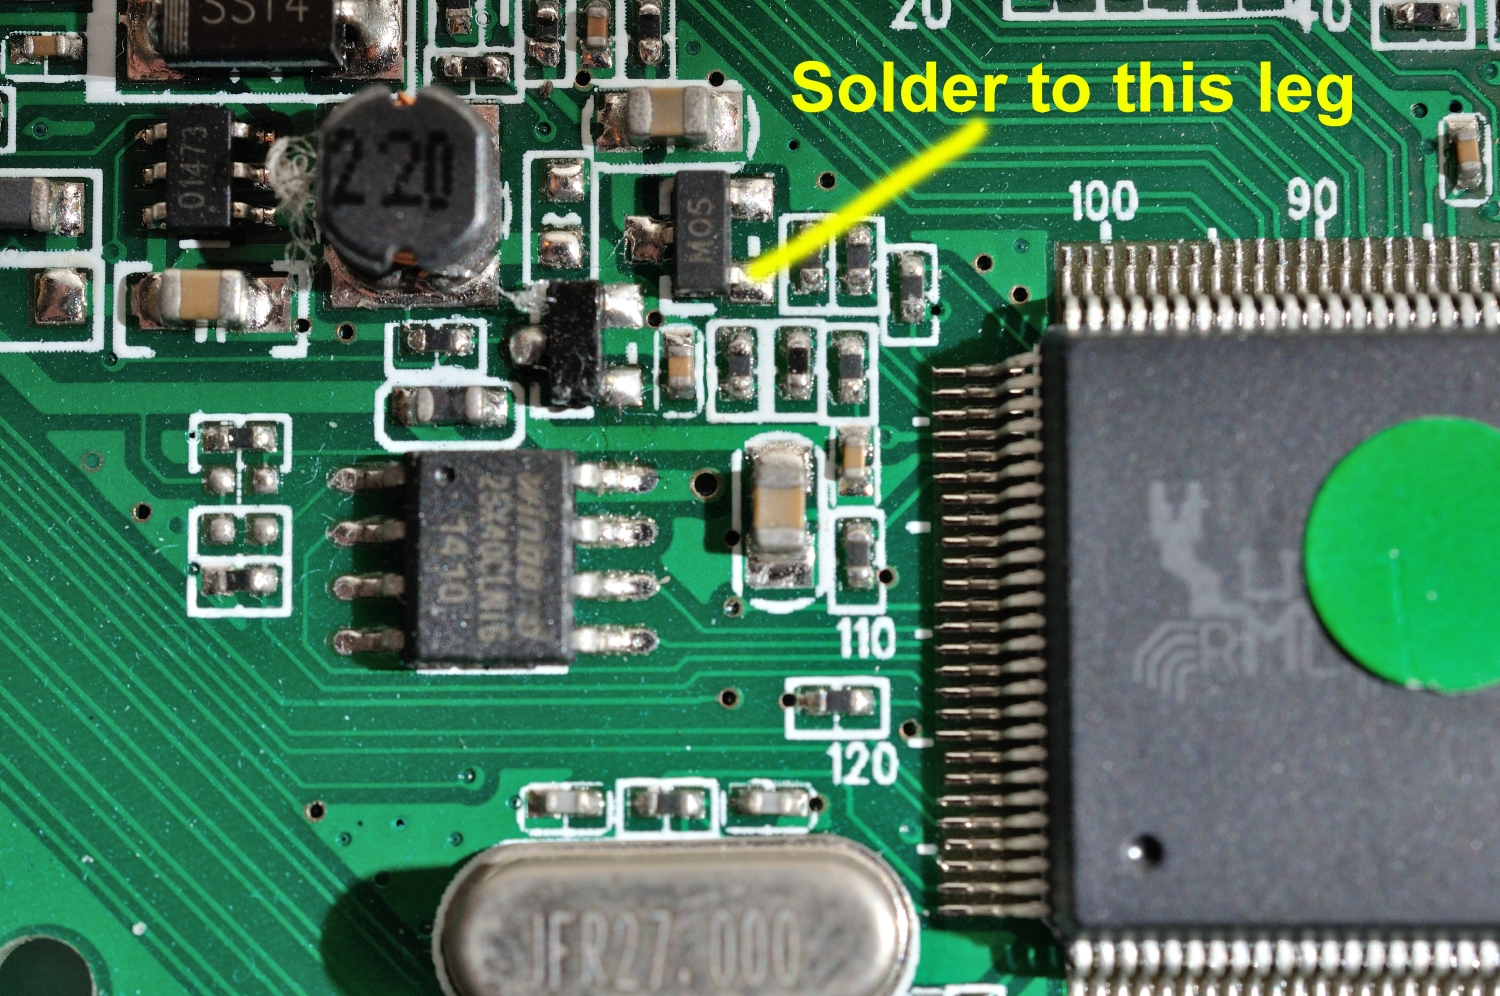
Close-up shot of the pad I soldered to
…but I put the smallest tip on my soldering iron, cut a length of my finest wire, and used 0.7mm leaded solder to reduce the required heat. It was intricate, but I managed it without too much difficulty. Although it’s not the best solder joint I’ve ever done (I could have done with a magnifying lamp) it works…
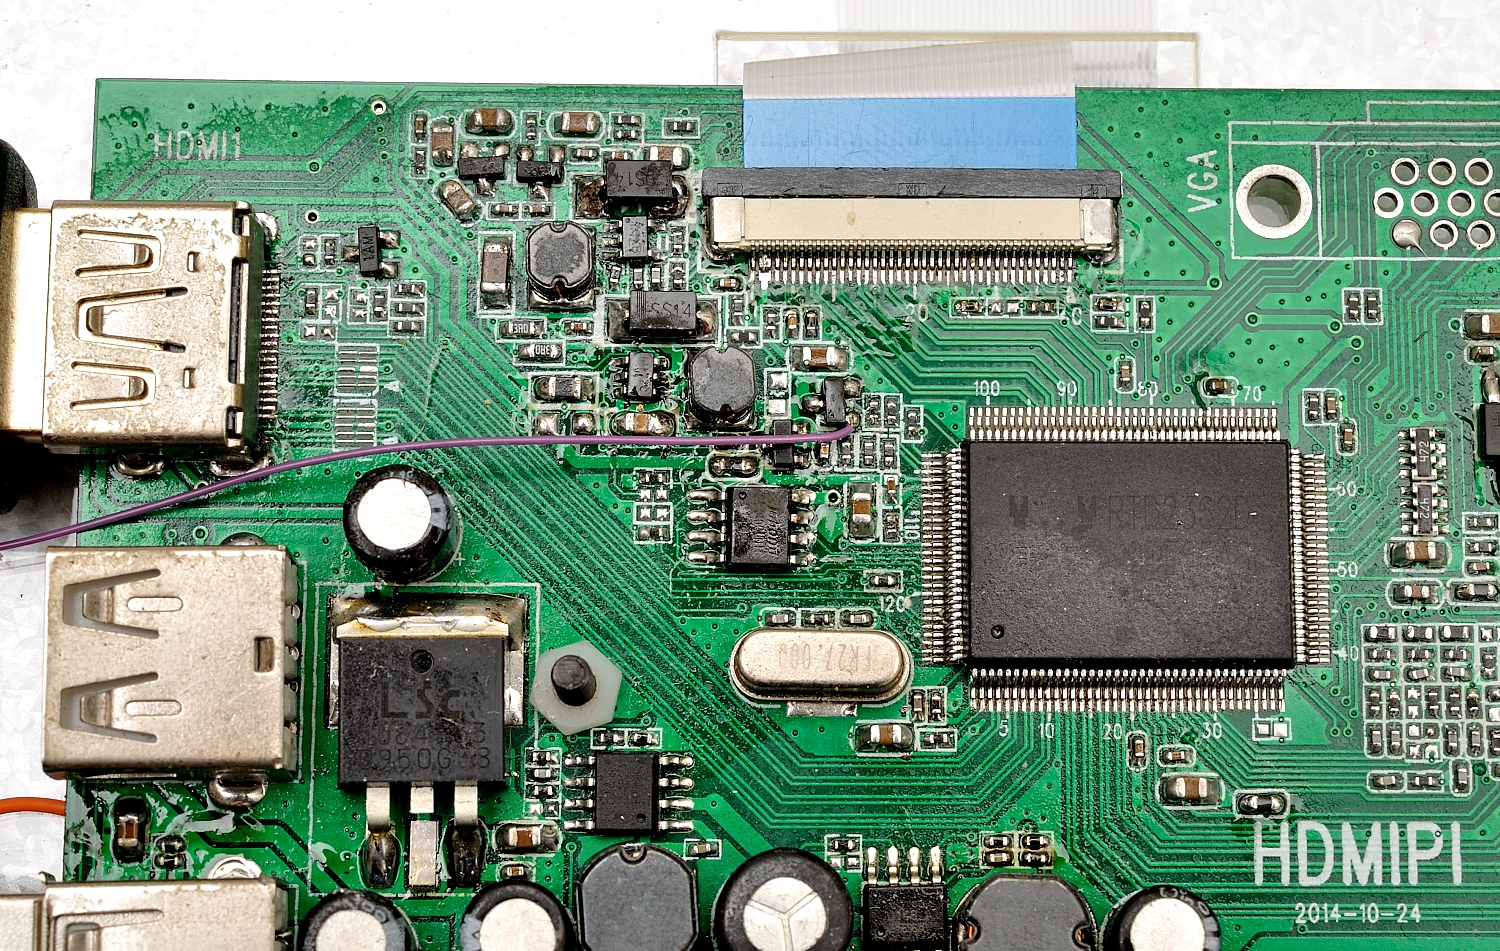
wire soldered to our trigger point
This One’s A Bit More Difficult
Whereas the previous hack involved soldering to a button leg, which is fairly easy, this one is more advanced because of the precision required in soldering to this tiny component. I soldered a 330R resistor to the other end of the wire, (to protect the GPIO port) and wrapped one end of the resistor’s wire round the pin for GPIO 22. This makes for a nice ‘semi-permanent, but removable if needed’ connection…
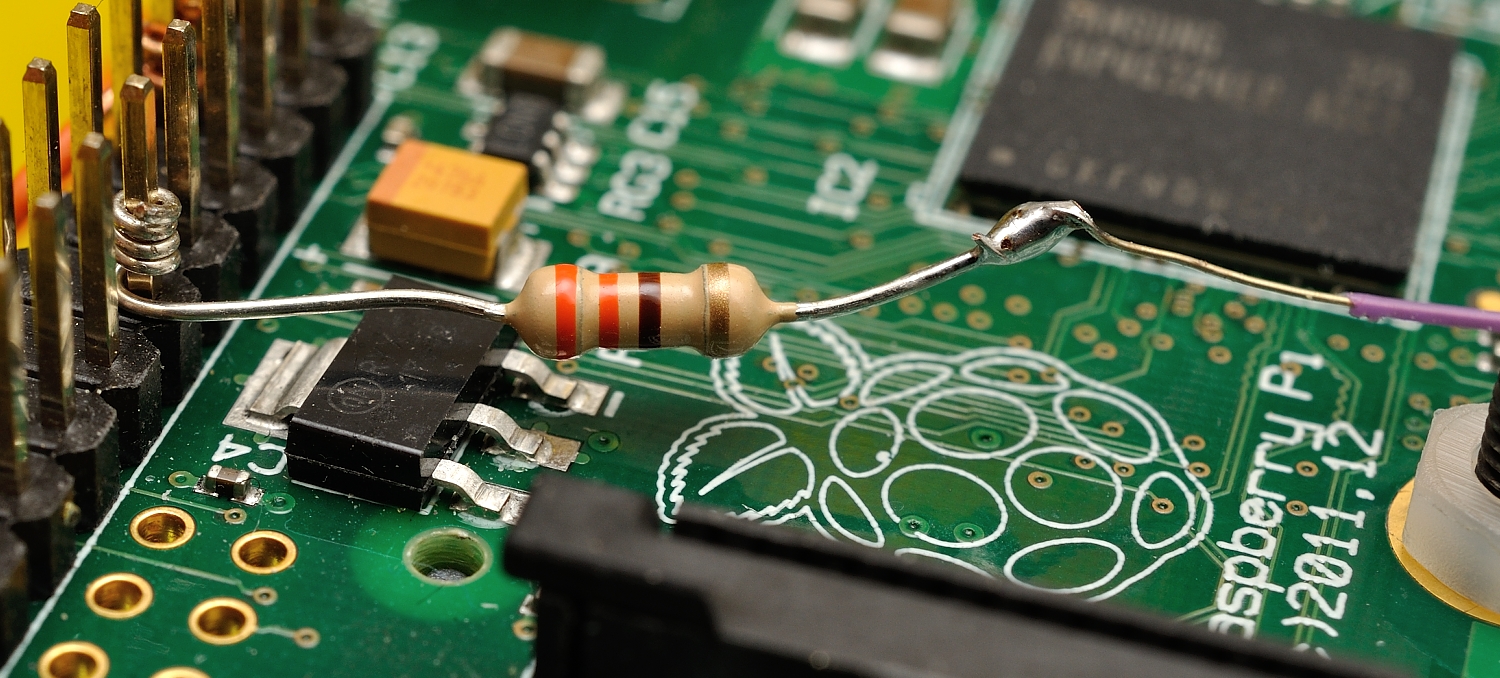
330R resistor connects wire to GPIO22
I also still have my wire connecting GPIO25 to the HDMIPi power switch in place (from the previous hack).
Let’s Write Some Python Code
So that’s the hardware side of it done. Now we’ll need a bit of Python code to control and read the status of the LCD. Here’s what I came up with. I’ve tried to name the variables sensibly so that it reads almost as English…
#!/usr/bin/env python2.7
# HDMIPi_toggle2.py by Alex Eames https://raspi.tv/?p=7580
import RPi.GPIO as GPIO
from time import sleep
GPIO.setmode(GPIO.BCM)
GPIO.setup(25, GPIO.IN)    # 25 used for switching HDMIPi power
GPIO.setup(22, GPIO.IN)    # 22 used for sensing HDMIPi power status

def toggle(switch_lcd_on):         # switch_lcd_on = 1 for on, 0 for off
    hdmipi_is_off = GPIO.input(22)
    # only toggle lcd power if its measured status != what we want
    if (switch_lcd_on and hdmipi_is_off) or (not switch_lcd_on and not hdmipi_is_off):
        GPIO.setup(25, GPIO.OUT, initial=0)    # press 'button'
        sleep(0.2)                             # hold button for 0.2 seconds
        GPIO.setup(25, GPIO.IN)    # set port back to input (re-enables HDMIPi buttons)
        sleep(0.5)                 # small delay needed to avoid false readings

for x in range(3):                 # on for 10s, off for 5s, iterate 3 times
    hdmipi_is_off = GPIO.input(22) # check if HDMIPi is powered up or not
    if not hdmipi_is_off:
        print "HDMIPi is ON at start of loop" , x+1
        print "HDMIPi will stay on for 10 seconds"

    else:
        print "HDMIPi is OFF at start of loop" , x+1
        print "HDMIPi will switch on for 10 seconds"
        toggle(1) # 1 = on

    sleep(9)
    print "HDMIPi is switching off for 5 seconds\n"
    sleep(1)
    toggle(0) # 0 = off
    sleep(5)
    toggle(1) # 1 = on

if hdmipi_is_off:
    toggle(1) # 1 = on
    print "Leaving HDMIPi on to finish, so we know where we are"

print "finished, now cleaning up GPIO ports"
GPIO.cleanup()

# How it works...
#################
# If 25 is set as an input, the hardware pullup on the HDMIPi board
# keeps value at HIGH. We only change the port to an output when we
# want to toggle the button.
# This is because, when set as an output, the HDMIPi buttons are disabled.
# So each time we toggle the HDMIPi on or off, we set port back to input

# 22 is used as an input to detect whether HDMIPi is powered on or not.
# An input wire + 330R resistor join GPIO 22 to a transistor on
# the HDMIPi board (It signals 0 when LCD is on, 3V3 when off)
So Now We Have Both Control And Status Reading
Now that we can read the status of the LCD and control it as well, what will you do with yours?
Will It Affect My Warranty?
I just know that someone will ask that, so I’m pre-empting the question. If your HDMIPi driver board breaks because you have interfered with it, it would be unreasonable to expect a free replacement. But if you know what you’re doing and solder carefully, there shouldn’t be a problem. (And if there is, we can sell you another one for something in the region of £20.)
TopTip: you could make your code even more readable by using meaningful variable names to replace the hard-coded ’22’ and ’25’ values in your code ;-) (maybe ‘power_detect’ and ‘button_press’ ?)
Also makes the code more flexible in case you ever need to change which GPIO pins you connect to for some reason…
And I guess there’d be no harm in reading power_detect again just before the final “if hdmipi_is_off:”, just to be doubly sure?
Another great HDMIPi hack though – and well done on getting all your KS rewards shipped out!
Thanks Andrew.
Excellent suggestions re the GPIO port variable names :)
[…] Raspi.tv posted a follow up to their how to hack the HDMIPi Power Switch tutorial- check it out here. […]
Before attaching the thin wire to the Pi you should anchor it… perhaps a loop around the electrolytic capacitor body and a dab of 5 minute epoxy or RTV compound ? This way the chance to lift the tiny transistor pad by accidental pull will be minimized.
Good idea :)
Hello,
I have a small problem and trying to solve for a long and I need your expert advise.
Is there any way to find out internally ( through OS ) the connected monitor/TV’s HDMI unplugged or the TV itself turned off .
My connection like this :
[ pi ]——-hdmi_cable——–>[TV] , used for video wall. So some way need to find out from the OS level, if any of the screen gone off/ power down because from that my monitoring tool make an alert.
Note: Here am not using GPIO.
Thanks in advance,
Best regards,
Mahesh.
You could try running “tvservice -s” on your Pi with the TV both switched on and switched off, and seeing if there’s any difference in the output? I believe it’s down to the TV whether or not it reports it’s power-state over HDMI.
Thanks AndrewS,
“tvservice -s” gives me same results in both cases.
Here is the test resuts:
[Pi]—- connected——> [TV] and TV is powered on.
pi@lab-test-101 ~ $ sudo tvservice -s
state 0x12001a [HDMI CEA (16) RGB lim 16:9], 1920×1080 @ 60.00Hz, progressive
[Pi]—-disconnected—x—>[TV] ( HDMI removed or TV powered off )
pi@lab-test-101 ~ $ sudo tvservice -s
state 0x12001a [HDMI CEA (16) RGB lim 16:9], 1920×1080 @ 60.00Hz, progressive
Note: tvservice -o and -p both are working fine. I tried the -s option in different manufacture TV/Monitors. eg:LG, Samsung, Panasonic, Mitashi TV, Dell monitor, etc. ( not all models of this brands).
Mahesh.
It might also be worth trying a different HDMI cable, to see if that makes a difference?
What display-related options do you have in config.txt? Do the ‘-n’ and ‘-d’ options of tvservice also provide identical output when the TV is on/off/disconnected?
Yes, I tried with other two different HDMI cable ( tvservice -s always same ).
Also tried tvservice -n and -d options,
( but most of the time I got same result)
pi@lab-test-101 /boot $ sudo tvservice -n
device_name=GSM-22MP56
pi@lab-test-101 /boot $ sudo tvservice -d test_display
Written 256 bytes to test_display
But some times tvservice -n and -s option gives wrong results
( Note: the below all condition, the screen was working fine!. )
pi@lab-test-101 /boot $ sudo tvservice -n
tvservice-client: Failed to connect to TV service: -1
[E] No device present
pi@lab-test-101 /boot $ sudo tvservice -d test_display
tvservice-client: Failed to connect to TV service: -1
Nothing written!
Here is my config.txt configurations:
# uncomment this if your display has a black border of unused pixels visible
# and your display can output without overscan
disable_overscan=1
# uncomment the following to adjust overscan. Use positive numbers if console
# goes off screen, and negative if there is too much border
# overscan_left=-5
# overscan_right=-10
# overscan_top=16
# overscan_bottom=16
# Whether the display standard is CEA or DMT
# CEA = 1, DMT = 2
hdmi_group=1
# Whether the connector is HDMI or DVI
# HDMI = 2, DVI = 1
hdmi_drive=2
# This will force a particular hdmi mode
hdmi_mode=16
# This will output hdmi even if hdmi detection fails:
hdmi_force_hotplug=1
# increase signal to HDMI, if you have interference or blanking
config_hdmi_boost=4
# for more options see http://elinux.org/RPi_config.txt
gpu_mem=128
framebuffer_depth=32
framebuffer_ignore_alpha=1
display_rotate=1
Thanks,
Mahesh.
Hmmm, seems very strange that ‘tvservice -n’ should still produce the same results even with the HDMI cable unplugged. You don’t need to use sudo to run tvservice BTW ;-)
I wonder if the tvservice output (with the HDMI cable unplugged) will be different if you delete (or comment out) the hdmi_force_hotplug setting in config.txt and then reboot?
Alex: apologies for going so off-topic from the original blog article!
Thanks a lot AndrewS,
I tried “hdmi_force_hotplug=1” commented in config.txt, but no luck!, result is the same.
PS: Am Sorry..guys for deviating the discussion topic. I new to rapi.tv, and not found any other discussion place. Is any other way I can ask questions/discuss?
Mahesh.
http://www.raspberrypi.org/forums/ :-)
Hi Alex, talking about warranty of the HDMIPi I have not hacked mine whatsoever but did not use it very often until recently. But after a few hours of use I was surprised by ‘magic smoke’ and a blank screen. The chip involved that is burned (found it after a short olfactoric survey) is snuggly fit between two large components and of the SMD-type, so no way I can replace it. Do you offer some sort of warranty or help for this kind of mishap ?
Regards.
Hi. Please send an email to support AT hdmipi.com