Works with Raspbian hf Aug/Sept 2012
Under Pressure
From previous blog posts, you’ll know I have a Raspberry Pi set up to read two temperature sensors and two light sensors (inside and outside) and log the data online at COSM
But, as ever, “we want more than that!” So I thought it would be fun to add a barometric pressure sensor. Looking around, it seemed like the BMP085 was a good bet. Even better than that, Adafruit have written Python libraries for it and some setup instructions here.
Their instructions are great – perfectly tailored for their Occidentalis Linux distro. I use Raspbian hf, so I’m detailing instructions for that. They’re very similar, but a couple of subtle differences. So, first we’ll start with the software…
sudo apt-get update

sudo apt-get install python-smbus
y to confirm
This installed i2-tools as well, which we’ll use a little later. :)
How to Enable i2c in Raspbian
Then it was necessary to make a tweak to enable i2c in raspbian. A quick google of how to enable i2c in raspbian revealed this page from S K Pang (I bought my Pi Cobbler from S K Pang). Here’s what I did…
sudo nano /etc/modprobe.d/raspi-blacklist.conf
…and comment out line 3 (the one with i2c in) with a # at the start of the line…
ctrl+o

<ENTER>

ctrl+x

commented out the i2c line (3)
Then…
sudo nano /etc/modules
you need to add…
i2c-dev on the last line

Add i2c-dev on last line
ctrl+o

<ENTER>

ctrl+x
Now we’re going to add the user pi to the group i2c.
sudo adduser pi i2c

adding pi to i2c group
Now we need to reboot to activate the new settings. Or if your sensor is not yet connected, you could shut down and connect it while the Pi is powered down. (Do disconnect the power after shutting down) :)
sudo reboot to reboot, or sudo halt to shut down.
Hooking it all up
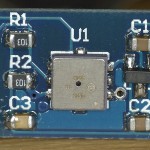
The board my sensor came on has eight pins. Only four of them are used here. Your board may be different, depending on where you source it from. Here’s a shot of mine…

- GND goes to Ground on the Pi
- 3.3 goes to 3V3 on the Pi
- SDA goes to SDA on the Pi (Rev 1 GPIO 0|Rev 2 GPIO 2)
- SCL goes to SCL on the Pi (Rev 1 GPIO 1|Rev 2 GPIO 3)
Login and try it out
When it comes back up, log in as pi and type
i2cdetect -y 0 (change 0 to 1 if you have a Rev. 2 Pi)
If your sensor or other i2c device is connected correctly, you’ll get an indication of its address.

My sensor is at 77
Adding pi to the i2c user group means we no longer need to use sudo for i2c access commands.
Now we need to install some software from the lovely guys at Adafruit. We use git for this. If you don’t have git installed, install that first with sudo apt-get install git. Then,
git clone https://github.com/adafruit/Adafruit-Raspberry-Pi-Python-Code.git

cd Adafruit-Raspberry-Pi-Python-Code

cd Adafruit_BMP085
Then you can test out your sensor with…
python Adafruit_BMP085_example.py
And if you did everything correctly, you should be rewarded with three readings; temperature, pressure and altitude…

It works :)
I was elated. This worked straight away for me and the whole thing took about 15-20 minutes. :)
Let’s go COSMic
I’m not going to fully detail this part, but essentially I took the parts I needed from the Adafruit_BMP085_example.py script and libraries…
This needs to be near the top of your python script
from Adafruit_BMP085 import BMP085set up resolution mode of sensor
bmp = BMP085(0x77)And these files need to be in same directory as your script
Adafruit_BMP085.py

Adafruit_I2C.py
And these function calls will get you your data
temp = bmp.readTemperature()

pressure = bmp.readPressure()

altitude = bmp.readAltitude()
Then I incorporated the bits I needed into my weather station Pi’s Python code, to log the new sensor’s data in my COSM feed…


PeterO from the Milton Keynes Raspberry Jam forum pointed out the trace could do with some low pass filtering, to make it a bit less noisy. So I tweaked my script to give a weighted average of the last five readings. It’s a little smoother. :) Could probably be further improved. I may well tweak it some more.
If you install a BMP085, I hope yours works out as smoothly as mine did. :)
Hi, I tried to use your good tutorial by I got several problems. Perhaps you could help me.
1°) My sensors doens’t looks like the yours
2°) I connected the 4 pins using adafruit setup, installed and enable i2c, but it doesn’t detect anything.
Do you have an idea of what could happens ?
Thank you
Manuel
It must be something to do with your wiring.
I have just been moving my BMP085 from my Arduino to my Pi. If you have a V2 Pi you need to change a line in the Adafruit I2C class, as the address of the SMBus has changed:
class Adafruit_I2C :
def __init__(self, address, bus=smbus.SMBus(1), debug=False):
The old value was smbus.SMBus(0). If you don’t do this you either get I2C errors, or the Pi can see your sensor.
Ian.
Yep, that’s absolutely right. I did the same thing on mine last week :)
I have been trying to get my BMP085 to work for ages now and i was just wondering if anyone knew what was wrong with mine. when i follow the tutorial, i do everything as it says, but when i do the i2cdetect -y 1 function it comes up as the same as the tutorials but there are no numbers on the table indicating that there is no i2c device connected. i have checked that i have wired up correctly. when i first tried i just ignored that it hadnt recognised an i2c device and carried on. i got to the part where you run the Adafruit_BMP085_Example.py and it says that there is a syntax error in the Adafruit_I2C.py which is in the same directory as the Adafruit_BMP085_Example.py. I was messing about and found that there is another Adafruit_I2C.py in a different directory, so i moved that file into the same directory as the Adafruit_BMP085_Example.py which replaced the other Adafruit_I2C.py file and ran the Adafruit_BMP085_Example.py and it came up with:
Error accessing 0x77: Check your I2C address
Error accessing 0x77: Check your I2C address
Error accessing 0x77: Check your I2C address
Error accessing 0x77: Check your I2C address
Error accessing 0x77: Check your I2C address
Error accessing 0x77: Check your I2C address
Error accessing 0x77: Check your I2C address
Temperature: 12.80 C
Pressure: 127.51 hPa
Altitude: 14449.01
I was just wondering if anyone knew what the problem is and any help will be really helpful
Matt.
Are you using the correct SMBus for your rev of Pi? Rev 1 and Rev 2 are different.
I have the same issue,
Error accessing 0x77: Check your I2C address
Error accessing 0x77: Check your I2C address
Temperature: 12.80 C
Pressure: 127.51 hPa
Altitude: 14449.01
I have modified Adafruit_I2C.py to
def __init__(self, address, busnum=1, debug=False):
self.address = address
# By default, the correct I2C bus is auto-detected using /proc/cpuinfo
# Alternatively, you can hard-code the bus version below:
# self.bus = smbus.SMBus(0); # Force I2C0 (early 256MB Pi’s)
self.bus = smbus.SMBus(1); # Force I2C1 (512MB Pi’s)
#self.bus = smbus.SMBus(
# busnum if busnum >= 0 else Adafruit_I2C.getPiI2CBusNumber())
self.debug = debug
but still have no joy
You need to connect also GND.
I have resolved my issue which looked as per above by using the GND on pin 5 instead of the GND on pin 13, even though the continuity checks out???
Thank you a lot for your beautiful article! All worked fine with my raspberry-pi (v.2) without any error!
Excellent. Always nice to hear that :)
Thanks a lot for your info. In 10 (ten) minutes the bmp085 & raspi fly on!
Thanks – up and running in under 10 minutes! Hope to link up barometer feed to time lapse pi-cam.
Excellent :)
Article very helpful, thanks. Pi up and running in no time. Have two in fact, dev and prod version. Was also able to integrate to xively to post these values as an activated device. You get the nice ui and history. Worth the effort of extra one install.
[…] RasPi.TV […]
I hooked mine up and with this software it works…..Thanks… I need deg. F , Feet , and inHg. values…