The Raspberry Pi Camera is a fixed focus module, so that anything from about 0.5m to infinity is acceptably sharp. This has strengths and weaknesses, as with every design decision. The weakness in this case is that if you want to film or photograph anything closer than about 50-75cm it will be out of focus.
With large SLR cameras, what people do is change the lens for a macro or close-up lens. We can’t do that easily. The other (cheaper, but generally less good) option photographers use is to add a small, screw-in, close-up magnifying lens in front of the existing lens which allows closer focus. This is something we can do…

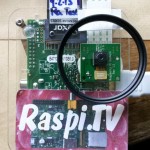
“Proper” +2D camera optic
Adding a +2D lens allows you to focus at about 25cm from the “target”.
For me this is ideal, since I’d like to use a Rapberry Pi Camera as a second video camera to give alternative close-in views in some of my workshop demos. It would also be great for time-lapse shots of small things growing.
What about cheap reading glasses?
Pluggy, over at the Raspberry Pi Forums, suggested using cheap reading glasses.
I was sceptical but tried it.
What I did was shoot some video of my laptop screen close enough for a full-screen shot (probably ~30cm). I did this twice, and grabbed screenshots for the comparisons…
- once for with and without the cheap Poundland +2D glasses
- once for with and without my “proper” +2D camera lens
Here are the results. You will need to click them to see the comparisons at full size. Otherwise you won’t get the full effect…

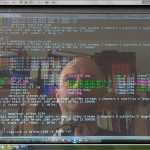
Comparison of without and with +2D £1 reading glasses
You can see above that the cheap +2D glasses give great focus, but reduce the contrast a bit. The black computer screen goes a bit grey.

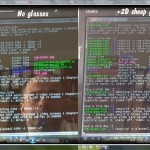
Comparison of without and with +2D camera lens
With the camera optic, you can see the focus is great and the contrast is much less affected.
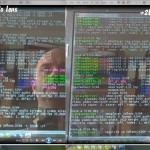
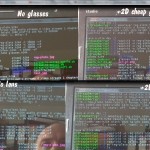
Comparing all four together
Here’s a shot with all four in so you can compare. The reason for shooting the “blank” twice was that different shooting positions affect the results. Ideally this would be done on a tripod, but I have yet to make a tripod attachment for my PiCamCorder

Comparison of all four
Outcome
The cheap Poundland +2D glasses give acceptable results, but the “proper” camera optic gives better results at about ten times the price. The “proper” lens is a bit more bulky and inconvenient as well. I love the “hackability” of the Poundland lenses. I could easily cut those up without issue. I wouldn’t want to spoil the camera optic – my precious. ;)
Here’s a little hand-held video showing the live action of the tests. Enjoy…
Here’s all the photos taken in the making of this article. Click to enlarge…
-
- “Proper” +2D camera optic
-
- Without cheap +2D reading glasses
-
- With cheap +2D reading glasses
-
- Without +2D close-up lens
-
- With +2D close-up lens
-
- Comparison of without and with +2D £1 reading glasses
-
- Comparison of without and with +2D camera lens
-
- Comparison of all four
Interesting…
If you’re more worried about close-up detail than you are about contrast, could you break the cheap reading glasses in half and stack the two lenses (left & right) in front of each other to reduce the focal distance even further?
Almost certainly, but you’d be better off buying stronger ones. They do up to +3.5D in Poundland. I bought +3D as well :)
Interesting. It’s not surprising that the “proper” photographic 2D lens was better, but I am still impressed by the performance of the cheapie Poundland lens.
Considering the price difference, if I didn’t already have the photography lens, I’d have been perfectly happy with the Poundland results. Looking at the box, the HAMA +2 was £11.75 when I bought it many years ago. I think it’s anti-reflective coatings etc. that make the loss of contrast a lot less pronounced.
[…] pour adapter la vision de la CameraPi à la vision de près…Le site néerlandais Raspi TV propose une solution utilisant des lunettes de lecture de près +2 dioptries, et compare cette […]
This article is now available in French courtesy of François at framboise314 http://www.framboise314.fr/des-lunettes-pour-la-framboise314-mise-au-point-rapprochee-avec-la-camera-du-raspberry-pi/
[…] Alex Eames posted a how-to at raspi.tv showing how to shoot close-up with the Raspberry Pi camera: “Shooting Close-up with your Raspberry Pi Camera. Video supplements blog article here… https://raspi.tv/2013/adapt-your-raspb… I tried a couple of different lenses; a “proper” camera +2D lens and cheap reading glasses. The results from both were pretty good.” (read more) […]
You CAN change the focus of the stock lens on the pi camera. It is tricky but can be done. Explained here (only does not mention that the camera unit can be separated from pcb) http://www.truetex.com/raspberrypi. To make it easier, unplug the camera from pcb (that thing that says P5V04A SUNNY separates with a mini slot-head screwdriver). The black lens housing is held on by double-sided adhesive tape. Process shown here: http://wiki.raspberrytorte.com/index.php?title=Camera_Module_Lens_Modifcation. Credit to Dr. Richard Kinch, PhD (truetex.com) and Martin Miller (raspberrytorte.com).
Also explained here…
http://www.raspberrypi.org/macro-photography-with-the-camera-board/
So glad I came across this article. The simplest and cheapest solution by far.