On day 2 of Raspberry Pi Camera ownership I decided it was time to make the new RasPiCam into a camcorder that could be taken anywhere and used to shoot video.
Hold on, there’s issues with that aren’t there? Sure there are, but there’s ways round ’em too ;) So here’s how I did it.
I’ll be taking this to the Cambridge Jam tomorrow. :)
Ingredients
- 1 Switching regulator
- 1 Bluetooth serial adaptor
- 1 Raspberry Pi with latest updated Raspbian
- 1 Raspberry Pi Camera
- Connectors for battery, reg and Bluetooth adaptor
- 1 power source (I’m using a lipo battery)
- 1 Bluetooth-enabled mobile device (Phone, tablet etc.)
- 1 Bluetooth console app (I’m using BlueTerm for Android)
- a case of some sort to put it all in
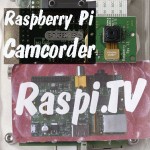
So here’s the end result including a comparison with a “proper” camcorder costing 10 times as much. ;)
No screen – YET
I don’t have a screen for it yet, but I hope to fix that in the near future. :)
OK. On with the details…
First hurdle for independence is we need power. 5V can be supplied to the GPIO header, where there are two 5V pins (good – we need both of those) and several GND pins.
Since I want an efficient power conversion, and since I have a stack of lithium polymer (lipo) batteries already, a switching regulator is the best option. I bought a stash of these on ebay back in September 2012. They’re a couple of pounds each (£2/$3). Google LM2596S regulator to find them.

Switching regulators. Completed one on the right
Wires are recycled from an old PC. I have a box full of wires. I used a couple of 2 pin female header connectors to attach the power wires on the regulator outputs…

Pinouts for Bluetooth adaptor and power
I’m using Pin 25 (GND), and Pin 2 (5V).
I set the voltage of the regulator to 5.20 V, which is near the top end of the spec, but gives us a bit of headroom. I’ve connected the regulator inputs to red and black wires and a male Deans type connector. All my lipos have female Deans on. It would be nice if we could fit it in the case too. A bit of heatshrink to insulate it and we’re sorted. (See regulators photo at top)
OK, so we’ve got power. Now hurdle 2…
How are we going to control it?
You could use wifi, but you need a network or a portable hotspot for that. You only really need a command line interface, so a BlueTooth serial adaptor fits the bill perfectly. It just so happens I got one last Saturday and got it working within about half an hour, thanks to an excellent blog article by Miguel Grinberg

Bluetooth serial adaptor in situ soldered to angled female header
It’s nice and small, so I figured it could go in the case. How to connect it though? Remember the leaning header of Pi5A? I had all sorts of header connectors in stock from that, so I picked out a 2×4 female angled header and soldered up the connections. I got it wrong twice, not remembering I needed to cross Tx and Rx and messing up GND and Tx as well, but once I’d got that correct it was OK. The last two pins on the Bluetooth adaptor need to be crossed over, so I had to snip the connector and use a couple of small wires. (See labelled photo above for connections).
I advise you get your Bluetooth adaptor set up and working with jumper wires before soldering things to it.
So we now need an app on our mobile device to be able to log into the Pi via Bluetooth. I’m using BlueTerm. It’s OK, but I can’t yet get it to send a CTRL+C signal, which can be a bit limiting.
Raspberry Pi, RasPiCam and fully updated Raspbian
You need the latest Raspbian on your Pi to be able to use the camera.
sudo apt-get update
sudo apt-get upgrade
y
Then wait until it finishes. Could take a while (maybe nearly an hour if your distro is old). You’ll also need a Raspberry Pi Camera module.
Just in case
I crammed my regulator into my Yoctopuce case. It just fits. I was hoping to fit it in so it wouldn’t cover the main CPU/GPU/RAM, but it wouldn’t fit. So chances are it might get warm with a source of power and a source of heat so close together. The only thing I can do about that is to take it out. If it becomes a problem, I will.
The Bluetooth adaptor fits well. The camera is “white-tacked” to the back. Liz told use to use Blu-Tac, but I disobediently defied because white was all I had :p
My concept was that it would all fit and the case could stand on end (the USB end) when no wifi dongle is plugged in. To achieve this I did have to press in the two little sticking out “lugs” on the USB hub.
It was tricky getting the case back together with all these bits inside, but somehow, with a liberal sprinkling of cursing and swearing, I got it done. (Sorry, I’m not disassembling it again for the photos :p ) Here’s what it looks like…

Raspberry Pi camcorder back

Raspberry Pi camcorder front
Plug and Go
So now all I have to do is plug in a battery (anything from 6 to 35V will work with this regulator) connect my phone or tablet using BlueTerm. Login, and start shooting video.
Neat! I look forward to seeing it tomorrow :-)
Could you use a Model A Pi ? You will have more space for the reg and more battery life.
What a good idea :)
[…] RasPiCamCorder […]
[…] results. Ideally this would be done on a tripod, but I have yet to make a tripod attachment for my PiCamCorder Comparison of all […]
I really enjoy your shows. How about one to add sound input to your standalone camcorder via GPIO?
(Also, sound input via a Bluetooth interface would be interesting.) Thanks!
Interesting ideas. I don’t know if sound via GPIO would be possible. Sound via bluetooth must be possible though, but I have no idea how to do it (yet). :)
Here is a link to people discussing the possibility of sound input via GPIO:
http://raspberrypi.stackexchange.com/questions/4341/can-i-get-audio-input-through-the-gpio
Oh, they suggest using an ADC. Fair enough. Yes – theoretically possible, but doubtful you’d get anything usably fast enough in Python and I don’t know C. Sound waves need somthing with high kHz sampling speeds, which means C.
Even using C, I don’t think you’d really get anything usable – ADCs (especially at the cheaper end as typically found on RasPi add-on boards) are generally too slow for audio.
If you don’t want to use a USB sound card, I2S using the P5 header (as described in a link at the bottom of that SE page) would indeed be the way to go, but like Alex this is something I haven’t experimented with myself :-)
I have tried a similar set up using a model A powered via 8xAA NiMh batteries & a regulator, but using the Edimax wifi dongle and connecting using the wifi hotspot facility of my phone. Using nohup in the command line allows me to start a simple time lapse and then disconnect. I have a working bluetooth USB dongle (Tesco Tecknica Nano) but haven’t used it yet. Does anyone know if this would be more efficient in terms of power than using the wifi, thus giving longer battery life? (Perhaps I may try a test to see the power consumption).
For a tripod mount I have used an old ‘off camera flash’ bracket to fix my Pi and battery pack to, but with the correct UNF threaded nut it should be simple to make your own bracket.(1/4″-20 or 3/8″-16 are the two common sizes used).
I demonstrated a similar setup (with Edimax wifi dongle and phone hotspot) to stream live video, albeit with a couple of seconds latency, at the Cambridge Jam a couple of days after I made this PiCamCorder. I’ve been making a MkII version with some improvements. Not talking about those yet though.
The Tesco Technika BT dongle is a different kettle of worms to the BT serial adaptor I’m using. I’ve been led to believe it is possible to communicate and get a terminal through a bluetooth dongle, but I haven’t done it. I gather it’s rather involved. I set up two more of the BT serial interfaces yesterday in an hour. So I’ve got three now :)
Good idea about the off camera flash attachment. I happen to have an old Cobra flash that went with my Nikon F50 back in the days of film. Maybe I’ll put it to good use.
Correction – It’s 1/4-20 UNC for the most common tripod thread, not UNF for those wanting to make a bracket. And a simple way to protect the camera board PCB (idea borrowed from others) is to use an old SD card case.
I have just got my first android phone today. A galaxy s4, after a few years of using iPhones. Could you recommend some apps for ssh and bluetooth please? You mention blue term above, I had this on my iPhone but I never used it as I was fond of vssh as an ssh terminal.
thanks,
Andrew
andftp for ftp, connectbot for ssh, blueterm for bluetooth TTY terminal, although I have another I paid for which handles CTRL+ characters better. That one is called Bluetooth Terminal. Fing is excellent for scanning the network to see what IP your Pi is using. Hackers keyboard is also useful.
Alex, I have a query regarding the use of bluetooth. For this project you used a bluetooth serial adaptor, but in you Wii controller project (Feb 2013) you used a bluetooth dongle. Clearly it’s easier and cheaper to use the bluetooth dongle, so what’s the advantage of using the bluetooth serial adaptor?
PS. This is an excellent blog, keep up the fantastic work, and all the best for 2014.
Thanks
David
The bluetooth serial adaptor does only one thing, but does it well. It gives you a way to wirelessly connect through the serial port and see the system messages right from boot, just as if you had a screen attached. You can then log in and run a command line session.
The USB dongle is only active after the system has booted. Although I believe you can set up a bluetooth network and log in via that, I haven’t done it before. I also gather it’s quite complex. There was a guy who used this method to control a camera rig a few months ago.
The other obvious advantages of the Bluetooth serial adaptor are that you can put it inside the case and it doesn’t take up a USB port, which could be useful on a model A with only one port.
To expand slightly on what Alex wrote above – the serial adaptor is “hardware based” so works with any OS as soon as you supply power. Whereas the USB dongle is “software based” and so requires support from the running OS after it’s booted up. But being software-based, the USB approach is much more flexible once you’ve taken the time to set it up.
At least that’s the way I understand it, not having used any Bluetooth hardware myself!
Nice thread. I created a timelapse camera but did it a slightly easier way:
Edimax wifi dongle – raspian just seemed to pick it up no problem
Tethering (portable hotspot) function on my Android phone
VNC using free app “AndroidVNC”
Portable phone charger 5,000mAh
This way I can get a raspi desktop on my phone and start up the python script which takes a picture every second. I can then use the desktop to click the pictures as they are being taken and view them on my phone.
I then use Movie Maker to create a movie from the hundreds or thousands of pics at 25 fps.
The battery runs the Pi inc wifi dongle for several hours. In my test, I ran it for 2 hours and it took 4600 stills. The battery still had plenty of power left and the 16gb SD card still had loads of spare capacity. The stills were 800×600 jpgs with a quality setting of 80.
Dave
Hi Alex,
I loved this idea of making a stand alone camera. I tried to implement as you have done.
I am able to capture image from Raspi by connecting it to a monitor and shoot a video as well by giving commands like raspistill etc. in TX terminal of Raspbian OS.
I am facing some issue with Bluetooth, when I am connecting Bluetooth adapter module to the Raspi, it is not getting detected from my android phone.
Do I need to configure Bluetooth module before connecting it with Raspi or I can directly get one and connect it to Raspi and get going ?
I am new to hardware and all this stuff,
Can you please guide me how to get it done ?
Thank You
Pooja
This is the tutorial I used to set mine up http://blog.miguelgrinberg.com/post/a-cheap-bluetooth-serial-port-for-your-raspberry-pi
Thank you for your reply Alex :).
I went through this link before, but I was using different Bluetooth module and hence I was facing the issue with baud rate.
I will try using the same module :).
Can be this done with 910Mhz RF module instead of Bluetooth?
I don’t see why not, but I have no idea how to do it myself.
Hah, 4 years later and it’s amazing to think how much smaller & neater this would be with the Pi Zero W and the new official Pi Zero case :-)
Yeah it would actually probably work a bit better too with all the software improvements since then and the Zero’s overclock. :)
Progress! :)