Yesterday I went to the Cambridge Jam. It was a very good Jam. I met four members of the Raspberry Pi Foundation and they were all extremely nice people.
I took three demos with me:
- Gertboard “Whackadoodle” Wii controller
- Wii controller nunchuk Guzunty car
- RasPiCamCorder
I had the RasPiCamcorder streaming live video to my PC via my phone as WiFi router. It worked quite well, but with poor latency. It took several seconds for changes to appear on the screen. I hadn’t had time to monkey about with the commands and was streaming 1080p at 30fps. So it was really slow.
I want to stream to my Nexus
I was musing out loud with Andrew Scheller about how nice it would be to be able to stream to my Nexus 7 tablet. He mentioned something about VLC, which I’d already installed on there but not done much with.
Streaming video is a bit of a new thing for me. It seems like a bit of a black art.
So I had a poke around on the Raspberry Pi Forums last night. There, I found out that if you install VLC on the Pi, you can stream video from the Pi and then view that stream using another device to access it. I’m also using VLC on the client device, but I imagine any program that can view an .h264 stream would work.
Lower frame rate and lower resolution was the key
I managed to get it working this morning, having read the camera software manual and discovered how to change the frame rate and picture dimensions. The Nexus couldn’t cope with a 1080p 30 fps stream. I tried 720p 30fps and 25 fps, but no dice there either. 720p (1280 x 720) nearly works, but the picture breaks up.
The Nexus copes perfectly with 640 x 360 @ 25 fps and 800 x 450 @ 25fps works well if not too far from the router. 900 x 506 seems about as much as it can cope with. Oddly enough, I think this is a limitation of the Nexus, not the Pi. The Pi can wirelessly stream to my ethernet connected laptop at higher res (720p @25fps) with no breakup.
OK. so how do you actually do it?
You need to install VLC on both devices. To install VLC on the pi…
sudo apt-get update

sudo apt-get install vlc

y
On the Nexus, or other android device, go to Google Play and install “VLC for Android Beta”. Don’t worry about all the Beta warnings. The world won’t end and it does work OK. :)
To start streaming from the Pi
From the pi command line, type
raspivid -o - -t 99999 -hf -w 640 -h 360 -fps 25|cvlc -vvv stream:///dev/stdin --sout '#standard{access=http,mux=ts,dst=:8090}' :demux=h264
(you don’t need the -hf horizontal flip if you are using the June 2013 or later camera driver. Also, omitting the -vvv cuts out a lot of debug messages that might make you think it’s failed)
The 99999 is the length of time in milliseconds that the stream will run for (99.9 seconds). You can change that to whatever you like. If you change it to 0 (zero) it will carry on indefinitely. (And CTRL+C to kill it at any time).
Be aware that you will get a lot of debug output on the console screen. (Several screens worth). This is what happens when it’s working. Ignore it.
You’ll get a raft of garbage debug output – ignore it.
Also, note that when the streaming finishes at the end of the 99999 ms time period, you will have to interrupt the process with CTRL+C to get back control of your console.

To view the stream on the Nexus
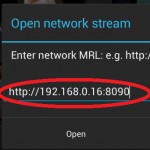
On the Nexus, start VLC and click the icon
Click the icon circled in red
and then key in the following URL and choose Open…
http://192.168.xx.yy:8090 where 192.168.xx.yy is your Pi’s ip address and 8090 is the port we told the Pi to send the stream to. (You can change that as long as it’s the same for both your Pi and mobile device commands).

If you don’t know the ip address of the pi, from pi console, type ifconfig, and you should be able to see what your ip address is. Alternatively you can use the brilliant free Android app Fing, which scans your network and tells you the ip address of everything connected to it.
Once you’ve done that, you should see the camera output on your Nexus’ screen (as long as you didn’t take more than 99.9 seconds to punch in the URL – I use copy and paste from another app to make this quick and easy).
Once it’s working, you can start to change the width, height and frame rate (-w 640 -h 360 -fps 25) parameters to see how much your Nexus and network can cope with. Mine copes with -w 800 -h 450 -fps 25 as long as I don’t get too far away from the router.
If you’re pointing the camera through a window…
…you may want to disable the red LED to get rid of its reflection. Simply add the line
disable_camera_led=1 to your config.txt file
sudo nano /boot/config.txt
add the line
disable_camera_led=1
CTRL+o
ENTER
CTRL+X
Then sudo reboot and when the Pi comes back up, the camera LED will be disabled. You can change it back either by commenting out that line or changing the value to 0.
I hope you have fun with this and find it useful. If you try it, let us know how you got on, and what resolution settings worked best for you. It would also be interesting to hear if anyone with an ipad or iphone gets it working. I’m sure it must be possible, even if with something other than VLC on the iDevice. It also works with my Galaxy S2.
Hi,
thanks for your tutorials…
BUT
raspivid -o - -t 99999 -hf -w 640 -h 360 -fps 25|cvlc -vvv stream:///dev/stdin --sout '#standard{access=http,mux=ts,dst=:8090}' :demux=h264
seems not to work on my side, and I have no idea why, maybe you have an idea whats the issue:
user@raspberrypi ~ $ raspivid -o - -t 99999 -hf -w 640 -h 360 -fps 25|cvlc -vvv stream:///dev/stdin --sout '#standard{access=http,mux=ts,dst=:8090}' :demux=h264

VLC media player 2.0.3 Twoflower (revision 2.0.2-93-g77aa89e)

[0x126f8f0] main libvlc debug: VLC media player - 2.0.3 Twoflower

[0x126f8f0] main libvlc debug: Copyright © 1996-2012 VLC authors and VideoLAN

[0x126f8f0] main libvlc debug: revision 2.0.2-93-g77aa89e

[0x126f8f0] main libvlc debug: configured with ./configure  '--enable-static' '--build=arm-linux-gnueabihf' 'CFLAGS=-g -O2 -fstack-protector --param=ssp-buffer-size=4 -Wformat -Werror=format-security' 'CPPFLAGS=-D_FORTIFY_SOURCE=2' 'CXXFLAGS=-g -O2 -fstack-protector --param=ssp-buffer-size=4 -Wformat -Werror=format-security' 'LDFLAGS=-Wl,-z,relro' '--config-cache' '--disable-maintainer-mode' '--disable-silent-rules' '--disable-update-check' '--enable-fast-install' '--prefix=/usr' '--docdir=/usr/share/doc/vlc-nox' '--sysconfdir=/etc' '--with-binary-version=5' '--enable-a52' '--enable-aa' '--enable-bluray' '--enable-bonjour'
------------SNIP lots of lines removed---------------------
[0x126f8f0] main libvlc debug: removing module "memcpy"
Thanks in advance.
Oooh – I probably ought to mention all that crap that gets output. Mine does that too. Ignore it and fire up VLC on your “receiving device” and see if it works. :)
Perhaps I’ll make a little video of this if I get time. Not had a chance yet.
Great tutorial. Worked well on my wife’s Samsung Note II. Crazy interface on Android though – took me ages to see that little arrow!
Mike, what resolution and fps did you get to? I’m interested to see what other people’s setups can do.
Works very well! Both on my PC, using VLC and on my LG p700 (-w 320 -h 180 -fps 25)
The only thing is the latency: 2 to 4 seconds!
Hi, is there any chance to encode video from an external webcam (/dev/video0) using ffmpeg in h264 and stream it to an rtsp server?
I tried it several monts ago but raspberry pi was unable to encode it proerty, it only had 1fps instead of 25 o 30fps.
¿Any ideas? Thanks in advance.
Sorry. I have no idea. I’m very new to streaming. Someone else might know though.
The reason that the video is so fast when using the Raspi camera is that the mighty GPU does all the heavy-work of doing the h264 encoding.
But when using an external (USB I presume) webcam, it’s the weedy CPU that has to do the heavy h264 encoding, and as you’ve seen you only get very low framerates.
I did a quick search, and http://www.raspberrypi.org/phpBB3/viewtopic.php?f=28&t=22019 suggests that USB webcams are unable to provide data in a format suitable for the GPU encoder? I’m afraid video stuff is all a bit above my head.
Alex: congrats on getting the direct streaming working :) (it was actually mplayer I mentioned rather than VLC, but I don’t have any Android (or iOS) devices myself)
Thanks to both, yes, RBPI is unable to transcode video from USB webcam. I bought raspicam last month and now i have it streaming to an rtsp (Wowza) server:
http://www.alvarolara.com/2013/07/20/emitir-video-en-directo-por-rtmp-con-raspicam-y-raspberry-pi/
Thanks a lot for sharing these instructions.
You will get a lot less debug information (output in terminal) during the capturing if you leave out the “-vvv” which enables verbose logging as far as i know.
Good stuff. Thanks for that tip. :)
I keep getting an error when trying this on my R-Pi :
pi@pi ~ $ sudo raspivid -o - -t 99999 -hf -w 640 -h 360 -fps 25|cvlc stream:///dev/stdin --sout '#standard{access=http,mux=ts,dst=:8090}' :demux=h264

VLC media player 2.0.3 Twoflower (revision 2.0.2-93-g77aa89e)

[0x7b0b98] inhibit interface error: Failed to connect to the D-Bus session daemon: Unable to autolaunch a dbus-daemon without a $DISPLAY for X11

[0x7b0b98] main interface error: no suitable interface module

[0x828710] main interface error: no suitable interface module

[0x7908f0] main libvlc error: interface "globalhotkeys,none" initialization failed

[0x828710] dummy interface: using the dummy interface module...

[0x7a4b50] main input error: Invalid PCR value in ES_OUT_SET_(GROUP_)PCR !
any ideas?
Sorry Bill. Beyond my level. Hope someone else can chip in. I’m currently on a ferry to France. :) (dedication or what?)
Bill,
I’m having the same issue. Have you solved it yet? I guess you are using Arch Linux on the RPi too, right?
Thanks
I think that happens if you’re running the RPI in “headless” mode – no TV connected and you’re connecting to it via ssh.
What worked for me was to connect with X11 forwarding – ssh -X user@
You need to set your local X11 session to allow remote connections.
It’s a bit intermittent over WiFi – maybe caused by electrically noisy devices near by.
I always get those “errors” too (I’m using Raspbian and connecting to my Pi over SSH), but as far as I can tell they can be safely ignored – the VLC streaming is still actually working :)
[…] all is still going smooth… I found a nice How-To that helped me to get raspivid & cvlc produce a video steam on port 8090 of the […]
[…] o https://raspi.tv/2013/how-to-stream-video-from-your-raspicam-to-your-nexus-7-tablet-using-vlc […]
Hi
When entering the command in the RPi
raspivid -o – -t 99999 -w 640 -h 360 -fps 25|cvlc -vvv stream:///dev/stdin –sout ‘#standard{access=http,mux=ts,dst=:8090}’ :demux=h264
I caught the following error
[0x1f61e60] inhibit interface error: Failed to connect to the D-Bus session daemon: Unable to autolaunch a dbus-daemon without a $DISPLAY for X11
[0x1f61e60] main interface debug: no interface module matching “inhibit,none” could be loaded
[0x1f61e60] main interface debug: TIMER module_need() : 8.297 ms – Total 8.297 ms / 1 intvls (Avg 8.297 ms)
[0x1f61e60] main interface error: no suitable interface module
The camera doesn’t start
Thanks
Have you assumed it’s not working because of that error message? I get errors like that, but if you try to receive the stream you may find it’s ok.
It may also be to do with minus signs “-” being converted to dashes by the wysiwyg web thingy. They should all be minus signs.
It might be worth trying –nopreview, -n, Do not display a preview window.
Good point. Could be, but I hope the code tags prevent that, at least when copying from the main part of the post. I notice that the second dash in La Framboise’s post looks distinctly wider than the others.
VLC for Android Beta is not compatible with my Android device (San Francisco II). Can anyone suggest an alternative?
I haven’t tried any others. Perhaps someone else will chip in?
I got it working! Many thanks for a useful tutorial.
For the benefit of others, here’s how I did it:
1. Installed VLC on my Pi.
2. Installed MX Player on my Android phone
3. On the Pi: $ raspivid -o – -t 9999999 -w 640 -h 360 -fps 25|cvlc -vvv stream:///dev/stdin –sout ‘#standard{access=http,mux=ts,dst=:8090}’ :demux=h264
4. MX Player: Network Stream –> 192.168.xx.yy:8090 where 192.168.xx.yy is the Pi’s ip address and 8090 is the port we told the Pi to send the stream to.
Excellent. I’ve got MX player on my phone and Nexus – it’s a brilliant media player. Never tried streaming with it though. Well done and thanks for sharing. :)
Dear Hystrix,
With these settings, how much latency (approx.) are you seeing in ms? Someone I am working with has really been struggling with this, but now has it down to 2 sec and I need it in the less than 500ms range for my application.
Have you ever done this with WiFi Direct?
Many thanks.
Any idea on how to get audio from a USB mic to stream as well? I’ve tried adding it as an input slave and doing transcoding but it never works. I always get errors buffering..
Never tried it. Sorry. Hopefully someone else will be able to help you :-)
Thank you for the tuto but like all the tutorial I have read on the web it looks like nobody read the help of raspvid for the -t flag:
$ raspvid –help
[…]
-t, –timeout : Time (in ms) to capture for. If not specified, set to 5s. Zero to disable
[…]
so “-t 0 ” means infinite capture which is better than a long capture :)
I don’t think that feature was in raspivid when I wrote this in May 2013 (4 days after the camera was launched), but thanks for bringing it to my attention.
Alex is right. Like most things to do with the RaspberryPi, the camera apps are constantly evolving :)
https://github.com/raspberrypi/userland/commits/master
That explains why all the tutorial don’t mention this!
Modify your command line and be the first ;)
Don’t we all love our little pis and the strong support they have! :)
OK. I will ;) (DONE) And then later on, someone posted in the camera section of the forums that it wasn’t working LOL.
So it may or may not work. I’ll stick to giving it a number for now :)
Hello,
I got the stream working over ethernet, but when I try the same over wifi the connection breaks down.
Has anyone got an idea what’s wrong?
Greets.
Mine works less well over wifi too. You’ll probably have to lower your image size (pixel dimensions) or bitrate to get it working reliably.
how can I set the “raspivid -o – -t 99999 -hf -w 640 -h 360 -fps 25|cvlc -vvv stream:///dev/stdin –sout ‘#standard{access=http,mux=ts,dst=:8090}’ :demux=h264” to start automatically from boot ?
That’s a tricky one as I have been unable to get vlc to work as root
I managed to get streaming to automatically start at bootup a few months ago…
https://raspi.tv/2013/how-to-stream-vlc-from-a-raspberry-pi-with-gpio-control-but-without-being-root#comment-33685
(I meant to integrate this change back into Alex’s RasPiCamcorder github project but unfortunately I’ve been too busy with other stuff)
Is the latency of the stream really 2 to 4 seconds? Does anyone have ideas how to bring that down to a more usable level (< 0.5 seconds)?
A quick search finds http://www.raspberry-projects.com/pi/pi-hardware/raspberry-pi-camera/streaming-video-using-gstreamer but I haven’t (yet) tried following those instructions myself.
Thanks, that seems promising, I’ll keep it in mind. I don’t own a raspberry pi (yet), so I can’t try it out.
Hey! Does this work out of the box if i open the ports 8090 on my ruter so other ppl can access it then ?
Yes. I think it should
The best is to try it ;) and you will see it works! :D
You want to see my living room? :P
I have tried a MJPG streamer as well which is pretty awesome I strongly recommend you to test it!!!
http://sourceforge.net/projects/mjpg-streamer/
MJPG is supported by surveillance software like the the one integrated to Synology NASes. This way you can have several Raspberry Pies with a camera and then add all of them in the surveillance software and then just open one port, the one to your surveillance interface :)
How can I change the mirror image on my raspicam it I see it mirrored, thanks
Have a look at the flip options:
http://www.raspberrypi.org/documentation/raspbian/applications/camera.md
In other words… RTFM :D
But indeed the flip option is what you are looking for.
Please also note than -t 0 will stream forever while -t 999999 is a workaround that will stop streaming at some point!
I already changed it to -t 0 and I have the VLC streaming option, I got it up and running but I wanted to be able to stream live video to the internet, and watch live streaming from my house when I am away, also for others to see. Thanks
I see from your other query that you used 8090 on the pi. You need to forward one of your ports on the router to port 8090 at the ip address of the Pi. Then view that port with your VLC client and it should work fine. It does for me.
Hi Alex, and thanks for the reply, I can open RaspiCam video streaming in VLC without port forwarding on my home network, but it doesn’t work even though I have opened for port 8090 and port forwarded it to rasbpi on my router. I also use port 22 when I connect raspicam android app to my Samsung Galaxy S2 It works fine, but only on my home network. I cannot understand what I am doing wrong.
Is it possible that your ISP blocks some / all incoming ports?
I want to be able to stream live video on the internet, I work a lot away from home and I was hoping that I could be able to see the weather at home and show other people the view from my home, not only from the home network. if that is possible. but for some reason I have no clue how to make my raspicam global :) i have had my share of frustration for today, the good thing about that is that there are people like you Alex who show amateurs like me a lot of patience and will to help, I am grateful for that, maybe I keep on trying tomorrow.
Thanks again.
I have Technicolor TG589vn v2 router and Internet service provider has never been a problem. No firewall, no parental control, I thought it could be something to do with the VLC video setup on the raspicam.
As a simple test, maybe try running a simple web-server on port 80 on your Raspberry Pi, and try port-forwarding to that from your router, and then see if you can access *that* from the internet outside your local network?
(always much easier to break big problems down into smaller parts, and try to get each part working individually)
There’s also lots of friendly and helpful people over at http://www.raspberrypi.org/forums/
Thanks AndrewS I will do that.
When I type the ip address http://192.168.1.87:8090 the same address I use for VLC on my Chrome browser the browser starts to download the video without showing any video on the browser, but afterwards I am able to play the downloaded file on the videolan player or even the windows media player afterwards. I must have programed the raspicam wrong, or I have to turn recording off or something.
I’ve never tried viewing it on a browser, only in VLC. Try viewing the stream directly in VLC on your PC.
Hi Alex, I can view my live streams from Raspberrypicam on my VLC and it is really good quality video stream. but I was hoping I would be able to spread the live video to the world, so that everyone could connect to my live streaming raspicam. :) Thanks
A quick google for “raspberry pi camera streaming web” finds http://blog.miguelgrinberg.com/post/stream-video-from-the-raspberry-pi-camera-to-web-browsers-even-on-ios-and-android for example, which seems to be more what you’re looking for?
A couple of bits of information others might find useful…
If you want to use cvlc without installing a desktop (for example on Raspbian Lite) use:
sudo apt-get install vlc-nox
The raspivid -t option now has an unlimited time option so you can use -t 0 instead of -t 99999
raspivid -o – -t 0
Awesome work!!
worked perfectly fine for .
but is it possible to stream via inernet,
ie, when not connected to the same wifi network?
how to make this coding is auto run during reboot. i mean the coding is auto run when i power up the raspberry pi without using terminal
.. thank you
Several different ways: https://www.google.co.uk/search?q=raspbian+run+script+at+startup