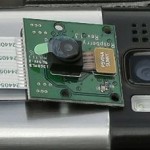
Yesterday I got my shiny new “RasPiCam” Raspberry Pi camera module about half an hour before I had to go out and teach. Being a good boy scout (although I never was one) I was ready for it and had it up and running within five minutes of it coming through the letterbox.
But when I got back from school, I shot some test videos that I wanted to edit and publish. You know how it is. You have to publish something on day 1 or it didn’t happen, right? :)
I knew there must be an FFMPEG command for it, but couldn’t find it anywhere. I wasted a couple of frustrating hours trying to figure out how to get the raw .h264 stream into an MP4 file that Pinnacle, my editing suite, could handle.
Eventually, Dom Cobley, one of the Broadcom guys who does a lot of work for the Raspberry Pi Foundation gave me most of the solution and Mike “Recantha, PiPod, CamJam” Horne gave me the rest. And it worked – on my Ubuntu laptop. But let’s back up a minute and deal with the commands to shoot (record) the video first.
To shoot video with the Raspberry Pi Camera
From the command line, type…
raspivid -o filename.h264 -t 20000
…where filename is a file name of your choice.
This will store the output .h264 stream in a file called “filename.h264” and will stop recording after 20000 milliseconds (20s). (It defaults to 1080p @ 30 frames per second).
There are a couple of other useful little options you might want to know about. By default, the image is flipped vertically, meaning you see a mirror image of what you filmed.
Depending on which way round you hold the camera, you might want to flip it either horizontally, vertically or both. You can do that by adding -vf and/or -hf to the command, like this…
raspivid -o filename.h264 -t 20000 -vf -hf or
raspivid -o filename.h264 -t 20000 -vf or
raspivid -o filename.h264 -t 20000 -hf
How to view your Raspberry Pi Camera output on the Pi
If you booted the Pi with a screen attached, you can quickly check which way round your video is by watching it with omxplayer (you can also see it while you’re shooting). Film something with text on and you’ll see straight away if it needs flipping or not. The command is simply…
omxplayer filename.h264
Then you’ll see if you need -vf (probably) and/or -hf (depends on which way up your camera is).
That still leaves you with a raw .h264 stream file. Pinnacle and other video editing software can’t open these files. :( You need to perform a bit of black magic first. ;)
How to convert your Raspberry Pi Camera output to MP4 or MKV
This is easy when you know how. It can be done on the Pi, but my FFMPEG install is a bit “custom” after installing Get-iplayer, so I use my Ubuntu Lucid laptop for this part. The command is the same though. We’re just putting a MP4 “wrapper” around the .h264 stream.
ffmpeg -r 30 -i video_in.h264 -vcodec copy video_out.mp4
…where video_in and video_out are your chosen file names. If you wanted mkv instead of mp4, just use mkv instead of mp4.
So that’s it in a nutshell. It helped me to make this video and get it posted on Day 1, so it very definitely DID happen. :)
Extra Tricks by Bill Tidey
Bill posted these tips in the Pi forums and they were too good not to share…
ffmpeg -f lavfi -i aevalsrc=0 -r 30 -i test.h264 -shortest -c:v copy -c:a aac -strict experimental testo.mp4
…adds a silent audio channel as some video editors don’t work without this.
ffmpeg -i test.mp3 -r 30 -i test.h264 -shortest -c:v copy -c:a aac -strict experimental testo.mp4
…adds a real audio track where the test.mp3 should normally be longer than the video as the output is the shortest.
[…] from 6 to 35V will work with this regulator) connect my phone or tablet using BlueTerm. Login, and start shooting video. Share this: Pin ItEmail Posted by alex at 12:14 […]
A Google for ‘raspivid mp4’ lead me here, while trying to automate a motion capture + online video clip combination for spotting wildlife (well, actually, evidence of rats in the loft – yuck). I found the ffmpeg installed by Raspbian does not work on the pi itself. It processes the file and produces a sensible size of output file, but only a single frame is viewable.
Despite outputting lots of warnings, the equivalent command passed to ‘avconv’ produces a playable file:
avconv -i “my_captured.h264” -c:v copy “my_captured.mp4”