Why do I need to know how to write a raspberry pi disk image to SD card with win32diskimager?
Even if you bought a ready-prepared SD card with your Raspberry Pi, sooner or later a newer, better version of the operating system (OS) will be released. Unless you know how to make a bootable SD card from the downloaded OS image file, you won’t be able to take advantage of the improvements (and believe me, there will be lots of them as time progresses). There have already been three versions of Debian since I got my first Pi in May 2012 (Squeeze, Wheezy Beta and Wheezy Raspbian).
How do we do it then?
You’ll need two things…
- a downloaded image of the Operating System you want to put on the card.
- a program called Win32diskimager.
Downloading the OS image
The latest version of Debian for the Raspberry Pi at the time of writing is Raspbian Wheezy.
A List of all official images available is found on the Raspberry Pi download page which currently looks something like this. Scroll down until you find Raspbian Wheezy (current at Oct 2012)…
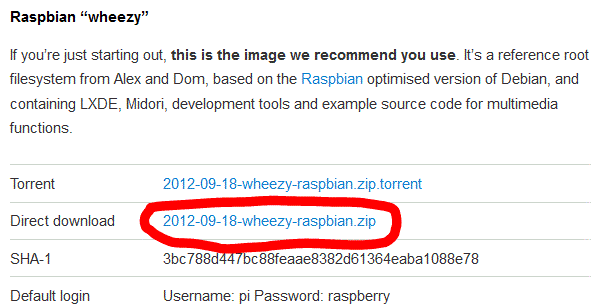
Click the circled link to download Raspbian Wheezy, which is a pretty good place to start (Oct 2012)
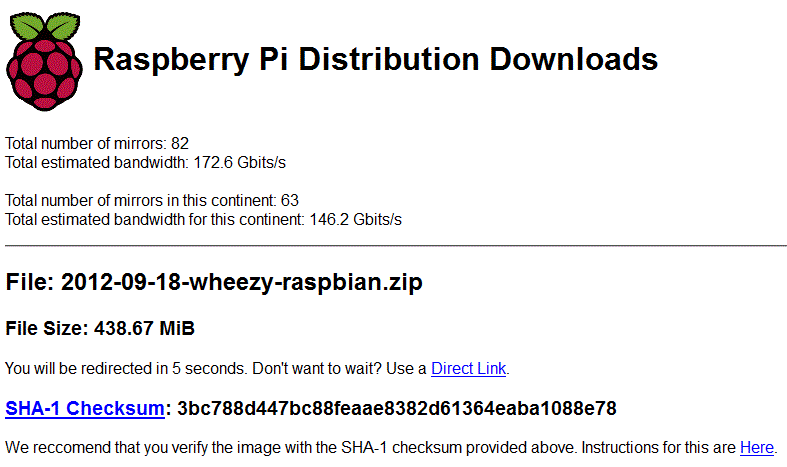
Once you’ve clicked that, you’ll get to the “auto-download” page, that looks like this…
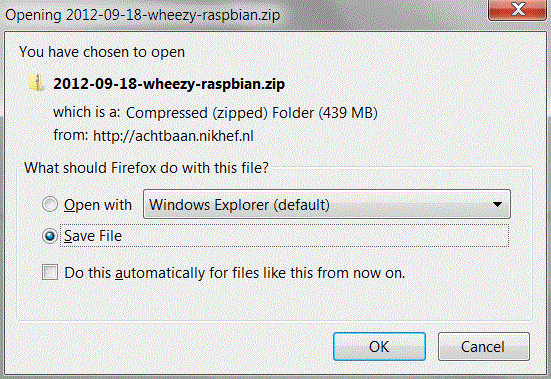
Your download should start by itself. You may need to confirm by clicking OK in your browser. (See next image)
If you happen to want the, now superseded, Wheezy Beta version it’s here
So once you’ve downloaded the OS image file, you might want to follow the instructions on the download page to check the checksum. In case you don’t know what this is all about, it’s a way of testing that the file you have downloaded has not been tampered with. Because of the sheer volume of download traffic, it’s necessary to use many “mirror” sites to host the downloads. In the event that one of these “went rogue” and started putting viruses or other malware into the files hosted on their site, the file’s checksum would be different. The checksum changes if the file is altered in any way. So this is a way to ensure that you have the “clean and correct” official file.
One more thing about this. You run the checksum program on the file you download – i.e. the .zip file itself. You don’t run it on the unzipped .img file. A carelessly written instruction on the download page has confused an awful lot of people who didn’t realise that. It caught me out first time as well :-P
Once you’ve downloaded the zip file and checked its checksum, it’s time to unzip it to get to the .img file. You’ll need this .img file to write the SD card with Win32Diskimager.
Installing Win32DiskImager
I’ve had great success with this using version 5. Download here. Then unzip the file win32diskimager-binary.zip, then double-click Win32DiskImager.exe in the unzipped folder called win32diskimager-binary. Click Yes to confirm you want to run the program. Then it will start. Once you’ve established that it works, close it down and plug in your SD card.
Using Win32DiskImager
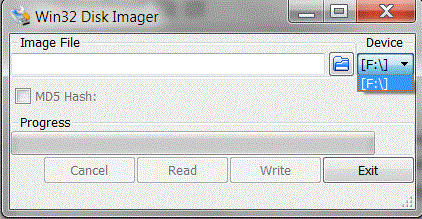
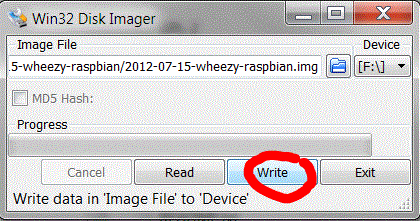
Having plugged in your SD card, (re)start Win32Diskimager. Choose the drive you want to copy the image to (in my case F: ).
Then click on the folder icon and choose the unzipped .img file from earlier that you want to put on the SD card. Then click Write, to write the Operating system on the card from the .img file.
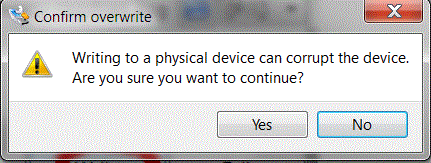
You will then be asked to confirm. Check carefully that you are writing to the correct device and if so, click Yes.
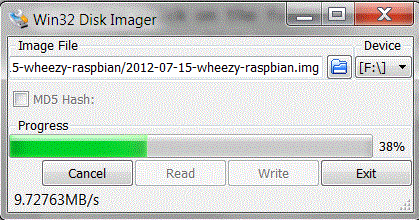
The progress bar will show you how far it’s got.
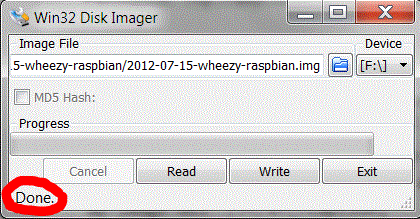
When it’s finished it looks like this.
Then you can eject the card reader and remove the SD card. Then you can try it out in your Raspberry Pi. If all went well, your Pi should boot up (start) into your new operating system. It may take a couple of minutes. If nothing’s happened after that, look at the LEDs on the Raspberry Pi. If you only get the red power LED, either the card is not inserted properly or it can’t boot this combination of card and image, or something went wrong with the process. But in the main it should work well. :-D
Dear RasPi.Tv authors,
I am creating a Raspberry-Pi app and wish to include a link to your newsfeed. I will be using the following 4 buttons linking to these newsfeeds:
http://www.raspberrypi.org/feed/ (Raspberry Pi official website)
https://raspi.tv/feed (RasPi TV)
http://www.youtube.com/user/RaspberryPiBeginners/feed (Video tutorials)
http://www.adafruit.com/blog/category/raspberry-pi/feed (Adafruit)
I would like permission to add your blog along with the others as shown above. It would help to inform app users about not only Raspberry Pi but also your website. It would be a win-win situation.
Please let me know as soon as possible. I eagerly await your response. Thank you again.
Sincerely,
Edy
That’s absolutely fine by me :)
Dear Alex,
I am happy to announce that the “Raspberry Pi on Blackberry” app has been approved and posted to Blackberry App World. This app features your RasPi.tv blog as I mentioned in my previous email, along with the official Raspberry Pi page, RaspberryPi for Beginners Youtube channel and Adafruit’s Raspberry Pi blog (use the section link with the number “4” at the top right corner to select). Thank you for allowing me to include your excellent blog on this *first and only* Raspberry Pi app for the Blackberry platform!
It is now freely available for all Blackberry phones on OS 5 through 7, as well as the Playbook tablet:
https://appworld.blackberry.com/webstore/content/129165
I encourage you to download it or let everyone you know where to download the ad-free and totally free app. Please help spread the word. I am happy to help spread the news now to all Blackberry users. If you email me directly, I can send you some more screenshots from the app store if you need.
Remember that the app constantly updates with new feeds from each of the links, so you will reach many more users hopefully with this app. They will be eagerly awaiting updates and checking in regularly, so regular updates to your blog will be most welcome! Keep up the great work!
Thank you again!
Sincerely,
Edy
[…] I recently started using two Raspberry Pi’s on the same network. On top of that, I had a nicely developed and updated image of Raspbian, so I made an exact copy of the SD card for Pi #2. (see: how to backup an SD card image here | how to write an SD card here). […]
I cannot get win32diskimager-binary to run on win 7. It keeps telling me it cannot find numerous .dll files. Can you tell me why?
Sorry about that. I’m afraid I haven’t a clue why it won’t work. I use it on windows 7. I suspect you might have an issue with your windows installation. The best people to help would be the people who wrote it. There’s a questions section on their site. I suggest a look there…
https://answers.launchpad.net/win32-image-writer
If your situation isn’t covered, you could ask them a new question. Sorry I can’t be of more help. :-((
You could try: http://www.winimage.com/
It’s a great app, tho it is paid, but you can try it for free. I’ve been using it for some time and it’s never let me down.
I’ve just used win32diskimager on windows 7 without problems
When you unzipped the downloaded file there should be a .exe file and a number of other files inclding some dll’s in a folder. I wonder if these are the missing ones.
I ran the program by clicking on the .exe while in the folder with the dll’s
hi,
I am interested in reading this post, especially this part,
Then you can eject the card reader and remove the SD card. Then you can try it out in your Raspberry Pi. If all went well, your Pi should boot up (start) into your new operating system. It may take a couple of minutes. If nothing’s happened after that, look at the LEDs on the Raspberry Pi. If you only get the red power LED, either the card is not inserted properly or it can’t boot this combination of card and image, or something went wrong with the process. But in the main it should work well.
that is exactly what happened to me.
i put everything in order and when i turned on the raspberrypi, i only get a blank page with only red power led. if theres a problem with the card and image, what should i do? or is there any explanation to my rpoblem?
the windiskmanager process finished and looked exactly like what u shown.
thanks for the help man. appreciate it.
It looks like you might have an incompatible card. Have you got one of a different type that you could try?
I found Alex’s blog v. good too.
So is there no app for android smartphones yet ?:-)
Hi Alex. Great to meet you yesterday.
One of the teachers asked me for a guide on downloading and installing images. If it’s okay, I’m going to point them at this post as it’s pretty much what I would have written.
I don’t suppose I could both you to add a couple of screenshots and sentences, could I? Just of the first (raspberrypi.org/downloads) and second (the auto download) download pages? I’ll do the screenshots if you like. The teachers were getting confused over where to click to initiate the download (i.e. What the heck is a TORRENT????) so a big red circle around the link would be good :-)
Still think yours is one of the “great sites” for the Pi!
—
Mike
Yeah, I don’t use torrents myself so that could be misleading for people who aren’t familiar with it. I’ll get on it right away.
Good to meet you too Mike. Pity we didn’t get more time to talk. I was a bit busy burning servos and fending off interest in the Gertboard. :-D
Done – I did three screenshots – bit more bulletproof. Any more suggestions, I’m always up for making the instructions more robust.
I’ve sent Steve Jones your way (well, this post’s way) – it’ll be interesting to see if it all makes sense to him so he can really install Pis quickly.
I have tried to download the diskimager file from several sources , and am unabable to do so, I’ve clicked on the retry icon numerous times to no avail???WHY?
No idea. Sorry. It’s just a tool I use, provided by someone else. You should ask them. Could be an internet issue, could be to do with your installation. Could be you’re doing something wrong (PBKS). :-)
[…] the link below for the instructions:https://raspi.tv/2012/how-to-make-a-raspberry-pi-disk-image-to-sd-card-with-win32diskimager Related […]
[…] of things with your Pi.Currently (1st October 2012), the site contains articles on everything from first installation to using the Gertboard expansion board to control a […]
[…] RASPBMC – http://www.raspbmc.com/ Instalar e usar o win32diskimager – https://raspi.tv/2012/how-to-make-a-raspberry-pi-disk-image-to-sd-card-with-win32diskimager Entrevista ao autor do Raspberry Pi […]
I am having some problems setting up my raspberry pi, whenever I try to write the disk image file to the sd card this error comes up:Error 5:Acess denied
Can anyone possibly help me?
What operating system are you using? Some people have had problems with Windows XP, you may need to run Win32DiskImager as admin (right click – run as admin). Others have simply had issues where the card reader seems to be incompatible and the only solution has been to try a different one. Hope these help. :)
The win32diskimager program will not show my sd card when I have it plugged into the computer. I can add the image of the raspberry pi image but i can’t chose any location to make a card bootable.
You’ve got two options, run as administrator, if that doesn’t work, use a different card reader. Option 3 is to use a Linux computer, but that’s not so helpful unless you have one. :)
Option 3b – use a Linux LiveCD ;-)
Yes, actually I did that with a Ubuntu boot stick I made a couple of weeks ago while abroad. I didn’t have my linux machine with me (apart from 3 Pis) so booted from a stick to flash a new OS. I prefer making them in Linux nowadays.
I followed the instructions in the Ra Pi magazine (the 1st or 2nd Edition) and it worked fine. :-)
This document contains a dead link, https://launchpad.net/win32-image-writer/0.5/0.5/+download/win32diskimager-binary.zip should be http://sourceforge.net/projects/win32diskimager/ I guess.
Darn it. It was the old version that worked well. People had complained about the more up to date versions.
Thanks Sander, I’ve updated it now. Version 0.7 now, whereas before it was 0.4. I guess the author wanted to kill off the old one. I notice several other sites now have outdated instructions as well, but I just tested the new version and it worked fine for me on a fresh install of OpenElec that I’ve been testing.
You can also use the WinFlashTool to write your image.
[…] Flash the above .img file to an SD card (>= 4 Gb). Instructions how to flash an SD card in Windows here […]
how can I install raspbian with a 64 bits windows 8 computer? I need help
Hi Claire,
Just installed on Windows 8 and Windows 10 both 64 bits operation systems and it work fine.
Only you need to run the program as administrator.
Raoul Grösser
Are you sure you are running a 64 bits system? win32diskimager.exe is a 32 bits apps and does not run.
I found a way: simply format the SD card, unzip raspbian package, copy it on the SD card.
When booting, the raspberry pi let you choose the operating system you wish to install.
https://www.raspberrypi.org/help/noobs-setup/
Yeah that will work Claire. NOOBS was specifically created for that purpose – to make it easy for people to do that. This blog post pre-dates NOOBS by a long way, but is still valid as many people (including myself) don’t use NOOBS as a rule. I generally flash my SD cards with the Raspbian image using dd in linux now. You can even do it from a Pi if you have a USB card reader.
how about data installation in SD Card? must we clean data or format before we put in SD Card again? how to clean that please
I think you need to format it. Just look at the video, you will find every thing:
https://www.raspberrypi.org/help/noobs-setup/
If i have a raspberry jasper image file. How am i going to put into the raspbian program since it will collide with my os once i use sd card formatter.
After win32diskimager is done I put my sdCard in Rpi and connected power and hdmi cable but nothing happens to display, and red and green led blink one after another then stops for few seconds then again blink one after another but no display after waiting for 10-15 mins. Kindly help me ! Thank you.