I went to the 4th Milton Keynes Raspberry Jam on Sunday. Now the thing with Raspberry Jams, is that you never know whether there’s going to be enough monitors to go round (some don’t have any at all). Last time I got one, this time there were not many laid out. I expect I could have had one if I’d have asked, but there was no need. I was prepared.
I had one of these…

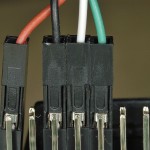
USB to ttl serial interface (with 3V3 logic)
This is a USB to serial adaptor, which enables you to connect your Raspberry Pi serial port Tx (white) and Rx (green) pins to the USB port of another computer and login using the Pi’s serial interface.
It also has red (5V) and black (GND) leads. If the 5V lead is connected to the 5V pin on the RasPi, you can actually power the RasPi through your computer’s USB port – if it’s capable of providing enough output. But if you’re powering the RasPi separately, omit the red lead (but still attach the black one).

How to connect the serial-USB adaptor

A closer look
I bought this one from ModMyPi.com and it arrived very promptly. I’ve made another purchase from them recently that went equally well. :yes:
If the right settings are configured on the Pi, (and they are by default on Raspbian) this means you can get a command line login console directly on your laptop. You will need to install drivers for the USB interface if you’re using windows. You can download those here.

USB-serial login on Raspberry Pi
Since none of my demos for this Jam involved the GUI (Graphical User Interface – Windows-like interface) this was more than sufficient for me.
What’s the catch?
There isn’t one really, but there are a couple of quirks. You need to unplug the USB dongle if you want to start a new session (in Putty, at least. This is a good reason not to power your Pi with it if you’re likely to need to reset the connection.) You do also have to install drivers on your other computer to run the USB-RS232 adaptor – but that’s normal for any device.
Another Gotcha! (If you have a Gertboard)
If you’ve installed the Arduino IDE for Gertboard using Gordon’s script, you’ll need to uncomment the second line below at the bottom of /etc/inittab
#Spawn a getty on Raspberry Pi serial line
#T0:23:respawn:/sbin/getty -L ttyAMA0 115200 vt100
sudo nano /etc/inittab
and change…
#T0:23:respawn:/sbin/getty -L ttyAMA0 115200 vt100
to
T0:23:respawn:/sbin/getty -L ttyAMA0 115200 vt100
then CTRL+o, Enter, CTRL+x to save and exit. It should look like this…

Edit the last line of /etc/inittab if needed
If you’re running an older version of Debian or Raspbian, you might need to disable the kernel log output on /dev/ttyAMA0 by removing the line “console=ttyAMA0,115200 kgdboc=ttyAMA0,115200” from /boot/cmdline.txt
But if you’re using a linux distribution (distro) newer than July 2012, you probably won’t need to.
How to do the actual serial port login
- If using Windows, you’ll need to install the drivers You can download those here.
- You’ll need a client application, like Putty, which can handle a serial login.
- You’ll need to configure it, but that’s quite simple.
- You’ll need to make sure your wires are hooked up correctly (as in the photos above).
You can download Putty from here
Configure Putty for a serial connection:

Settings you need to tweak on Putty
- choose the virtual COM port that your computer allocates to the USB device (Mine is on COM7 in Windows7 and /dev/ttyUSB0 in Ubuntu). You should be able to find this in “Devices and Printers” if you are a Windows user.
- select serial connection
- set the speed to 115200
- save settings (if you want to)
If your wires are hooked up right, it should now just be a question of clicking Open to start a connection.
When you are faced with this screen (minus the yellow text I’ve added)…

Logging into your Pi with Putty through serial port
…just press enter and you should get a login prompt.
You can only use this as a terminal. You can’t view LXDE through it. But if a terminal is what you want, this does the job very nicely indeed. And since you can power your Pi with it too, it makes quite a useful tool for people who do demos at Raspberry Jams and other places.
I hope this is useful for you :-D
Thank you for this one – very useful indeed !
I really like your website: lots of useful information.
Thank you and please keep on !
Joshi
Thank you Josh. It’s always nice to get a bit of encouragement. :)
I used this device at the Oxford Raspberry Jam last night as well. Really useful, as I already had too much to carry.
Thanks very much for this clear, concise tutorial. I bought an Adafruit starter kit that came with one of these cables. I had no idea how to use it though. Please do keep up the great work!
[…] you are invited to test your 5V FTDI interface if you have one. I have a similar thing I reviewed last week so I tried it. I got Tx and Rx the wrong way round first time (didn’t bother looking up which […]
good job ! this is awesome. will this connection also allow me to use GUI and if not can you help me. thank you, eddie
No. Just command line.
I have a Windows PC and using Putty to for serial communication with Pi.I followed all the steps in this post. I got to this point :
“When you are faced with this screen (minus the yellow text I’ve added)…:
Nothing happens when I press “Enter”.
Any ideas or suggestion on what could be wrong?
Have you got Tx and Rx wires the right way round? One thing you could try is wire up the pins on the Pi, but without the red one on 5V, plug in the USB, start up Putty.
Then connect a power supply to the Pi in the normal way.
You should see messages while it boots. Something like “uncompressing Linux kernel” and then get a login prompt when boot has finished.
I have the white wire connected to GPIO 8, Green wire connected to GPI0 10.
I will give your suggestion a try. Thanks
wrong hookups Tx is 14, Rx is 15. Where did you get the idea it was 8 & 10?
You are correct, I actually meant pin 8 and pin 10. I erred in calling them GPIO 8 and 10.
I followed your suggestion above on the connection and power sequence. I reversed the connection with white wire connected to pin 8 and green connected to pin 10.
It now works as described above,
Thanks very much for your help
Excellent – glad it works now :)
Do you have any idea how to configure the usb ports on my linux box to talk to the Pi?
When I plug the cable from the Pi to my laptop (Slackware 14.0)
dmesg reports:
[ 2479.629123] usb 7-1: new low speed USB device using uhci_hcd and address 2
[ 2479.692100] hub 7-0:1.0: unable to enumerate USB device on port 1
(These messages are repeated many times with a different port number – up to 127, then starts over)
ls /dev
# ls -l /dev/usb*
crw——- 1 root root 189, 0 Oct 1 16:21 /dev/usbdev1.1
crw——- 1 root root 189, 128 Oct 1 16:21 /dev/usbdev2.1
crw——- 1 root root 189, 129 Oct 1 16:21 /dev/usbdev2.2
crw——- 1 root root 189, 256 Oct 1 16:21 /dev/usbdev3.1
crw——- 1 root root 189, 384 Oct 1 16:21 /dev/usbdev4.1
crw——- 1 root root 189, 512 Oct 1 16:21 /dev/usbdev5.1
crw——- 1 root root 189, 640 Oct 1 16:21 /dev/usbdev6.1
crw——- 1 root root 189, 768 Oct 1 16:21 /dev/usbdev7.1
crw——- 1 root root 247, 0 Oct 1 16:21 /dev/usbmon0
crw——- 1 root root 247, 1 Oct 1 16:21 /dev/usbmon1
crw——- 1 root root 247, 2 Oct 1 16:21 /dev/usbmon2
crw——- 1 root root 247, 3 Oct 1 16:21 /dev/usbmon3
crw——- 1 root root 247, 4 Oct 1 16:21 /dev/usbmon4
crw——- 1 root root 247, 5 Oct 1 16:21 /dev/usbmon5
crw——- 1 root root 247, 6 Oct 1 16:21 /dev/usbmon6
crw——- 1 root root 247, 7 Oct 1 16:21 /dev/usbmon7
(there is no ttyUSB device)
lsusb doesn’t show anything.
I’ve tried telling minicom that the port is /dev/usbdev7.1 and /dev/usbmon7 but nothing happens.
Thanks!
I recently set one up with Putty on Ubuntu 10.04 Lucid and “it just worked” on /dev/ttyUSB0
Ubuntu FTW :)
Sorry. I know nothing about slackware. :( Hopefully someone else could give you some pointers.
Thanks, Alex. Really not a whole lot of differences between the different distros. I lied, I first tried it on Slack 13.37 (which doesn’t handle all USB devices very well). So, I just tried it on Slack 14.0 and Debian. Same results.
Couple of questions, if I may:
What does the last few lines of dmesg show after you plug the Pi in?
When you do a ls /dev after you plug in the Pi, ttyUSB0 is listed?
And a real dumb one – just want to make sure – I can make the cable by just cutting the end off a USB cable and crimping on the ends that plug into the header, right? The cable you are using doesn’t have any electronics in it?
Since it “just works” for you, I guess I either have a bad cable or a library not loaded.
Thanks!
The cable has a level converter in. It’s a proper FTDI USB-UART chip. The USB on a PC runs from 5V and the Pi serial ports are 3v3. It’s not a dumb cable.
I’ll try and have a look at the other bits later for you when I’m near my Pi and cable.
Oh, and what does lsusb show after the Pi is plugged in?
OK, Just answered my own question “Inside the big USB plug is a USBSerial conversion chip”.
Got a cable on order. For some reason I thought the signals were compatible…..RTM ….
Thanks!
I´m wondering if I us a Serial LCD display, how can I use TTY-to-USB Cable and also the Serial Display? a Quick question. Thank for the reply !
If you have a Rev 2 Pi, I think there might be a second serial line on the P5 header. Could that be a solution?
I have had success using this serial connection iff I don’t use the USB 5V but use the power supply connection. Using the power supply enables the boot up process. Disconnecting the power and using the USB 5V, the pi shows the color gradiant screen but then stops the boot process. Any idea why a B+ wouldn’t boot on a completely USB connection? Thanks,
RL
Insufficient power from the USB?
Although I seem to remember reading somewhere that one isn’t supposed to back power the B+. Although I may be confused about whether that is through the GPIO or USB.
Insufficient power would be my guess too. A USB device is only ‘allowed’ to draw 500mA from the USB port, so the maximum current coming out of the serial cable will be (500mA – (whatever current the serial converter itself uses)), which obviously isn’t enough to power your B+.
In terms of backpowering the B+ – the B+ has additional protection circuitry (not found on the Model B) which means it’s impossible to back-power via USB, but you *are* allowed to back-power via the GPIO (it’s in the HAT specs), as long as you don’t also power via the microUSB.
For me, the blank screen was a matter of timing. I had the USB power connected to the GPIO 5v, so connecting the serial interface to a USB powered hub (connected to an iMac), immediately booted the Pi to the point at which it hung (something wrong on the RasPi initialization on the SD card). So, then opening a screen session in OS X Terminal showed — nothing! There was nothing happening at that moment, the Pi was hung — but the USB serial setup was working.
I discovered this by first opening a screen session on the iMac, then plugging in the Pi, either through an external power supply, or by connecting the 5v (red) connector (but not both!). The Terminal screen session (or an alternative, such as CoolTerm) filled with data, to the point at which the Pi hung. And as we were trying to troubleshoot the defective SD setup, we had what we wanted.
It was all a matter of timing — at least, for me. I hope that helps!
“When you are faced with this screen (minus the yellow text I’ve added)…”
when i get to this step i get no response from the Pi, any ideas why this might happen? its a fresh img flash (not NOOBS) and i’ve modified the config file to enable serial connection. checked my wiring numerous times. more specifically im using this usb adapter…
http://www.waveshare.com/PL2303-USB-UART-Board-type-A.htm
any help would be appreciated.
thanks in advance,
Finbar