The Cyntech GPIO paddle board is a new type of breakout board for the Raspberry Pi.
It’s nice and small (about half the size of the Pi) elegantly simple, and I like the connectors. To connect a wire, you hold down the orange tab, push your wire into the hole and release the tab. The wire is gripped by a spring-loaded contact.

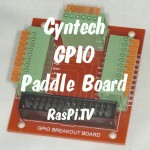
Cyntech GPIO Paddle Board
It comes with a very nice “rainbow” ribbon cable, which is much more cheerful to look at than a grey one and it’s a decent 20cm length as well. You don’t always want the rest of your circuitry right next to the Pi. :)

Cyntech paddle board + Pi
Where can I get one?
You can get them from Maplin, CPC and Cyntech for a very reasonable £5.99 delivered. I’ve also seen them on Amazon (US site) as well.
Suggested Improvements?
I would suggest a sticker so that the port labels and/or alternative port labels can be placed right next to the wire holes. This would make it even harder to stick a wire in the wrong hole.
This is something you can easily add yourself, although I haven’t yet done so.

Paddle board + GPIO cable
I like it and think it makes a useful addition to the range of breakout boards available for the Raspberry Pi. I haven’t used mine yet, but will report back when I do. :)
Have a look at this short video walkround (<4 min) and see what you make of it.
http://youtu.be/2Que9moDdqs
Cyntech and Pimoroni have also produced a GPIO Cheat sheet with information about the Raspberry Pi GPIO ports.
[caption id="attachment_2764" align="aligncenter" width="695"] GPIO cheat sheet, click to enlarge[/caption]
Interesting product. I haven’t seen that type of breakout connector either. A small issue with the link to the Cyntech store is that there is an extra “http://” appended to the link url, which takes you to a page not found page.
Thank you Clinton. I’ve fixed the link. :-)
IMHO it would also be useful if the silkscreen or ‘sticker’ also mentioned the actual pin-number (01 – 26) that each ‘paddle’ is connected to (including the 5V and GND connections), since that’s how many tutorials refer to the pins in their connection-descriptions.
I wonder if the ‘long’ 20cm cable length would cause problems with high-speed signals such as SPI?
But yeah, it looks like a fantastically useful board for rapid prototyping and experimentation, I may have to “invest” in one ;-)
Maybe the best option would be if they produce a set of stickers and you can apply whichever you prefer? But then that would be confusing. (so you can’t win) :)
Trouble is there’s so many numbering schemes, pin number, GPIO number, alt function, wiringpi number, Quick2Wire number.
You’re never going to be able to please everyone. I generally stick to GPIO numbers – mainly because it’s the first system I used (and it’s on the Gertboard).
“Trouble is there’s so many numbering schemes…”
Yeah, I was thinking that just after I hit Submit on my last comment ;-)
The advantage of physical pin numbers is that they’re totally unambiguous, whereas a few of the GPIO numbers are different on the Rev.1 and Rev.2 Pis. The disadvantage of physical pin-numbers is that you then have to do an extra “translation” step when writing your code. Nothing’s perfect!
Bought a Gertboard myself a while ago but haven’t really found the time to play with it yet :-/