The Guzunty Pi board is an open source Complex Programmable Logic Device (CPLD) add-on for the Raspberry Pi. Derek Campbell is behind this project, and has clearly spent a lot of time and effort putting it all together.
He describes it… “a CPLD is like several large breadboards laid out on your desk, full of every combination of logic devices you are ever going to need. It is waiting to be told what to do. It doesn’t need a host of jumper wires like a breadboard would. It can be reprogrammed again and again (even at runtime), and it is small enough to fit on top of your Pi.”
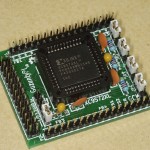
Derek sent me an evaluation kit for his new Guzunty Pi CPLD board a few weeks ago. I soldered it together, taking photos as I went. It was an easy build, and I sent Derek the photos to use on his Github build instructions page. I’m glad I did that because it was another few weeks before I found time to do anything other than run through the basic test procedure to prove I’d built it right.

Here’s what you need to make a Guzunty
As you can see, there are not many parts, but there are quite a few solder joints to do. I forgot how long it took me to build, but it wasn’t very long. Since I shot photos all the way through, I looked at the first and last file date/times and there was one hour between them. Bearing in mind that I am a fussy macro photographer, and stopped to shoot each build stage, half of that hour was probably spent on the photos. So I reckon it was a half-hour build (Derek confirms this).
What’s so special about Guzunty Pi?
Here’s six things for starters…
- It’s very small
- It’s very flexible
- It’s got hardware pulse width modulation (PWM) capability
- It’s got lots of I/O capability
- It can handle 5V logic
- The GPIO ports are protected
Small – it can fit on top of the Pi
Guzunty is less than half the size of the Pi. If you build it with the 26 way female socket on the underside, it can press down straight onto the Pi and sit on top. I built mine with pins so I could use a ribbon cable. But I will probably build another using the socket at some point.

Here’s the Guzunty I built
Flexible – Many cores available
A CPLD program is often referred to as a ‘core’ to distinguish it from a regular computer program. Cores can do things thousands of times faster than an equivalent computer program.
This is because the cores are programmed in the Xilinx XC9500XL hardware. There are currently 11 different cores available for Guzunty Pi. Some focus more on input, some on output and some on PWM. They have names like gz_4p8o8i.xsvf
gz_ for Guzunty, o = output, i = input, p = pwm (s will be servo PWM). So gz_4p8o8i has 4 PWM outputs, 8 digital outputs and 8 digital inputs.
You can even program your own cores using the free tool chain from Xilinx. It is hoped that community members will do this and submit their own cores to the available cores page for use by others.
Lots of I/O (input/output) capability
You can program in up to 25 digital inputs or outputs (or a mixture), using the Guzunty. This gives you more than the basic 17 on the Pi’s P1 header.
It can handle 5 Volt logic signals
Guzunty can cope with 5 Volt logic I/O signals which would damage the Pi.
The GPIO ports are protected
Guzunty acts as a buffer between the Pi and whatever you’re interfacing with, protecting the GPIO ports from damage. The CPLD chip itself is about £2/$3 to replace, so it’s better to trash that with wiring errors or “careless screwdriver moments” than to burn out ports on the Pi.
Did I mention the cost?
Derek reckons you could build one of these for about £10/$15. He may do kits if there is demand to justify the required investment. (He has a limited number of kits available for UK purchasers at the time of publishing for £10 + £2.20 P+P).
You can control it with Python
The Xilinx CPLD communicates with the Pi via the SPI interface, (but can use other protocols like i2c). This is nice because we can access that in Python, either using the supplied GZ module or with py-spidev.
PWM – motors, servos etc.
I have a “top secret” project which requires the use of servos. I know how to control these with ATMega and directly from the Pi (but only one). But I thought it would be fun to use Guzunty for this. I tried the PWM core gz_4p8o8i, but the PWM for RC servos can be a little fussy. It requires pulses of between 1 and 2 ms at about 50Hz. 1ms = 0 degrees, 2ms = 180 degrees, or thereabouts.
The “pure” PWM on the 4p8o8i core didn’t work for my servo (although it does work for some servos apparently). I mentioned this to Derek and he cooked up a core specifically for servos. This is no trivial task, but obviously has much wider use than just my little project, so it was worth doing. Thanks Derek. :) That core is still under testing and hasn’t been released yet, but no doubt it will be when Derek is happy with it. I can confirm that it works with my servos (currently with about 90 degree movement, but rock-steady control).
If this has piqued your curiosity, check out Derek’s Github Guzunty Pi page
I will update you on my “top secret” project as and when I have something to show, hopefully within a couple of weeks. :) And hopefully there will be video to go with it.
Very interesting stuff indeed – seems like a fantastic little board. And I mean little – the size of it is fantastic for what you get. As you pointed out on my blog, it could be a solution for my servo motor project. Can’t wait to see what you come up with!
It is an awesome little board Mike. I’d previously looked at FPGAs and thought they looked “wonderful but expensive and scary”. The CPLD is something a little less intimidating, but still really flexible and a lot cheaper. For your application (pan and tilt mount) you’d likely need a full (or nearly full) 180 degrees of movement, but I’m pretty sure that’s achievable with a tweak to the servo core.
I was having a play yesterday and taking it further, but that’s for another blog :-P …
Tease! What have you got up your sleeve!?!
I could tell you, but then I’d have to kill you. :-P
Glad you like the design. Although the board is quite small, there was quite a bit of thought put into it, making it easy to build and choosing signal assignments so that the Pi can drive it with minimum overhead. Sometimes less really is more.
By the way, one feature not mentioned in the article is that the Xilinx tools for creating cores are FREE for non commercial use! This means you don’t have to be limited by the cores available on GitHub. You can make your own using schematics or a Hardware Design Language (VHDL or Verilog). So another use for the Guzunty is for teaching yourself HDL skills, though Xilinx removed a web based tool chain that would have allowed everything to have been done on the Pi.
My hope was that the community would begin to develop new cores collaboratively and contribute useful ones back into GitHub. I’m excited to say that this is starting to happen already.
I’ll be happy to answer any Guzunty questions so please do ask!
Xilinx WebPACK tools are free for both commercial and non-commercial Xilinx CPLD and FPGA design. The last time I looked WebPACK was limited to smaller Xilinx parts (I think this includes all CPLD and all Spartan FPGAs) and are limited to Web-based support. They also omit some of the Xilinx extra tools, like ChipScope.
I recommend Xilinx WebPack version 5.2 for the XC9500XL series. I had a problem once using a newer version of the tools and found that going back to 5.2 worked very well. Unfortunately, 5.2 only runs on Windows and Solaris. Maybe it runs under WINE? You need to get 5.2 from the Xilinx design tools archive:
http://www.xilinx.com/support/download/index.html/content/xilinx/en/downloadNav/design-tools/archive.html
John,
Yes, I recall you making that suggestion to me a while back. I followed it up and found that ISE version 5 cannot write xsvf output files. For this reason alone I can’t currently recommend this version because the Guzunty loader supports only xsvf.
Please do correct me if I am wrong and there is a way to get xsvfs out of version 5. Frankly, I’d love to be able to specify an earlier version, because the older ones are so much smaller to download. I also find the latest release is darned buggy with the 9500XL series.
Unfortunately this may have to wait until I can get around to creating a loader that will accept the svf format instead.
You might be able to convert a 5.2 JEDEC .jed file using a newer version of iMPACT. Unfortunately, this requires having two versions of ISE around. It also may be possible for a future version of the loader to write the .jed file without going through SVF or XSVF. SMOP, as they say. [Simply a Matter Of Programming]
I’d be very grateful if you can point me at the specification for the jed file format.
svf, I know I can do, since it is simply an ascii version of the xsvf.
Don’t worry, I forgot for a moment Google is my friend*. :-) I found them:
http://www.pldtool.com/pld-file-formats
* Disclaimer: Other search engines are available, take your pick :-)
Oops I just noticed the article does mention the free tool chain, sorry Alex. Well, I think that the possibilities opened up deserve mentioning twice. :)
One more thing, I am delighted to tell you that the depth of interest has taken me by surprise. I was surprised to the extent that I am just about out of PCBs. More on the way of course, but just to let you know that you may need to be a little patient if you order now while the fab turns around the latest batch for us.
That’s awesome news Derek. And there was me looking at the traffic stats and thinking I hadn’t sent you much traffic and it didn’t look like there was much interest :-D
Personally, I am quite excited about the possibilities a Guzunty CPLD opens up. My top secret project’s coding is well under way and the hardware functionality is all there. I’ll be using a couple of servo PWMs and at least 5 output ports.
I ordered three Guzunty boards after reading this blog two days ago. I hope I am not too far down the list :sweat: . It seems that technology like this would be a tinkerer’s wildest dream :hypnotized: . My hat is off to Derek Campbell for his work on this project and to Alex for introducing me to it. Thank you both very much.
Having that many flexible I/O pins is truly a wonder for one board, but lets assume for a moment that a user had need of more inputs and outputs than could be delivered by a single Guzunty Pi board. For instance, if a user wanted to PWM a 40 LED matrix or something of that nature (of course with external power). Could a user run more than one core and more than one Guzunty Pi board at the same time from a single Pi? Just curious.
Thanks Scott :)
Derek will be able to give you a more complete answer, but somewhere in the documentation I remember seeing a note about using more than one Guzunty with the Pi. I seem to remember it was something about shorting one of the solder pads to make the spi receive on the other channel. So yes I’m pretty sure you can use at least two together, but Derek will be able to fill out the details. :)
I agree with you regarding the tinkerer’s dream. I think the possibilities are tremendous and really exciting.
That is excellent news! I had a followup question if using more than one board is possible, then can the user also use more than one core or do they have to program a specific core to use with both boards at the same time?
I was also wondering if there is a plan to implement stepper motor control as a core? 4 wires per motor in some cases and one could use solid state relays to allow use of a cheap/recycled external power source that is triggered/controlled by the Guzunty Pi. That would make for a less expensive way to get into 3d printing versus having to buy specialized power sources, special controller boards, less powerful Arduino processor, etc.
I think this board opens up so many avenues of expanding the abilities of the Raspberry Pi. It is amazing and very exciting to consider all the possibilities that have been opened up by this board.
I’m almost certain they would be able to use different cores.
Hi Scott,
> I hope I am not too far down the list
I just checked and your order did arrive just before my stocks were depleted. It won’t be too long before the next shipment arrives though.
Most of the standard cores use SPI, and Pi supports two SPI devices with standard Raspian. A small hardware configuration change to one of your boards and a tweak to your chosen core will take care of running two boards simultaneously. Let me know when your PCBs show up and I’ll take you through it.
As coincidence would have it, I was experimenting with driving a stepper motor a few evenings ago. I was using an SN754410 half H driver chip, only $1.23 a pop at Newark. I was just modulating the stepper coils directly through the Guzunty from the Pi, so no fully automated stepping, but it worked flawlessly.
Is the Guzunty capable of controlling the stepper autonomously? Definitely. That would be the logical next step. It would be possible to configure a Guzunty to accept a write in an SPI register where you want the stepper to go and receive an interrupt when it’s done. I also think controlling 2 simultaneous steppers would be possible from one Guzunty.
That is magnificent. I would really like to be able to control 4 steppers at the same time from one Pi. If this can be done straight through Guzunty Pi and the TI controller chip, I’m all for it. I would love to be able to cobble something together using a hacked up PC power supply for 24 volts dc to push the steppers. I don’t need the 3d printer to be all that fast. I just want it to do a good job and be as inexpensive as is possible.
4 steppers? Hmm, I consider that a challenge! You’d need 1 of those 754410s for each motor of course. Pretty sure they handle 24 volts ok.
I share your interest in 3d printers, esp. ones that can replicate themselves. The right design there could easily go viral.
I’m continuing to experiment with driving steppers. Controlling 4 steppers is tantalizingly just out of reach.
I think I’ll publish a 3 motor version while I continue tweaking the design to squeeze in the 4 that you need.
Oh, and ‘yes’ to the earlier question of ‘can I have different cores in different boards’.
[…] Raspberry Pi ก็มี Guzunty Pi ครับ ไปเห็นมาจากเว็บ RasPi.TV (งานนี้ RasPi.TV ซื้อมาใช้เองครับ) […]
Looks fantastic! Wish I could order one for myself (I’m in Cape Town :-( )
I’m interested to know how one programs the CPLD?
Hi Benjamin,
You can order one. Just use the ‘Guzunty-world’ link. In fact, I’ll be shipping some boards to some fellow South Africans this very week.
You program the CPLD by using a loader that runs on your Pi. You can install the loader from the Guzunty GitHub web site.
You run the loader from the command line and specify as a parameter which core file (*.xsvf) you want to use. Like this:
sudo gz_load gz_test.xsvf
It’s pretty painless and takes under a minute to do the programming. The program is stored in flash on the CPLD, so you don’t need to reprogram after power down or restart of the Pi.
The core files you can just download from the Guzunty GitHub site, or get the Xilinx web pack and make your own!
Hope that helps,
Derek
Oh, sorry Benjamin, maybe I was too hasty. You mean you’d like a kit?
You really are better off sourcing the parts locally, but if that is a difficulty I can certainly work out how much it’ll cost to ship a kit out to you. You can then decide if that works for you or not.
Please give me a few days to get that done and check back here.
best,
Derek
The parts I sourced here in the US cost roughly $26 per board to populate with some extra parts thrown in if I messed up on a few things. I also bought an extra XILINX chip in case I fried one.
It’s probably best to get together and group buy the parts if you can find others who are interested. If you buy just one or two of anything they’re usually twice the price that you can get per item if you buy 10. I regularly buy 10s of electronic bits “because it’s cheaper” :rotfl: (in the long run – IF you use them all)
Hmmm, that seems rather high. You did find the Bill of Materials on GitHub, right?
https://github.com/Guzunty/Pi/tree/master/bill%20of%20materials
If you post the supplier and the list of part numbers, I’ll take a look and comment on the part costs.
It is not uncommon for a given supplier to have isolated items which seem to cost much more than others, which is another way of saying you do need to shop around to get the BOM cost down to the minimum. About $15 should be achievable if you are prepared to use multiple suppliers and organise group buys as Alex is suggesting.
BTW, it looks like we’ll be able to offer kits to folks in the USA in the next month or two.
Hi Benjamin,
I got an estimate for international shipping. It’ll be about £6 to send a kit to South Africa, so the total would be £16. By my calculation that would be just over R.220.
Let me know if you are interested and I will add a Paypal link for you.
Hi Derek,
Thanks for providing a great little piece of hardware, should keep me occupied for hours providing I can get it to work. I have constructed the Guzunty and downloaded all the software needed to get it to work as per your instructions on Github.
Whenever I try to run the test I get the following:
pi@raspberrypi ~ $ sudo gz_load gz_test.xsvf
Guzunty loader v5.01, portions courtesy Xilinx, Inc.
XSVF file = gz_test.xsvf
ERROR: Cannot open file gz_test.xsvf
pi@raspberrypi ~ $
Below is a list of all the files and directories that reside on my Pi:
pi@raspberrypi ~ $ ls
bcm2835-1.17 Documents gertboard_sw omxplayer_0.0.1-arm.deb
bcm2835-1.17.tar GB_Python.zip Guzunty python_games
Desktop gertboard_python_test indiecity Scratch
pi@raspberrypi ~ $ cd Guzunty
pi@raspberrypi ~/Guzunty $ ls
Pi
pi@raspberrypi ~/Guzunty $ cd Pi
pi@raspberrypi ~/Guzunty/Pi $ ls
bill of materials design files README.md schematic src
pi@raspberrypi ~/Guzunty/Pi $ cd src
pi@raspberrypi ~/Guzunty/Pi/src $ ls
gz_16i8o gz_24i1O gz_25i gz_4p8o8i gz_arduino gzlib gz_test
gz_16o8i gz_24o1I gz_25o gz_8p8i gz_led_driver gz_load
pi@raspberrypi ~/Guzunty/Pi/src $ cd gz_load
pi@raspberrypi ~/Guzunty/Pi/src/gz_load $ ls
gz_load lenval.h Makefile micro.h ports.c ports.o uart.c
lenval.c lenval.o micro.c micro.o ports.h README.md uart.h
pi@raspberrypi ~/Guzunty/Pi/src/gz_load $ cd
pi@raspberrypi ~ $ cd Guzunty/Pi/src/gz_test
pi@raspberrypi ~/Guzunty/Pi/src/gz_test $ ls
gz_test gz_test.rpt gz_test.vhd Makefile
gz_test.c gz_test.ucf gz_test.xsvf
pi@raspberrypi ~/Guzunty/Pi/src/gz_test $ ls
gz_test gz_test.c gz_test.rpt gz_test.ucf gz_test.vhd gz_test.xsvf Makefile
pi@raspberrypi ~/Guzunty/Pi/src
I wonder if you have any suggestions as to where my problem can be.
I have also obtained Xilinx WebPack version 5.2 and was wondering if there are any simple tutorials that can get me going on this.
Thanks a million for a great product
Have you been through this lot of instructions? (you don’t need the optional bits for this)
https://github.com/Guzunty/Pi/wiki/Get-your-Pi-set-up
Is SPI enabled?
Hi Alex,
Thanks for your reply. Yes I followed all the instructions in your attached link, including all the optional ones and have enabled SPI.
I even tried to load the gz_16i8o and got the same error message
The test waveform folder has the following files in it:
gz_test
gz_test.c
gz_test.rpt
gz_test.ucf
gz_test.vhd
gz_test.xsvf
Makefile
all of the file permissions show read and write
The gz_load folder has the following files in it:
micro.o
micro.c
micro.h
ports.c
ports.o
ports.h
uart.h
uart.c
lenval.h
lenval.c
lenval.o
gz_load
Makefile
README.md
and again all of these files have read and write permissions.
Hi Ian,
From the looks of it, you’re trying to execute the load from the root of your home directory.
Try:
cd ~/Guzunty/Pi/src/gz_test
before executing the load command. Please let me know how that works for you.
Best,
Derek
Thanks Derek, that worked a treat. I now get this:
pi@raspberrypi ~ $ cd Guzunty/Pi/src/gz_test
pi@raspberrypi ~/Guzunty/Pi/src/gz_test $ sudo gz_load gz_test.xsvf
Guzunty loader v5.01, portions courtesy Xilinx, Inc.
XSVF file = gz_test.xsvf
SUCCESS – Completed XSVF execution.
Execution Time = 10.720 seconds
pi@raspberrypi ~/Guzunty/Pi/src/gz_test $
but when I place the run/program jumpers into the run position the cpld seems to do nothing. The state of all the pins with the exception of configurable input/output pins sit at a constant -3,281 vdc with respect to +3,3v ie. they are all low.
I have the Rev 1 256mb type of board and was wondering if this has any bearing on the problem.
I’ve never moved the jumpers since building the board and mine works fine. :)
Didn’t even know you were meant to? Perhaps you’re not?
Hi Ian,
Congratulations. You programmed the CPLD successfully. :-)
Why isn’t it doing anything? Generally a core won’t do anything without being stimulated by a program running on the Pi. In the case of gz_test, it requires a hardware clock input (as many regular chips do). You turn on the clock to it by running the gz_test program:
$sudo ./gz_test
See the Construction Guide > Program and Test section for more details.
As for the programming jumpers, you don’t need to move them very often. You typically only move them if you need to send the states of the CPLD pins GTS1, GTS2, GSR1 or FB4MC8 to the Rasperry Pi GPIO. None of the sample projects require this, for example.
Hi Derek,
Thanks for your help and patience.. finally got it up and running with lots of flashing LED’s
Finally, I almost missed your last question, Guzunty is known to run fine with both Rev 1 and Rev 2 RPi’s.
Best,
Derek
Ian,
Sorry, but ISE 5.2 is not going to work for you. Until we can provide JEDEC programming, I recommend ISE 12 or later.
A tutorial for installing and using ISE is in my to do list. :-)
Best,
Derek
Thanks Derek
I went ahead and made kits available worldwide.
enjoy,
best,
Derek
Great stuff Derek :-D
In other Guzunty news, I’ve got all the hardware/software systems working on the top secret project, but I still have to build the thing ;)
Would it be possible to source just the parts without the boards directly from you Derek? I don’t mind spending a bit extra if I can get everything in one place. :-D
Hi Scott,
Sure, I can do that. I only recently added the worldwide kit purchase option so you didn’t get the choice, so it’s the least I can do :-).
I’ll mail you direct to discuss the details.
Hi Scott,
Am I using the correct email address for you? I used the one PayPal is using.
Please ping me here if you didn’t receive anything from me.
Best
Derek
I’m sorry Derek. I have become otherwise occupied working on my new Rostock Max 3D printer and haven’t checked back here until now. My junkmail filter hid your email from me and it has probably been deleted. Please re-send your email and I’ll be looking for it this time.
No problem Scott, I mailed you again.
The servo core Alex mentioned in the article is now available on GitHub.
enjoy,
Derek
Is it unchanged or have you tweaked it?
The actual core is unchanged.
I have added all the canonical files, for example the waveform png to support the wiki page.
Next stop, stepper motor controller ;)
Alex,
I have bought the Guzunty, but cannot figure out how we write a simple program to output for a PWM signal. Is there any chance of a snippet of example code just to drive a pwm device in one direction.
Many Thanks
Tom
C or Python? If C, Derek’s the man to help you, if Python, I’ll have a look in my script and dig out the relevant bit for you. :)
Hi Alex,
Python please if you don’t mind. Just an example of how to do a PWM motor off the Guzunty.
Thanks
Tom
Would also appreciate some ‘example’ code for python.
Sorry, I’ve been so busy I completely forgot about that.
The below code uses the servo PWM core, the Guzunty Python bindings (GZ) and py-spidev for spi.
You can use the Guzunty module for SPI as well, but I was more familiar with spidev.
The following code will cycle an ESC up and down. It works, I’ve used it. Didn’t have time to create the simple example asked for but hope this will give you an idea.
# ESC control for Guzunty import GZ import time import spidev GZ.clock_ena(0, 80) # enables 5 MHz clock at about the right speed spi = spidev.SpiDev() # create spidev object spi.open(0,0) # normal Guzunty is on 0 top = 150 # highest PWM signal level (0-255 possible) bot = 20 # lowest PWM signal level # main loop try: while True: for x in range(bot, top): spi.xfer([0,x]) # [0,x] 0 is FB1_2, 1=5 2=6 3=8 if x % 10 == 0: print x time.sleep(0.05) for y in range(top, bot, -1): spi.xfer([0,y]) if y % 10 == 0: print y time.sleep(0.05) except KeyboardInterrupt: spi.xfer([0,0]) # kill the motor on CTRL-C exit except: spi.xfer([0,0]) # kill the motor on errorThank you, that’s EXACTLY what I have been looking for, for the past few hours.. You sir are a gentleman and a scholar.
If you have any issues finding/installing spidev – instructions for how to install it are in the README file for the Python Gertboard software
https://raspi.tv/download (mind you, the GZ module does have its own SPI driver, but I haven’t used it much).
I’ve only tested the code on a JETI Eco 18. Other ESCs may vary in how they work (particularly the auto ranging).
Hi Alex,
Many thanks for this help. Much appreciated.
You’re welcome. Sorry it took a bit longer than I thought it would. I needed to get a round tuit.
Hi Alex,
I tried to ‘import GZ’ but it says the module is not available. I have followed the instructions on the Guzunty web site twice now and run the test program to confirm the board works ok.
There’s something you have to install. I’ll have a look if I can find the instructions
You have to run setup.py
It’ll be somewhere in your cloned copy of the Guzunty software
Here it is on github
https://github.com/Guzunty/Pi/tree/master/src/gzlib/src
I’ve just ordered a board kit which I’m going to experiment with controlling stepper motors and servos. I’ve done this already via GPIO, but I’ve had problems with OS background tasks slowing my motor steps down, or even totally scuppering servo control (which is software controlled). The Guzunty looks like it will sort out these problems nicely!
Anyway I’ll start out with one of your pre-defined cores to get me going, but for stepper motor contol I will want to do more advanced things.
– Motor step acceleration
– Operating motors at the same time
I’m very quickly going to be getting into the world of core development… question is, how easy is this for a person who knows Java or C?
I had a a look at the downloads section of the Xilinx site to get their development tool and couldnt’ work out which tool was needed. There are 3, but it didn’t say which one is for the XC9500XL.
http://www.xilinx.com/products/design-tools/index.htm
Any pointers?
Thanks
Mark
Hi Mark,
You want ISE Webpack.
Beware, the download is HUGE! :(
The examples in gitHub are all in C, but I’m wondering if anyone knows if there is any support for controlling Guzunty in Java using the Pi4J libraries.
I guess other people might be interested if there is any Python development possibilities
Thanks
Yes,
For the record, there are a few Python examples too. :-)
There is at least one person using Pi4J with the Guzunty. I have not had time to try it myself, but Guzunty is not dependent on any one particular IO library, it can work with any one..