
Continuing with our theme of 7-segment displays driven directly from the Raspberry Pi’s GPIO using Python, I was asked for an explanation of the code from the previous post. In order to explain something, you first have to fully understand it, so I took some time to have a good look at the ‘business end’ of Bertwert’s code and figured out exactly how it works.
I’ve now put a full code walkthrough of that script in the comments section of the previous post.
Having done that, and having had a tweet from David Meiklejohn saying he’d done something similar in the past…
@RasPiTV Nice! Interesting to compare with a RPi 7-seg clock I did a while back, with similar Python code: https://t.co/AznHVJyfAW
— David Meiklejohn (@gooligumelec) November 16, 2015
…I had a look at David’s code, which reminded me that you can use Python list variables with RPi.GPIO to switch multiple ports at once. More on this, a bit later.
And Now Let’s Make a Countdown Ticker
So having ‘done’ a clock last time, today, I thought we’d have some fun with a simple countdown ticker. I wanted to see how fast we could drive the display, so I’ve made it count down from 9999 to 0 and placed it on an imaginary ‘stick of dynamite’. See it in action in the video…
Want To Have A Go?
If you’d like to have a go at this project, I have a limited number of kits available for £12 including global shipping. Here’s what’s in the kit. Pick yours up today and start playing with 7-segment displays on your Pi…
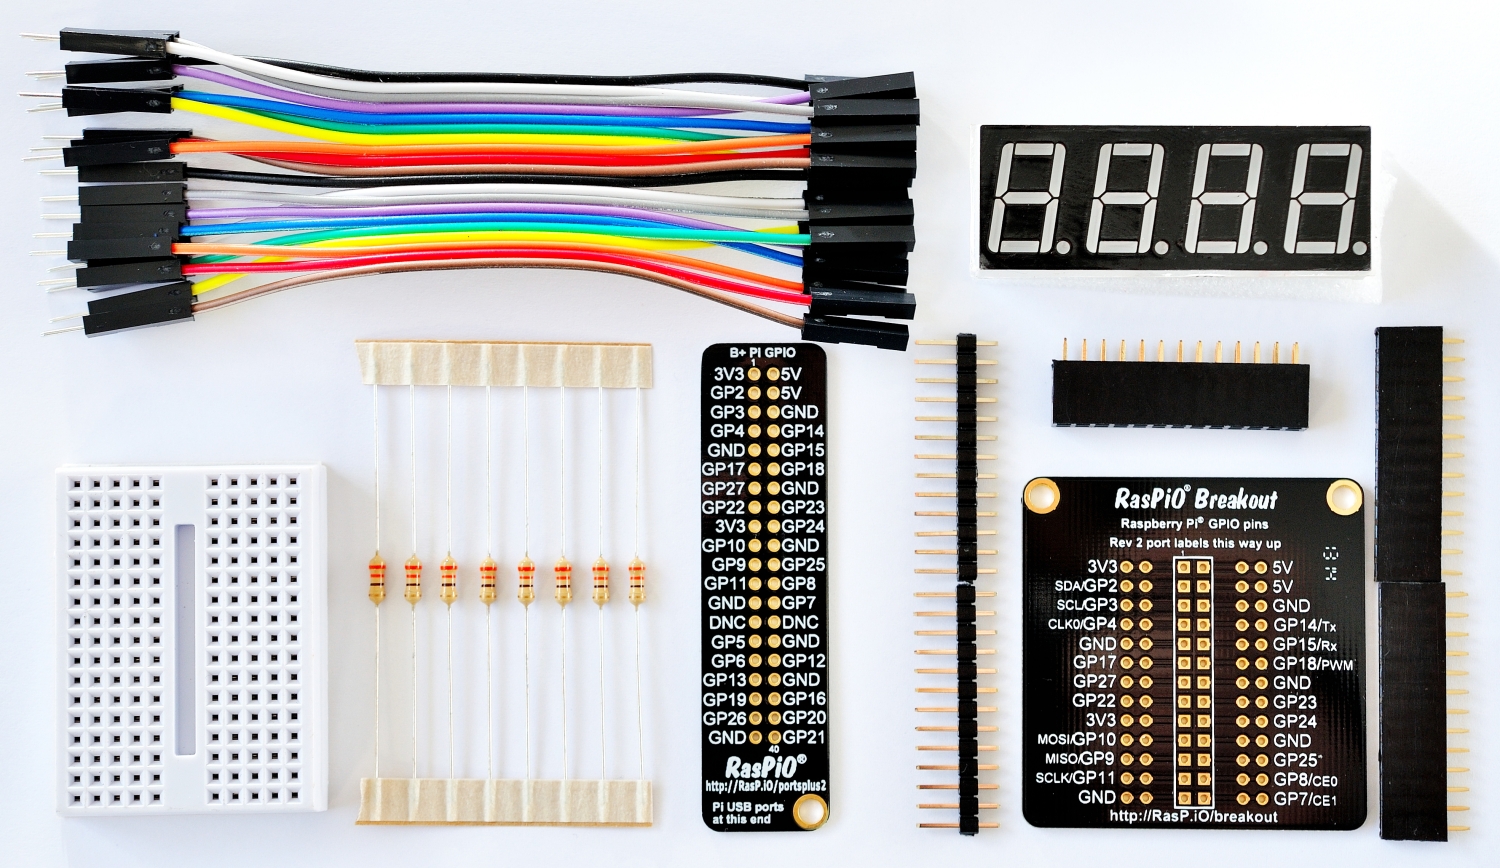
RasPiO 7-segments display tinkering kit
How To Create Characters
I also wanted to have a go at creating some other characters. You’re a bit limited with what letters you can create on a 7-segment display, but it’s fun to see what can be done. Let’s have a look at how it’s done…
We need a diagram to help us here…
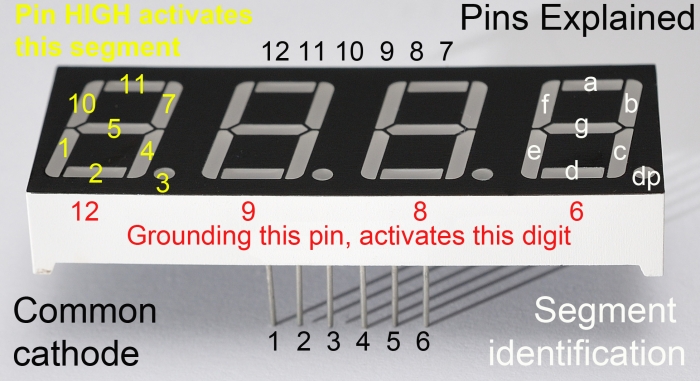
White lettering showing segment IDs
Look at the white lettering on the right-hand side. Each of the segments has a name a-g or dp.
In our dictionary in the Python script, each entry has an 8 digit list of 1s and 0s. The first list element corresponds to a and they go in alphabetical order, ending with dp (decimal point).
   #(a,b,c,d,e,f,g,dp)
'L':(0,0,0,1,1,1,0,0),
Our letter L has a, b & c inactive (0), d, e & f active (1), g and dp inactive (0).
So let’s suppose we wanted to create the letter P. Looking at the diagram, we can make a P if we light all of the segments except for c, d and dp. But we have to map this in the correct order for our dictionary. So here’s what we arrive at…
   #(a,b,c,d,e,f,g,dp)
'P':(1,1,0,0,1,1,1,0),
So you add that entry to your dictionary – it doesn’t matter where, but make sure you have a comma at the end of the line to match the correct format (the last entry has a }).
And that’s really all there is to it. Some letters are difficult/impossible. I couldn’t do an X, so my X is the same as the standard 7seg H. All letters with diagonal lines on are tricky for this kind of 7 segment display.
Now onto the code tweaks…
RPi.GPIO Can Use A List Variable
I knew this was possible, but I’d never used it before. Using this feature of RPi.GPIO allows us to completely eliminate our for loop in range(0,7): loop. This makes our code shorter, simpler and easier to understand.
for loop in range(0,7):
    GPIO.output(segments[loop], num[s[digit]][loop])
…becomes…
GPIO.output(segments, (num[s[digit]]))
…which means one less loop and one less level of slicing to get our heads around. In (num[s[digit]]) we’re finding the segment values in our dictionary num for the nth digit of our display string s.
Another way we can simplify the code is to change…
for segment in segments:
    GPIO.setup(segment, GPIO.OUT)
    GPIO.output(segment, 0)
We can do all this with one line of code…
GPIO.setup(segments, GPIO.OUT, initial=0)
…using our list variable segments and taking advantage of the fact that we can set an initial value for each port at the time of setup, using initial=0 or initial=1.
For these two tweaks to work correctly, we have to add a ‘,0‘ to the end of each character defined in our dictionary num because we defined 8 ports in our list variable segments (the last entry represents the decimal point).
I’ve incorporated all of the above changes into the new code. I’ve also changed s to display_string to make the code easier to read and understand.
Here’s The Ticker Code
from RPi import GPIO
import time
GPIO.setmode(GPIO.BCM)

# GPIO ports for the 7seg pins
segments =  (11,4,23,8,7,10,18,25)
# 7seg_segment_pins (11,7,4,2,1,10,5,3) +  100R inline
GPIO.setup(segments, GPIO.OUT, initial=0)

# GPIO ports for the digit 0-3 pins
digits = (22,27,17,24)
# 7seg_digit_pins (12,9,8,6) digits 0-3 respectively
GPIO.setup(digits, GPIO.OUT, initial=1)

#          (a,b,c,d,e,f,g,dp)
num = {' ':(0,0,0,0,0,0,0,0),
    '0':(1,1,1,1,1,1,0,0),
    '1':(0,1,1,0,0,0,0,0),
    '2':(1,1,0,1,1,0,1,0),
    '3':(1,1,1,1,0,0,1,0),
    '4':(0,1,1,0,0,1,1,0),
    '5':(1,0,1,1,0,1,1,0),
    '6':(1,0,1,1,1,1,1,0),
    '7':(1,1,1,0,0,0,0,0),
    '8':(1,1,1,1,1,1,1,0),
    '9':(1,1,1,1,0,1,1,0),
    'b':(0,0,1,1,1,1,1,0),
    'y':(0,1,1,1,0,1,1,0),
    'E':(1,0,0,1,1,1,1,0),
    'A':(1,1,1,0,1,1,1,0),
    'L':(0,0,0,1,1,1,0,0),
    'X':(0,1,1,0,1,1,1,0)}

def seg():
    for digit in range(4):
        GPIO.output(segments, (num[display_string[digit]]))
        GPIO.output(digits[digit], 0)
        time.sleep(0.001)
        GPIO.output(digits[digit], 1)
try:
    n = 9999
    while n >= 0:
        display_string = str(n).rjust(4)
        if n == 0:
            display_string = ' byE'
        seg()
        n -= 1
    n = 1000
    while n >= 0:
        if n <= 500:
            display_string = 'ALEX'
        seg()
        n -= 1
finally:
    GPIO.cleanup()
Code Walk-through
Lines 1-2 import the libraries we need
Line 3 sets up BCM mode for RPi.GPIO
Lines 6-8 create a list variable for the segment ports and initialise them all to outputs at 0
Lines 11-13 create a list variable for the digit ports and initialise them all to outputs at 1 (remember setting these ports to 0 activates the digits on the 7-seg)
Lines 16-32 define our dictionary num of characters to display. Notice we’ve added a few new ones from last time, namely b, y, E, A, L, & X.
Lines 34-39 I’ve taken the main segment/digit driving code and put it in a function. This is so that we can reuse the same code in two different loops in our main code block without repeating it.
Line 35 iterates through the digits.
Line 36 GPIO.output(segments, (num[display_string[digit]])) sets all of the segments’ GPIO ports in one line using list variable segments and looking up the appropriate display_string character for the current digit in our dictionary num
Lines 37-39 activate our digit for a millisecond and then deactivate it. Then the loop can go to the next iteration
Lines 40-55 contain our main program block, wrapped with a try: finally: so that we can clean up our GPIO ports on exit, error, or exception.
Lines 41-47 First we set our counter n to 9999, then we start a loop that continues until we reach 0. Line 43 displays the current value of our counter. 44-45 check if we’ve got to 0 yet, and if we have, changes the display_string to ” byE”. 46 calls the seg() function we defined in 34-39 to display the current display_string. 47 decrements the counter value by 1. Then the loop starts again.
Lines 49-53 determine what happens when our countdown is completed. In 48 we set n back to 1000, so that we can display ” byE” for 500 iterations. In line 50, once n goes below 500 we change the display_string to “ALEX” (although the X is more of an H – it’s the best we can do on a 7-seg). Line 52 calls our seg() function to display the current display_string.
Want To Have A Go?
If you’d like to have a go at this project, I have a limited number of kits available for £12 including global shipping. Here’s what’s in the kit. Pick yours up today and start playing with 7-segment displays on your Pi…
RasPiO 7-segments display tinkering kit
“imaginary ‘stick of dynamite’” A countdown ticker for cooking eggs may be a better way to use a raspberry
or maybe a countdown ticker for cooking raspberries xD
Nice, hope you didn’t get too badly injured by your polite bomb! ;-)
Today’s tips – good idea to separate seg() out into its own function, but what would be even better would be to pass display_string as a parameter to the function, rather than treating it as a global variable, so you could then do:
seg('Andy')
instead of having to do:
display_string = 'Andy'
seg()
(I guess my name is better 7-seg-able than yours!)
Although thinking about it a bit more, if you did do that I guess you’d need to rearrange your loop to:
n = 9999
while n >= 0:
    seg(str(n).rjust(4))
    n -= 1
n = 1000
while n >= 0:
    if n > 500:
        seg(' byE')
    else:
        seg('ALEX')
    n -= 1
And you could make it even shorter as:
for n in range(9999, -1, -1):
    seg(str(n).rjust(4))
for n in range(1000):
    if n < 500:
        seg(' byE')
    else:
        seg('ALEX')
7-segment displays are also able to easily display the characters "A b C d E F" which makes them useful for printing hexadecimal digits, should you ever need to do that.
And regarding your "I wanted to see how fast we could drive the display", I guess you could make it count down even faster if you made the time.sleep() value even smaller?
P.S. Any plans yet for a RasPiO Breakout Plus? (i.e. with the full 40-pin header)
…and to help build the num dictionary for custom characters, here’s a little handy helper function (that you can run in the interactive Python prompt):
def convert(char):
    chars = set(char)
    out = list()
    for c in "abcdefgp":
        out.append(int(c in chars))
    return tuple(out)
(Note that it uses ‘p’ instead of ‘dp’ for the decimal point)
So for example to get a ‘0’ we call convert(‘abcdef’) as the segments we want turned on, and it returns us (1, 1, 1, 1, 1, 1, 0, 0)
However it doesn’t matter what order you pass in the segment-string, so you could call convert(‘fabedc’) and it would still give us (1, 1, 1, 1, 1, 1, 0, 0)
To get the value for just lighting up the decimal point, we’d call convert(‘p’), and it returns (0, 0, 0, 0, 0, 0, 0, 1), so we could add:
‘.’: (0, 0, 0, 0, 0, 0, 0, 1),
to your num dictionary above.
Or to get the value to light up just the horizontal segments, you can use convert(‘agd’).
P.S. Please could you do your magic indentation-markup-fixing on my comments? :)
Code fixed :) That helper function looks great as well. Saves having to work it all out. I wonder how it would handle an X? (Only one way to find out)
Looks like silly WordPress has done “too much” escaping? :-(
Edited – I didn’t actually change anythin, just deleted the < and put it back. Seems OK now (at my end - weird)
Looks fine now, thanks Alex!
Alex – I got the kit going, and it works fine. I also have a 4-dig 7-seg common ANODE display, and I know all its pin-outs. What changes to the wiring/code would I have to make to get it going?
I would expect you’d need to invert the logic in the GPIO commands so that 1 becomes 0 and 0 becomes 1. (I think this would include the dictionary entries as well.)
Thanks Alex – you are right – the dictionary entries need inverted as well as the GPIO.output() digits. It works a treat!
Now wouldn’t that be an interesting thing to do with the RasPiODuino?
Yes it would :) I’ve not got to it yet, but I do want to have a go at driving one of these from a duino as well :)
I’ve just spent a few hours over the holiday weekend getting the Duino to talk to a 7-segment display. If you would like a copy of my code and Word document with the listings and comments please contact me at arduinolink (at)gmail.com and I will send you the files. The sketches include suppressing leading zeros and displaying floating point values with the decimal point.
Hi Alex – thanks for the kit and your helpful post. I’ve added a button to my breadboard, and the display does nothing til you press it. Then it counts down from 60 seconds until it gets to 0 when it clears the display and waits again for you to hit the button, starting the count down again.
Excellent. That looks good. And a creative way to wire directly to the pins on the 7 seg as well. I’d wondered if they’d be a good fit like that but not tried yet. 😀
Here’s where my seven seg kit has ended up.
That’s brilliant. :)
i had no idea what python or raspberry pi was until 10 minutes ago. i have no coding experience at all. at 40, after doing some intense reading for the last 10 minutes, i must say i am very intrigued. very intimidated, but intrigued. now looking at your project and the language, i’m blown away. it actually looks like hours of fun!!! do you still have these kits available?!
Yes I still have a few :)
Amazing.. What about connect this countdown to the “next train arrival”?
Suppose to connect the component to the web, to the train website…. you can get the next arrival time (considering also the delay :-D). Then you can count the difference in seconds between the real arrival time and the current timestamp.
What do you think about this?
Thank you
Best Regards
Riccardo
Yup, entirely possible. Have a look at the bottom of https://www.raspberrypi.org/blog/friday-grab-bag-2/ :-)
Although it _might_ be more convenient to display minutes and seconds (with a dot in between?), rather than just seconds ;)
Can Anyone Tell me please how i can make a Timer which starts from 15:00 and goes on 15minutes?
Do I understand that you want an accurate 15 minute countdown timer showing the seconds ticking by?
Yes. Thats right
That was a nice little problem for a dull afternoon.
I think this is what you want.
I’ve probably got the segment and columns connected to different GPIO pins but they are all commented on at the top of the script. Just change the pin numbers to your connection in the script.
# Retro Display 15min timer V2
# Tony Goodhew 29 April 2017

# Import required libraries
import RPi.GPIO as GPIO
import time

GPIO.setwarnings(False)
# Connections
#    A
#  F   B
#    G    Segment positions
#  E   C
#    D  dp

#Colour Br R  O  Y  G  Bl P G
#       A  B  C  D  E  F  G dp
LEDs = [14,15,18,23,24,25,5,6] #GPIO pins
#Colour W  Bk Br R
#       Th H  T  U
cols = [12,16,20,21]   #GPIO pins

# Tell GPIO library to use GPIO references
GPIO.setmode(GPIO.BCM)
# Setup LED pins as outputs
for x in range(8):
    GPIO.setup(LEDs[x], GPIO.OUT)
    GPIO.output(LEDs[x], 0)
# Setup col pins as output pins
for x in range(4):
    GPIO.setup(cols[x], GPIO.OUT)
    GPIO.output(cols[x], 0)

#one row per digit - 0 to 9
nums =[1,1,1,1,1,1,0,  # 0
       0,1,1,0,0,0,0,  # 1
       1,1,0,1,1,0,1,  # 2
       1,1,1,1,0,0,1,  # 3
       0,1,1,0,0,1,1,  # 4
       1,0,1,1,0,1,1,  # 5
       1,0,1,1,1,1,1,  # 6
       1,1,1,0,0,0,0,  # 7
       1,1,1,1,1,1,1,  # 8
       1,1,1,0,0,1,1]  # 9

def show_num(val,col,dp): #Displays one digit briefly
    for x in range(4): GPIO.output(cols[x],1)
    GPIO.output(cols[col], 0) # Turn col ON
    offset = val * 7
    for p in range(offset,offset + 7):
        x=p-offset
        if nums[p] == 1:
            GPIO.output(LEDs[x], 1)
        else:
            GPIO.output(LEDs[x], 0)
    # Decimal point needed?
    if dp == True:
        GPIO.output(LEDs[7], 1)
    else:
        GPIO.output(LEDs[7], 0)
    time.sleep(0.005) #temp delay
    GPIO.output(cols[col], 1)  # Turn col off

def show_number(val):  #Base 10
    digits =[0,0,0,0]
    abs_val = abs(val)
    temp_val = abs_val
    digits[0] = temp_val//1000
    temp_val = temp_val - digits[0] * 1000
    digits[1] = temp_val // 100
    temp_val = temp_val - digits[1] * 100
    digits[2] = temp_val // 10
    digits[3] = temp_val % 10
    for cycle in range(5):
        for col in range(4):
            show_num(digits[col],col,(col == 1))

# +++ Main +++
mins = 15
sec = 0
n = mins * 100 + sec
x = time.time()
y = x + 1.0
try:
    while mins > -1:
        print(n)
        while x < y:
            show_number(n)
            x = time.time()
        sec = sec - 1
        if (sec == -1):
            sec = 59
            mins = mins - 1
        n = mins * 100 + sec
        y = y + 1.0

except KeyboardInterrupt:
    GPIO.cleanup()

print('\nDone')
You should be able to copy and paste this script into Python 3.
Best of luck. Please let me know how you get on with it.
Hello Tony.
I have try it and it’s Work!
Many thanks for your Help!
Have a good Day.
Hello. I wanna start a .wav on the same time with the Timer.
Where should i buil in this code: os.system(‘aplay /home/pi/sound.wav’)
Have you a idea?
hello if you add a few buttons that its function is to increase or decrease the account, how would the program?
Greetings
Do you want an ‘increase’ button and a ‘decrease’ button to just change the value displayed?
Yes it is, Thanks
This is the right file . Sorry Alex
# Retro Display Up/Down switches V2 # Tony Goodhew 31 October 2017 # Display range -999..0..999 # Import required libraries import RPi.GPIO as GPIO import time GPIO.setwarnings(False) # Connections # A # F B # G Segment positions # E C # D dp #Colour Br R O Y G Bl P G # A B C D E F G dp LEDs = [14,15,18,23,24,25,5,6] #GPIO pins #Colour W Bk Br R # Th H T U cols = [12,16,20,21] #GPIO pins # Tell GPIO library to use GPIO references GPIO.setmode(GPIO.BCM) # Setup LED pins as outputs for x in range(8): GPIO.setup(LEDs[x], GPIO.OUT) GPIO.output(LEDs[x], 0) # Setup col pins as output pins for x in range(4): GPIO.setup(cols[x], GPIO.OUT) GPIO.output(cols[x], 0) # Set up buttons up = 3 # Up button on GPIO pin 3 - 10K Ohm physical pull up down = 2 # Down button on GPIO pin 2 - 10K Ohm physical pull up GPIO.setup(up, GPIO.IN) # Set switches as inputs GPIO.setup(down, GPIO.IN) #one row per digit - 0 to 9 nums =[1,1,1,1,1,1,0, # 0 0,1,1,0,0,0,0, # 1 1,1,0,1,1,0,1, # 2 1,1,1,1,0,0,1, # 3 0,1,1,0,0,1,1, # 4 1,0,1,1,0,1,1, # 5 1,0,1,1,1,1,1, # 6 1,1,1,0,0,0,0, # 7 1,1,1,1,1,1,1, # 8 1,1,1,0,0,1,1, # 9 0,0,0,0,0,0,1, # - 0,0,0,0,0,0,0] # Blank def show_num(val,col,dp): #Displays one digit briefly for x in range(4): GPIO.output(cols[x],1) GPIO.output(cols[col], 0) # Turn col ON offset = val * 7 for p in range(offset,offset + 7): x=p-offset if nums[p] == 1: GPIO.output(LEDs[x], 1) else: GPIO.output(LEDs[x], 0) # Decimal point needed? if dp == True: GPIO.output(LEDs[7], 1) else: GPIO.output(LEDs[7], 0) time.sleep(0.005) #temp delay GPIO.output(cols[col], 1) # Turn col off def show_number(val): #Base 10 digits =[11,0,0,0] # Left display digit blank if val < 0: digits[0] = 10 # Left display digit "-" abs_val = abs(val) temp_val = abs_val digits[1] = temp_val // 100 temp_val = temp_val - digits[1] * 100 digits[2] = temp_val // 10 digits[3] = temp_val % 10 for cycle in range(5): for col in range(4): show_num(digits[col],col,0) # +++ Main +++ n = 0 # Initial value of display print("Left button decrease value") print("Right button to increase value") print(" CTRL+C to HALT") try: while True: switches = GPIO.input(down) + GPIO.input(up) * 2 if switches == 2: n = n-1 if n 999: n = 999 show_number(n) except KeyboardInterrupt: GPIO.cleanup() print("\nDone")No worries :) It looks like the syntax highlighter might have “eaten” some of the
<and>symbols though :(I’ve got no idea what you’re trying to do with “switches = GPIO.input(down) + GPIO.input(up) * 2” ?? It would be much easier to just read each switch independently in separate if-blocks.
You do not have to deal with both switches down together. Illogical but somebody will try it!
Ahh, then given that you’ve documented the switch GPIOs as being wired to pull-ups, I guess:
switches == 3 means nothing is pressed
switches == 2 means only the down-button is pressed
switches == 1 means only the up-button is pressed
switches == 0 means both buttons are pressed
?
Maybe it was a copy’n’paste error, but there seems to be no handling of ‘switches == 1’ in your code?
That is correct. Only two of the possible outcomes need to be dealt with, the others can be ignored.
arduinolink(at)gmail.com is my secondary email address. Send me a message and I’ll email you the full code.
The problem is that this comment software uses ‘greater than’ and’ less than’ as formatting indicators and I do not know what code to use to format python correctly.
Best wishes
Tony
Some of my code is missing from the upload. it has also lost greater than and less thans. Missing code is between these characters. What do I wrap the code in to get it to display correctly?
Sadly there is nothing you can do.
Even at my end some of the < and > symbols get removed. It’s pretty annoying really, but not much I can do.
For code fidelity it’s batter to shove it on Github or pastebin and put a link in the thread :)
Content Mismanagement Systems, hey? ;-)
For these kinds of one-off scripts I like using https://gist.github.com/
I’ve put the code in pastebin
https://pastebin.com/20HrQTHE
I hope you can get it as I’ve not used it before.
Alex, can us please remove the previous mis-displayed posts?
Done :)
hi, excuse me send an email to your email, Thanks
Did you get the email? Have you got the code working?
How do you change a letter into numbers? (like how you did it in your code) I want it to show ‘Hello’ when my Pi starts up. Thanks a lot!
Like this:
‘b’:(0,0,1,1,1,1,1,0),
‘y’:(0,1,1,1,0,1,1,0),
‘E’:(1,0,0,1,1,1,1,0),
‘A’:(1,1,1,0,1,1,1,0),
‘L’:(0,0,0,1,1,1,0,0),
‘X’:(0,1,1,0,1,1,1,0)}
Hello Tony
Could you please put again the code in the next link https://pastebin.com/20HrQTHE
it is not available now.
Thanks
Hi Jos
send me and email, see above, ardui…@gmail and I will send it to you
Sorry for delay – I’ve been away – retirement is so much fun!
Regards
Tony
How would I turn this into an up-counter, with the same message being displayed after reaching 0-9999? I think I’ve gotten it to properly count 0 to 9999, but the message doesn’t display afterwards. What gives?