The Raspberry Pi 3, launched this week, is more powerful than the Pi2. It also requires a bit more electrical power if you’re going to be hammering those four A53 CPU cores. How much more? The recommended PSU is 5.1V, 2.5A, which is 0.5A higher than for previous Pis.
That doesn’t mean the Pi itself needs that much, but with four USB ports onboard, the PSU has to cater for power-hungry USB devices as well. I usually publish some power measurements each time a new Pi is released. But this time I learnt something new about the way I do my measurements, and I felt it was important to share it. All measurements have their limitations and it’s important to understand them.
I’m well aware that I do not know everything and have learnt an awful lot through the Raspberry Pi. Not knowing something is not shameful or shocking – as long as you don’t pretend to be what you are not. I’m here to learn and, hopefully, to pass on what I learn to others.
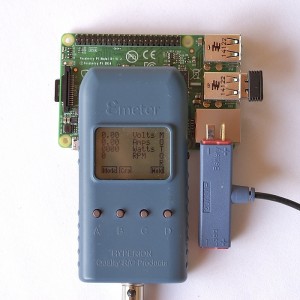
To make my Pi power measurements, I use my Emeter (essentially a multimeter with a calibrated 20A shunt) and a bench PSU.
It’s useful to do this because I can see if the readout on the PSU matches that of the eMeter. This gives me a useful sanity check of the measurements. But I’ll let Gordon Hollingworth explain the limitations of my measurement approach…
The problem with those measurements is that they don’t measure instantaneous peak power consumption which is extremely important. When your processor kicks off to do something important it can easily triple the power consumption for a few micro seconds. You’ll not notice this on a DVM…
What Does This Mean?
It means that my Emeter measurements are…
- fine for looking at overall power consumption, for example if you want to work out how long your battery will last for
- not so good for choosing the rating of your PSU, which needs to take instantaneous peak power consumption into consideration
So, when specifying your PSU, follow the official guidelines. But there is one further point to bear in mind – the “USB budget” (also from Gordon)…
But we do assume 1.2A continuous for the USB supplies, so if you’ve got nothing plugged in there then you’re looking at 1.3A min instead… But considering HDDs can pull 2A from a USB connector (when the spec says a maximum of 500mA you have to wonder why PC manufacturers allow this)
This explains the difference between what is specified and what I measure. It’s important to understand that the 2.5A is specified to work in pretty much all circumstances you can think of. But in many cases, a bit less will be OK, depending on what you’ve got plugged into your Pi.
OK. With the preliminaries over, let’s get on with the measurements…
‘Standard’ Tests
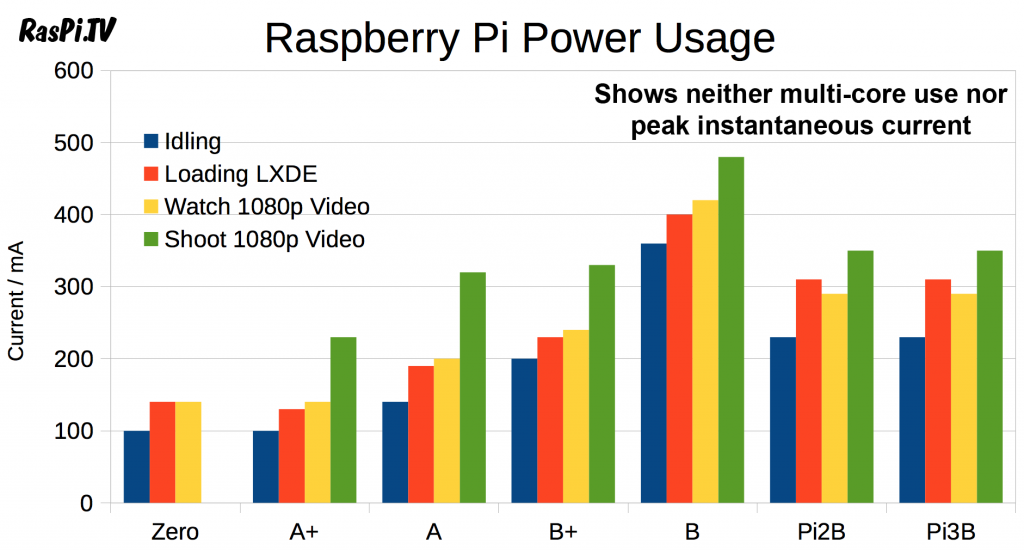
These tests are done as a comparison of all consumer Pi models. The current consumed is measured while the Pi is…
- Idling
- Loading LXDE
- Watching 1080p video
- Shooting 1080p video (without saving it)
As you can see clearly in the chart and table, these were all exactly the same as the Pi2B. I was surprised, but probably shouldn’t have been because the above tests don’t really test the differences due to the more powerful CPU cores.
The current draw when in shutdown state was 0.06A
Multi-threaded CPU Tests
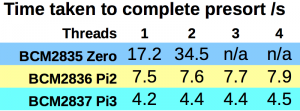
I ran the same tests I created for Pi2. Other people do “proper official” benchmarks. I wanted to do something fun. (We’re sorting the Scrabble word list again.)
The Python script and data file is on github if you want to do your own…
git clone https://github.com/raspitv/pi2test/

cd pi2test

python Pi2test.py
Here’s where differences start to become apparent. Hammering all four Pi3 cores takes 480 mA more than idling, whereas the corresponding Pi2 figure was 190 mA. And don’t forget these measurements are blind to peak instantaneous current.
Also don’t forget that the Pi3 “does the job” in a little over half the time using a little under twice the power. Quantifying this…
7.9s * 420mA = 3318 mAs for Pi2
4.5s * 720mA = 3240 mAs for Pi3
So, for a given “piece of work”, you might argue that the overall power budget favours the Pi3, but the difference is not large and a lot more exhaustive work on this would be needed to draw any proper conclusions.
But you can safely say that, for these tests, the Pi3B is nearly twice as fast as the Pi2B. I’m sure other people will publish other benchmark tests (if they haven’t already).
WiFi Tests
Since the Pi 3 has built-in WiFi I thought I’d try to test the amount of power this consumed as well. The cleanest way I could think of testing this was just to download a file in the command line. So I downloaded the RasPiO Duino manual which is about 17 MegaBytes…
wget https://rasp.io/wp-content/uploads/2015/04/raspio-duino.pdf
This was done several times. The idle current was 0.24 Amps, with occasional fluctuations to 0.28A. The first time, the file downloaded at 1.7 MB/s and the current peaked at 0.36 Amps. Trying several more times, I was unable to repeat this. Further attempts were all around 500 kB/s and peaked at 0.31 Amps with a reading of 0.28-0.29 Amps most of the time.
So, not very conclusive, but we can deduce that hard use of the onboard WiFi adds 40-100 mA (but it’s ~40 mA most of the time).
Summing Up
The Pi3B uses about the same power as the Pi2B except when the A53 CPU cores are being pushed. Then it can use ~300 mA more than Pi2B, but will get the job done nearly twice as fast.
Stressing the WiFi adds 40 mA with occasional peaks up to 100 mA. But when not in constant use, the wifi adds no noticeable difference to the overall consumption.


Interesting and informative as usual, Alex. Thank you.
Hi Alex, thanks for this – informative and interesting as usual.
I spotted this article (below), on makezine and wondered if you’d seen any high core temps while running your tests?
http://makezine.com/2016/03/02/raspberry-pi-3-not-halt-catch-fire/
Thought you might find it interesting if you hadn’t seen it already. Essentially, a couple of users saw varied results r.e. temps, when stressing the cores. It doesn’t seem like anything that a modest heatsink wouldn’t cure – it’s just interesting reading while avoiding work :-D.
Thanks again for the article
Rich
I’ve been following a thread on the Pi forums where that was mentioned. One of the engineers said the Pi has been tested in an oven at very high temperatures and ran fine. One of the main reasons for the new recommendation that a heat-sink _might_ be a good idea is actually to do with physical safety (i.e. not getting burnt fingers). The issue I had with Gareth Halfacree’s findings is the large disparity between the onboard temp sensor and his IR camera-based measurement. It would be interesting to see what went wrong there.
I haven’t noticed any great heat myself, but I haven’t done a large amount of CPU hammering.
Thanks Alex, an excellent informative article as always!
One thing I noticed was Gordons statement about triggering an activity can cause “triple the power consumption for a few micro seconds”. If they really are “microsecond” spikes and they never get any longer (even with extremely intensive tasks), and it really does cause issues if these spikes aren’t satisfied, then it would seem to me that perhaps the Pi’s power rails are in need of some additional smoothing?
A potential “quick fix” solution could be something as simple as adding an electrolytic capacitor across the 5v and ground pins via the GPIO connector for example. If this does indeed reduce the spikes then we have a potential solution for users that wish run their Pi3’s from much lower current sources, potentially as low as 0.75A as long as its just the Pi. This opens up a whole world of USB battery packs, LiPo adapters (such as the Adafruit Powerboost) and even on the older Pi’s as I’ve always done; the USB port on their computers.
Also correctly smoothing at the Pi end rather than increasing the size of the power supply would be especially beneficial for users with long power leads where spikes in current are more likely to produce threatening voltage drops. (For example someone with a remote Pi and camera in a bird box and the PSU in the house)
I could be wrong about all this of course so if anyone has the time and a digital storage scope (unfortunately I only have a regular scope) it would be really interesting to actually see these spikes in real life, how long they are, and what effect if any adding a capacitor has.
If nobody has one I might go to a friendly local electronics service centre I know and ask them to do the tests as technically there’s no reason why a Pi without accessories can’t run on 750mA adapter (I have 2 original model A’s that have been running 24×7 since the day I bought them like this).
Well, I’m in the process of selecting and purchasing a 150Mhz digital storage scope… so perhaps I can help you out there… but in all honesty, I completely agree… if we’re talking about short period transients then it seems much more logical to add a bigger input smoothing cap to the Pi, say ~1000uF. The main reason a larger capacity USB supply will satisfy this problem is that it will have a larger output smoothing cap, but that cap would do much more good if it was at the Pi end of the power cable… so if you don’t need to power peripherals requiring more current then this would be a good choice, and will also help to insulate your system from mains fluctuations which are probably a much more likley culprit for unexplained crashes when you realise how primitive some of these small USB chargers actually are….
Consider this power supply:-
http://www.ebay.co.uk/itm/AC-DC-85-265v-TO-5V-1A-Switching-Power-Supply-Board-Module-220V-Industrial-Power-/272075869048?hash=item3f58fc4b78:g:skkAAOSwnipWbeDX
That is much larger/better constructed than most 1A USB chargers, and yet at the rated load it has 0.15v ripple… you have to consider that your USB charger is worse than that, and lets say it outputs 5.00v, and you loose 0.1v in the cable… now your 0.15v ripple takes you up to the very edge of what the Pi is capable of operating on… so any transients have the potential to cause you major issues.
Personally, when I ran a Pi on the end of a long wire, I ran it at 12v and attached a small buck converter to the Pi to do the voltage conversion at the Pi itself, so even if I dropped several volts on the wire (which was about 40′)… the Pi still got a nice stiff 5.1v.
I look forward to seeing the results, thanks James :)
Hi James if you want to look at microsecond / 10 MHz transients you will need a low resistance low inductance shunt as well – don’t be tempted to use your multimeter as a shunt as the usual internal shunts look quite inductive.
What’s the best thing to use for that John? Sandbar power resistor?
I was planning to use a 75mV 10A shunt, which is simpy a flat bar about 20mm in length, it should have minimal inductance, and should give me enough resolution without colouring the results.
What about the reports of a lot of heat being generated by the Pi3? Wouldn’t that imply that more power is being used by the CPU than the Pi2?
I think the above blog post clearly demonstrates that when the CPU cores are being pushed the Pi3 uses more power than the Pi2 per unit of time. That’s the trouble when people only “read the pictures”.
Interestingly… it also shows that more work gets done per unit of energy consumed,. so YMMV depending on your application it’s code quality and the type of process being executed
Indeed. That’s what I was trying to show with my mAs calculations. It would be very interesting to see whether this held true over a wide range of applications. I simply don’t have time to do the thorough testing that this would need to be statistically valid, but you can see what looks like around a 3% ‘efficiency’ improvement on the A53 for that single test.
Regarding power consumption… what time period do these benchmarks and metrics apply to? Is consumption based on what? Seconds, Hours, Years? My apologies if I missed it… this might be second nature to many, but it isn’t to me, so I hope someone can please educate me as well as others…
Thanks,
Sebastian
Time is irrelevant as these measurements are how much current is consumed (at 5.2V) during a particular activity. This is much more useful than time-based measurements because I don’t know how long you will use your device for.
From that you can calculate the power consumption from Watts = Volts x Amps
(Volts = Joules / Coulomb, Amps = Coulombs / second. Multiplying those gives J/s which is Watts)
If, then, you want to work out the total electricity used you can calculate Watt.hours by multiplying Watts x hours.