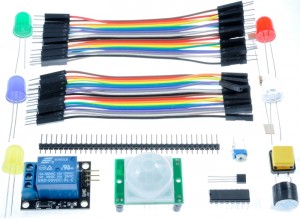
In the previous article I showed you the GPIO Zero Experimenter’s Kit I put together to go with the RasPiO® Pro Hat. Today I’m going to give a quick overview of how to use the MCP3008 analogue to digital converter to read the TMP-36 temperature sensor. This gives us a temperature reading (in °C) that we can use to make “decisions” in our Python program. In our case, we’re going to switch on a red LED when the temperature is 24 °C or greater. But there are all sorts of other things you could do, (e.g. tweeting, texting, sounding an alarm) limited only by your imagination. Here’s a short video overview of what we’re doing…
A Quick Video Overview
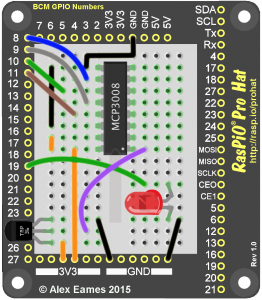
Circuit Diagram Made Clearer
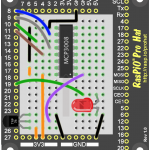
Since I made that video, I realised that the circuit wiring diagram could be made much clearer if the chip was rotated 180°. We now don’t need loads of wires criss-crossing the chip. The whole idea of GPIO Zero is to make experiments like this accessible to all. So, even though it takes a few iterations to get it right, I’m determined to make my RasPiO® Pro Hat tutorials and diagrams as easy to follow as possible (click the image to enlarge it).
So, having wired up your little circuit, you’ll need some Python gpiozero code…
Here’s The Code
from gpiozero import MCP3008, LED
from time import sleep
deg = chr(176)+'C'
tmp = MCP3008(channel=0, device=0)
red = LED(19)

while True:
    temperature = (tmp.value * 3.3 - 0.5)*100
    if temperature >24:
        red.on()
    else:
        red.off()
    print('{:.1f}'.format(temperature), deg, 10 * ' ')
    sleep(0.1)

############
#  This would show you the voltage from the TMP36
#    print(tmp.value * 3.3, " V")   # Voltage
#  This would show you the temperature to lots of dp
#    print((tmp.value * 3.3 - 0.5)*100, " C ")
In the above 14 lines of code (including a blank line) we manage to read the TMP-36 sensor’s voltage using channel 0* of our MCP3008 analogue to digital converter chip. Then our decision whether the LED should be on or off is taken and we format our output to make it look clean.
*I used channel 7 in the video, before I flipped the chip round to make the wiring look better.
Code Walkthrough
Line 1: we’re importing the functions we need from gpiozero
Line 2: we’re going to use the sleep function for our short pauses between readings
Line 3: to make our output look professional, we’re going to use the degree symbol °C. We define that here as a variable deg
Line 4: defines an object tmp for our temperature measurement. It sets up the channel number and SPI chip select device (both default to 0, shown here for completeness)
Line 5: defines our LED object red on GPIO19
Line 6: gives your eyes a break. White space is useful to separate sections of code.
Line 7: Starts our main program loop
Line 8: Converts the ADC voltage into a °C temperature and stores it as temperature
Lines 9-12: Here’s where we decide whether the red LED should be on or off and switch it accordingly
Line 13: Displays our temperature on the screen with °C – just how we want it. The scary-looking bit '{:.1f}'.format(temperature) takes our long value with many decimal places and shortens it to just one decimal place.
Line 14: Waits 0.1 seconds before we do it all over again
GPIO Zero Experimenter’s Kit
The GPIO Zero Experimenter’s Kit is designed to work with the RasPiO® Pro Hat which is currently funding on KickStarter. Please come and have a look and consider backing the project.


I guess you could possibly get rid of the crossing purple and green wires in your diagram too, if you put the TMP-36 and LED on the other sides of the breadboard? (I think you’d just have crossing 3V3 and GND lines, but as they’d be shorter it might look neater?)
Small typo in your blog article: “our decision whether to LED” ;-)
If you wanted to get fancy, and aren’t bothered about having the temperature printed on-screen, you could use generators to allow the LED-switching to happen “in the background”, which allows you to do other stuff without being tied up in a while-loop. (But generators are complicated to get your head around at first, so probably not suitable for a beginners tutorial)
from gpiozero import MCP3008, LED
from signal import pause
tmp = MCP3008(channel=0, device=0)
red = LED(19)

def on_if_over_temp(gen, threshold):
    for value in gen:
        temperature = (value * 3.3 - 0.5)*100
        yield temperature > threshold

red.source = on_if_over_temp(tmp.values, 24)
# do other stuff here
pause()
P.S. Congrats on hitting the latest stretch goal :)
P.P.S. Could you fix my code-formatting if it screws up, please Alex?
I actually had the LED on the left before (like it is in real life) and it was a bit congested. If I showed you iterations 1 and 2 of the diagram (well iteration 2 is in the video) you’d be amazed it’s got this far. In reality though, it’s clear as a very clear clear thing, so I think it’s good enough.
I think GPIO Zero has some built-in stuff that looks a lot like what you’ve done there with gen. It may be that it’s already been done for us and all we have to do is use it. I’ve not got that far yet :)
Ta for the correction and I’ve fixed your code formatting :)
Yes, I’m making use of the generator stuff already built into GPIO Zero :-) See the https://gpiozero.readthedocs.org/en/latest/recipes.html for some examples.
But the on_if_over_temp function I’ve used above is an ‘adaptor’ so that an analogue ‘output value’ (between 0 and 1) from the ADC can be used as a boolean ‘input value’ to the LED.
You _could_ do “red.source = tmp.values” but then the LED would only be off if the ADC reads a value of exactly 0V (anything non-zero is considered “True” by Python).
This is what the four stages of evolution of the wiring diagram look like (and yes I did just go and tweak it a bit more)…
Fun! ;)
Nice mini tutorial and hard to see how the diagram could be any clearer. Not looked into Fritzing in too much detail yet but am curious to know why it is so expensive to create custom parts?
It’s the cost of labour to do it properly and get included in the mainstream Fritzing distribution. The Duino part took 8 hours and cost me something around £300. I don’t begrudge it at all, but amortised over 1000 units of Pro Hat, that adds ~30p to the cost of the board, which is something like 5 times the cost of the RGB LED stretch goal. (I know it’s awful to think about the numbers in those terms, but I’m afraid one has to, to avoid overstretching.)
Will it work with mcp3208?
It’s “coming soon” ;-)
https://github.com/RPi-Distro/python-gpiozero/issues/134
Hi,
Great post. I’ve had some luck with the LED and PWMLED on GPIO Zero, but am struggling with the MCP3008. I’m very new to coding so might be doing something very simple quite wrong. When I try your code, I get:
Traceback (most recent call last):
File “./adc.py”, line 7, in
tmp = MCP3008(channel=0, device=0)
File “/usr/lib/python2.7/dist-packages/gpiozero/devices.py”, line 78, in __call__
result = super(GPIOMeta, mcls).__call__(*args, **kwargs)
File “/usr/lib/python2.7/dist-packages/gpiozero/input_devices.py”, line 802, in __init__
super(MCP3008, self).__init__(channel, device, 10, differential)
File “/usr/lib/python2.7/dist-packages/gpiozero/input_devices.py”, line 678, in __init__
super(MCP3xxx, self).__init__(device, bits)
File “/usr/lib/python2.7/dist-packages/gpiozero/input_devices.py”, line 613, in __init__
self._spi.open(0, self.device)
IOError: [Errno 2] No such file or directory
Any help greatly appreciated!
Hayden
Have you got the mcp3008 wired up to the right ports? I wonder from the error message if the spi driver can actually see a device? If the wiring is wrong or there is no chip present, perhaps this is the error you would see? That’s about the only thing I can think of.
Have you enabled SPI in raspi-config?
Oh yes it could well be that.
Just received my RasPIO Pro Hat today and I am very excited. It is a great board combined with a perfect experimental kit. Ended up burning the yellow LED already, because I was not careful :-(.
Now I tried to get te temperature sensor connected to the MCP3008, but I am getting a wrong temperature. At room temperature it shows 32 deg celcius, when it should be only 26. Any idea what I am doing wrong? I copied the python code from your tutorial.
THX, Johannes
I guess I was just not patient enough. After checking the voltage of the TMP36 with a multimeter it showed, everything is correct, and when I moved the TMP36 further away from the board, the measurement dropped.
I thought that might be the case. Glad it makes sense now.
May I have the Fritzing file?
There isn’t one. I did the graphics in photoshop, but I can provide a .PSD if that’s any use to you?