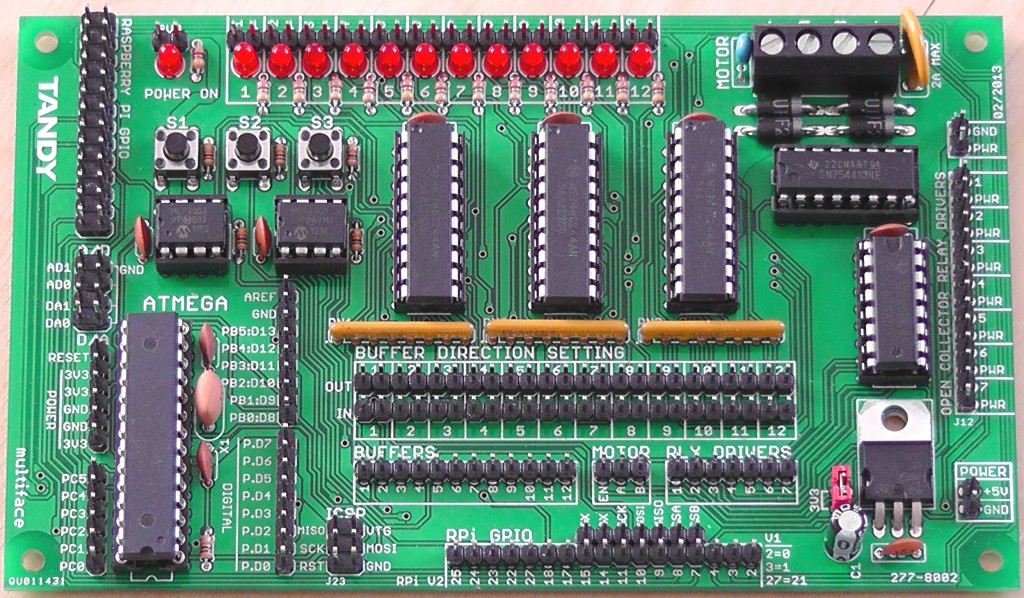
The Tandy Multiface is a brand new I/O interface board for the Raspberry Pi designed by Darren Grant from Tandy.
The reason it came about is that, back in September 2012, Tandy was marketing a Gertboard kit, having bought a supply of official Gertboard PCBs from Farnell. This was a bit of a coup because Tandy beat Farnell to the punch with their own product. Farnell struggled to get their ducks in a row (I seem to remember comments about a shortage of one of the chips) and launched their kit about a month later.
So it wasn’t a complete surprise (to me at least) when, a little later on, it was announced that the bare boards were no longer available and Farnell discontinued the Gertboard kit in favour of a pre-assembled board.
A bit of self-indulgent speculation
This next part is pure speculation on my part. [speculation on]I have no inside knowledge of this, but it looks to me like they tested the market with a kit. Then, having proved there was a market for it, decided it was worth investing in production. Either that, or they wanted to ensure exclusivity – or both.
Part of the original aim of the Gertboard was to get people into hardware. Gert spent a lot of time on the assembly manual and a series of soldering videos. It’s clear both from forum comments and just looking at the way things turned out that there was a change of direction which was more than likely commercially driven.[/speculation off]
I want a kit!
But there was, and still is, demand for a kit. So Darren designed a compatible board of his own, with through-hole only parts – so no surface-mount soldering. The result of this is the Tandy Multiface, which is pretty much pin compatible and functionality compatible with the Gertboard.
If you’ve soldered before, it should take you a couple of hours to put one together. If you haven’t, it might take up to four hours. But it’s not a scary experience at all.
The video shows a 2 minute walkthrough of the board’s contents. There’s a lot more detail in the text below it. Actually, I suggest you read on then come back for the video.
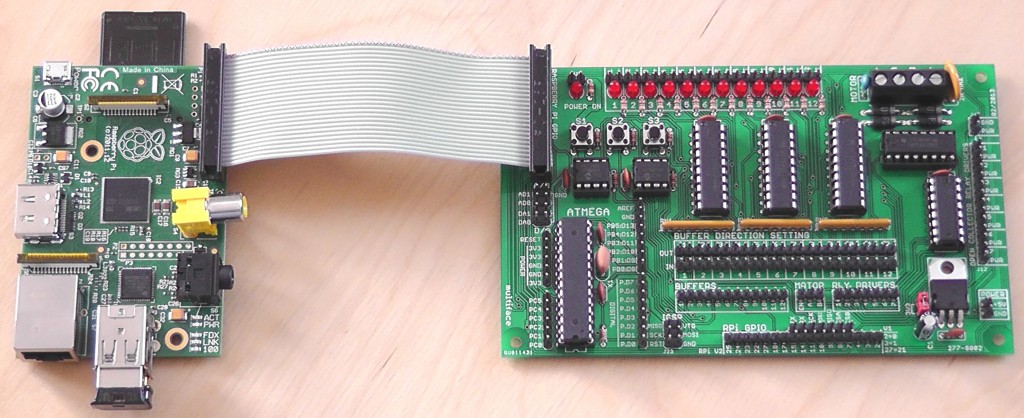
The Multiface board is designed to sit next to the Pi and is connected by a short ribbon cable. The nice thing about ribbon cables is that you can use one of whatever length suits you. If you prefer a socket, you could easily mount one under the board and add some “feet”. Because it’s a kit, you have that choice.
What are the differences between Multiface and Gertboard?
The three most obvious differences visually, when you look at the two side by side are…
1) the Multiface is slightly larger – because through-hole components are larger
2) there’s no prototyping area on the Multiface
3) The buffer direction settings are all in one place on the Multiface
Other differences are…
4) Multiface uses a ribbon cable, whereas the Gertboard V2 sits above and adjacent to the Pi via a direct socket connection.
5) Multiface has a “power on” led, which is constantly lit when power is connected. This is a nice additional feature. (Gertboard V2 leds are all lit when powered up unless pulled down.)
6) Multiface has an auto-resetting fuse instead of one which can blow and need replacing if you mess up with the motor.
7) The way that the motor controller is implemented. Multiface has a 3 pin arrangement, one for enable, one for MOTA and one for MOTB, whereas Gertboard uses two pins MOTA & MOTB.
For the final edition, Multiface has no “J7 jumper” which has caused quite a few queries on the Pi forums. (People don’t read instructions and assume an assembled board is ready to go, but they need to apply a jumper before Gertboard will work properly.)
What about the chips?
All the integrated circuits (ICs) are socketed, just like the original Gertboard kit, which makes it easy to replace a chip if you damage it. All the ICs are the same (or equivalent) as the ones on Gertboard, with two exceptions…
- The motor controller is a different chip. Gertboard uses Rohm BD6222HFP, Multiface has SN754410NE
- The Darlington Array is also a different chip. Gertboard uses Toshiba ULN2803, which has 8 ports on, but only 6 are used. The Multiface has a ULN2003 which is the seven port version, and all seven are in use. So you have 7 open collector ports on the Multiface and 6 on Gertboard.
Apart from those two differences, the ICs are the same.
- 3 bidirectional 4-way buffer chips
- ATMega 328p
- ADC MCP3002
- DAC MCP4802
What about the software?
It all works with my Python Gertboard software, and Gordon Henderson’s modified Arduino IDE. I will need to make a couple of small tweaks for full compatibility with my software…
- One to the open collector program to make the 7th Multiface port available. Although the way this program works it’s only a change in the wiring instructions since only one port at a time is tested with one wire from GPIO 4.
- One tweak to the butled program wiring instructions because of a discrepancy in the pinouts on the buffer 3 I/O select header (Multiface pin 2, Gertboard pin 1).
- Possible tweak to the motor program to make full use of the three pin arrangement (although the existing motor program works ‘as is’).
- Small tweak to wiring instructions for ADC/DAC programs as less jumpers are needed on the final version
(Update: I’ve tweaked all the software so that the correct pin names appear in the wiring instructions for Multiface. You just run each program as sudo python program_name.py m the extra “m” on the end tells the program you want the Multiface version. This software will be released before the Multiface is launched.)
12 leds, 12 Jumper wires
One of the things I really liked about this kit is the fact that it comes with a full complement of 12 jumper wires. One of the things I found slightly frustrating with the Gertboard kit was that the leds program needs 12 wires (to drive all the leds) and the kit only supplied 10. (This applied to the original Tandy kit too – I remember suggesting 12 to Darren when I bought my first one – he obviously listened.)
What’s the best thing about it?
Obviously the layout on the Multiface is rather different. You can see that a considerable amount of effort and thought has gone into it.
I think my favourite feature is the user-friendly area for setting the buffer direction. It makes it really easy to see what’s going on.
OK, let’s talk turkey (How much does it cost?)
£26.99 GBP including VAT.
When will it be out?
Soon. Probably some time next week. (i.e. ~15th-20th April 2013) I’d better get on with those software tweaks. ;)
If you prefer polling, check Tandy’s website every day.
If you prefer interrupts, follow me on twitter. ![]() I will be tweeting when the Multiface launches.
I will be tweeting when the Multiface launches.
Late update
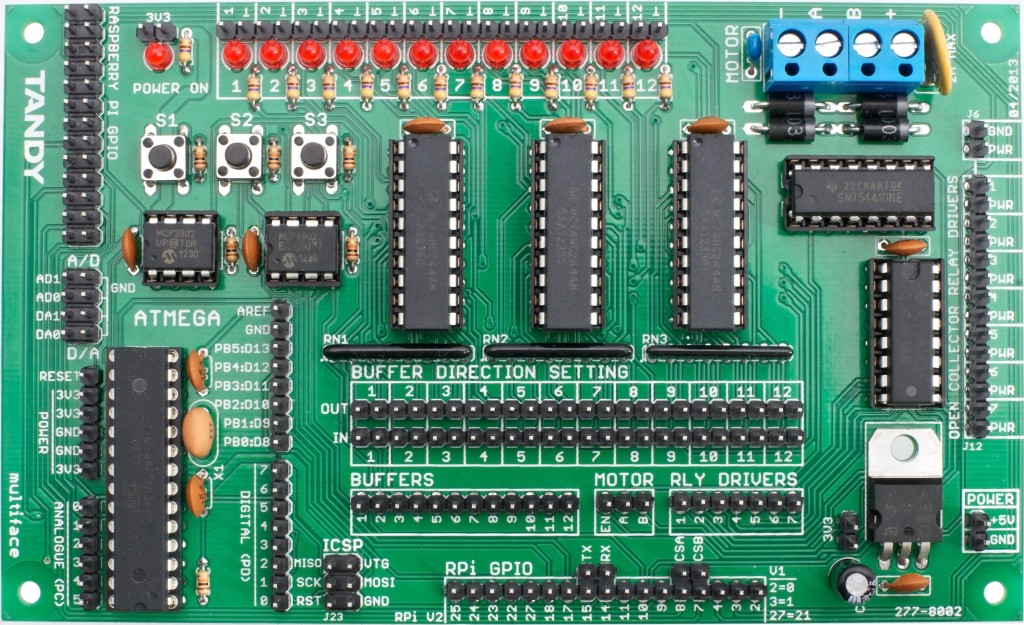
Here’s a photo Darren sent me of a fully assembled final production version.


Excellent write-up for what looks like an excellent board. Good price point too – cheaper than the assembled Gertboard and, because of the through-holes, actually feasible to put it together for a soldering beginner.
It also looks a lot less cluttered, better labelled and easier to use. I am also totally frustrated that there is no gpio cable on the assembled Gertboard. I might have to get one of these to use instead.
If female headers are used for the AVR lines, is the spacing such that it will take Arduino shields?
I expect Darren could answer that, but I can measure it for you. What dimensions does it need to be to fit? I’m not sure the pinouts are the same either. The ATMega headers are ~2.5cm apart.
The headers on an Arduino Uno are 48.3mm apart and 26mm on the Multiface as the overall board width is only140mm wide so it wouldn’t fit without adding another 25mm to the board size. It was decided that because the ATMEGA is running at 3.3V a lot of the shields for the Arduino would not work and the pin headers would need to be changed to female headers to accommodate shields that it was better to keep the board small.
The pin layout of the ATMEGA has been designed as a close approximation of an Arduino, i.e all the pins have the same functions as the Arduino so that people following Arduino examples can follow illustrations for the Arduino. The only difference being that 5V power headers have been substituted with 3.3V so as to avoid accidental damage by feeding a 5V signal to the ATMEGA or Raspberry Pi.
[…] ที่มา RasPi.TV […]
I have just checked Tandy’s website and it’s out of stock already :-/
They haven’t launched it yet :-)
They just launched it now though – my order is in. :)
Yes. My tweet went out at about 1710 yesterday. That was about 5 minutes after I got the tip-off :)
[…] the kits before they sold out! Alex as always has written a great review, you can read more over at RasPi.TV. Share […]
I ordered last week and got by mail after few days, easy to assamble, very high quality kit
Hi guys, does this company really exists or it’s fake ?
I’ve tried to contact them so many times, but my mails are without any answer…
I’m trying to order this awesome piece of hardware to Poland, but they does not provide that option on their website… :no:
I met Darren last week and I can assure you he is real. I think he’s been pretty busy though as he hasn’t had time to reply to my follow-up email either. :)
Thanks for your answer, it explains a lot. I will try to order a package to one of my mates from Denmark, and simply – wait :)
Btw. You can find my blog interesting (mpolaczyk.pl), I’m going to write some arts about Raspberry Pi from time to time :)
Ok, I finally got one :) I’m wondering if there are some docs or schematics that could help me with connecting multiface with other stuff. Same question about Arduino… what about voltage levels, do I have to translate them ?
The only documentation I am aware of is the Gertboard manuals. But Gordon has covered the Arduino IDE bit pretty well. Links in the Gertboard manuals.
The board doesn’t appear to be available in the USA. Do you know if / when it might be released here?
I haven’t heard from Darren for a month, but I know he had plans to start shipping them Stateside.
I ordered the kit on the UK Tandy site, and I received the kit the fifth day. The shipping was a extremely reasonable UKP 4.00 and very quick. Very impressed by the kit and the buying and shipping experience from Tandy. Compare that with the lovely Radio Shaft experience stateside :-)
++jrb
I have assembled the board I think correctly. I am experiencing a weird fault in that the board appears to function correctly with the 12 leds all off as expected. When I disconnect the HDMI cable from the raspberry pi, the same 12 leds all come on. Whilst my program functions correctly with the HDMI cable plugged in, when removed the leds come on and stay on.
Any idea’s?
what happens if you run your finger along the row of headers next to the leds? I think this happens because the ports are “floating” as no pull-ups or pull-downs are being used. It’s nothing to worry about.
That sounds plausible. But wouldn’t that occur with the hdmi cable plugged in?
What size resistor should be across the led pin outs?
I would usually use 10k to pull a port up or down.
I have the same experience. I think unlike the gertboard the multiface floats the LED while the gertboard pulls them up until you reconfigure the pins. It’s hard to tell without seeing the schematic. Alex do you know if a schematic for the multiface is available ? I have not seen it anywhere.
Cheers
++jrb
I haven’t seen one. You could ask Tandy?