For a long time now I’ve wanted wireless temperature sensors scattered around the house and garden reporting their temperatures regularly to a central server. It’s not something I really need, but something nice to have. I’d originally planned to do it with a RasPiO Duino or Arduino nano and inexpensive NRF24L01 radio boards. Albert @winkleink Hickey, a friend of mine, who also runs the Egham Jam put me onto these when he did his buttonflash game. Albert has a useful hobby of trawling ebay for bargain-basement electronics. A few weeks ago he showed me the Wemos D1 mini.
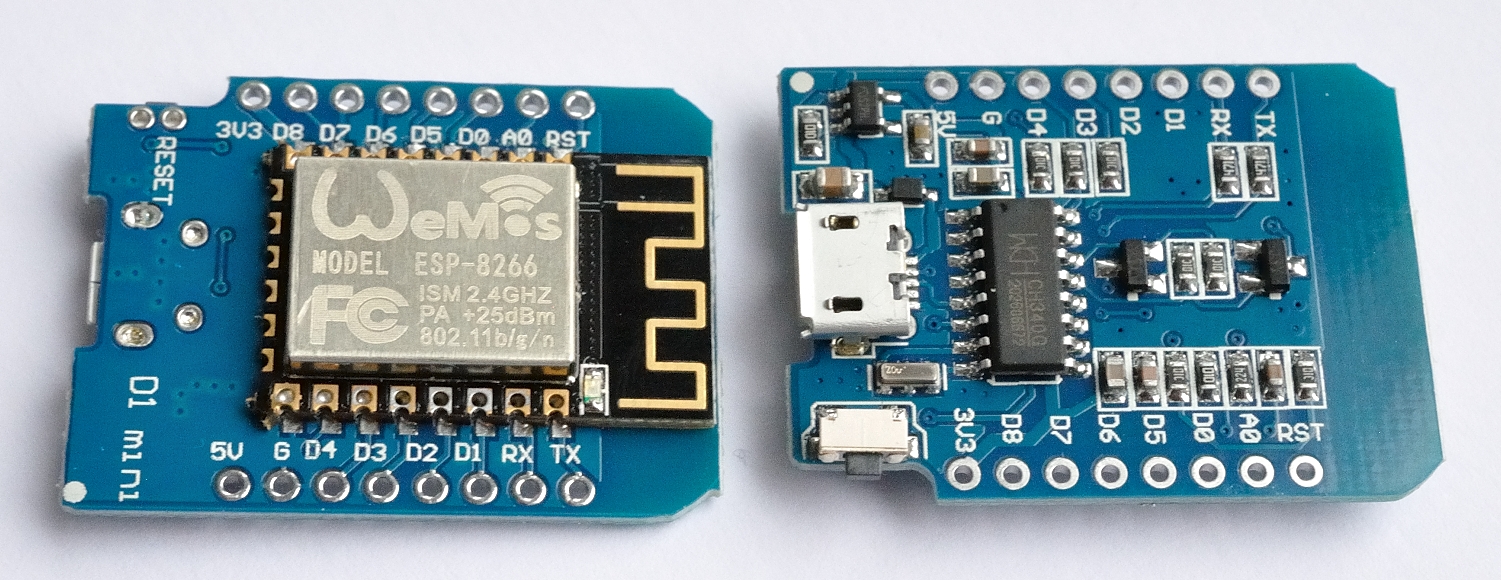
Wemos D1 mini
On inspection, it ticked all my boxes for this project.
- Small
- Cheap
- Built-in wifi (via an ESP8266)
- Has an ADC input (I love my TMP-36 sensors)
- Supports Arduino IDE
So I ordered some to try out. They arrived recently and I took a little time to have a play. (I’ve been heavily into a development cycle on a top-secret new project that I hope to be able to announce within the next few weeks. So a little ‘playtime’ was very welcome.)
Installation
Installation was fairly straightforward. A driver for the CH340 USB interface is provided (I already had this installed from previous Arduino nano clone usage). There’s also a link you can copy into the Arduino IDE to install all the relevant libraries and examples specific to these boards. It all “just worked”. This is what we like. WIN!
Looking through the examples is quite an eye-opening experience. There are quite a lot of them (each of the items in the screenshot is a menu), but it gives you a flavour of what these boards can do.
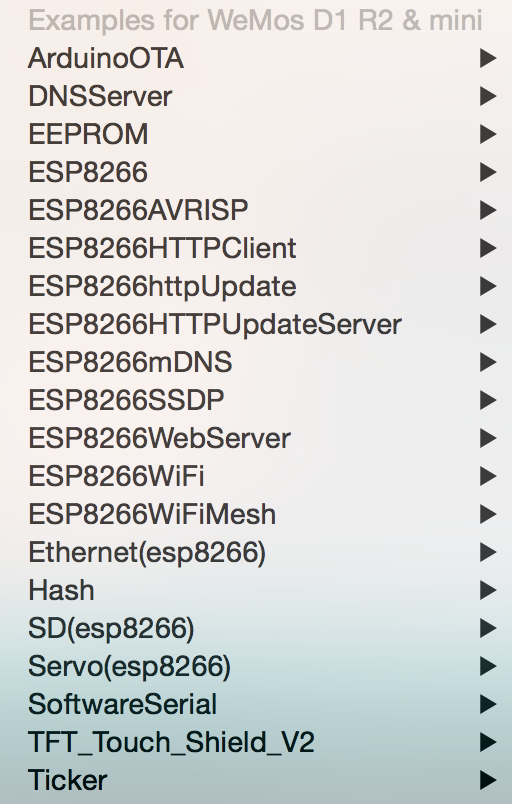
Wemos Arduino Examples
You can have them working as web client, web server, or access point (to name but three modes).
Port Numbering Can Be Tricky!
The only caveat is that the port numbering is a bit confusing. For digital pins you need to use D1, D2, D3 instead of just the 1, 2, 3 for your digitalRead() and digitalWrite() commands. If you use just the integers, it defaults to the ESP8266’s GPIO numbers.
pinMode(D4, OUTPUT);  //These two lines
digitalWrite(D4, 1);

pinMode(2, OUTPUT);   //do the same thing as
digitalWrite(2, 1);   //these two


pinMode(D4, INPUT);   //These two lines
digitalRead(D4);

pinMode(2, INPUT);    //do the same thing as
digitalRead(2);       //these two
The pinouts are here in the table. That’s really the only “gotcha” though.
If you are familiar with the Arduino IDE, these boards are a breeze to use. You can even update them wirelessly, although I haven’t tried that yet (it screams “security hazard” to me, but would be OK if done well).
WiFiWebServer
The first sketch I tried was the WiFiWebserver sketch. The only modification you have to make is to add your WiFi login credentials. This sketch is very simple. It enables you to type a URL into your browser to switch the onboard LED on and off. You use the Arduino IDE’s serial monitor to get the Wemos’s ip address, then http://192.168.x.y/gpio/1 and http://192.168.x.y/gpio/0 toggle the LED on and off. Having done that, I modified the sketch to read the TMP-36 and report the results when accessed. That was pretty easy, but the connection was not persistent and kept dropping out. This is why I decided to use the Pi as a server and have the Wemos ‘nodes’ report in to it.
Temperature Logging
So once I’d proved the concept and that WiFi was working, I did a quick google to see if anyone else had already done the temperature sensor network before. It’s always good to do this so you can crib ideas and sometimes even borrow some bits of code. In this case I found exactly what I was looking for here. Someone had done a similar thing with the Wemos, but using different temperature sensors (DS18B20). The temperature sensor part was easy for me to change, but I used the rest of the method, which was in turn based on parts of the Wemos examples.
How Does It Work?
Before I go any further with the details and procedures, here’s an overview of how the whole system works.
I have multiple Wemos D1 minis. Each one has a TMP-36 sensor being read by the analog port. Every minute, each Wemos reads its sensor and reports the value, via WiFi to a Raspberry Pi on the local network.
The Raspberry Pi is running a lighttpd web server and php5. A short php script is used (a first for me) to log the data from the incoming http “GET” commands from each of the Wemos boards.
That takes care of the data logging. I wanted to be able to view the current data on a web page, so I wrote a short Python script to generate an html page from the most recent data. This script is run every minute using a cron job on the Pi. If I knew php, it could probably be done dynamically using php. But I don’t, so meh!
So the outcome is that, every minute, each sensor sends in its new data, which is logged, a new html file is created and I can always view data in my browser which is never more than a couple of minutes old. All I have to do is visit http://ip.of.my.pi/temps.html
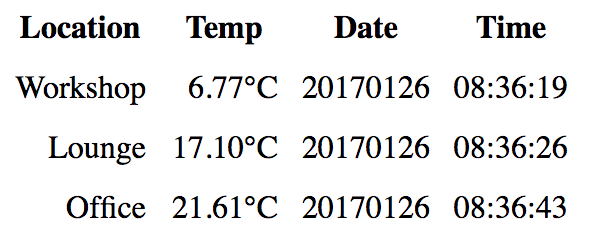
Temperature Output at RasPi.TV HQ
It wouldn’t be hard to open up a port on the router and make this viewable from the outside world, but I haven’t done that at this point.
How Reliable Is It?
It seems pretty solid to me. It’s not internet dependent, so even if your external connection goes down, your data should still be logged as long as your router(s) are behaving. I’ve only been running it a couple of days but it’s looking good at this point.
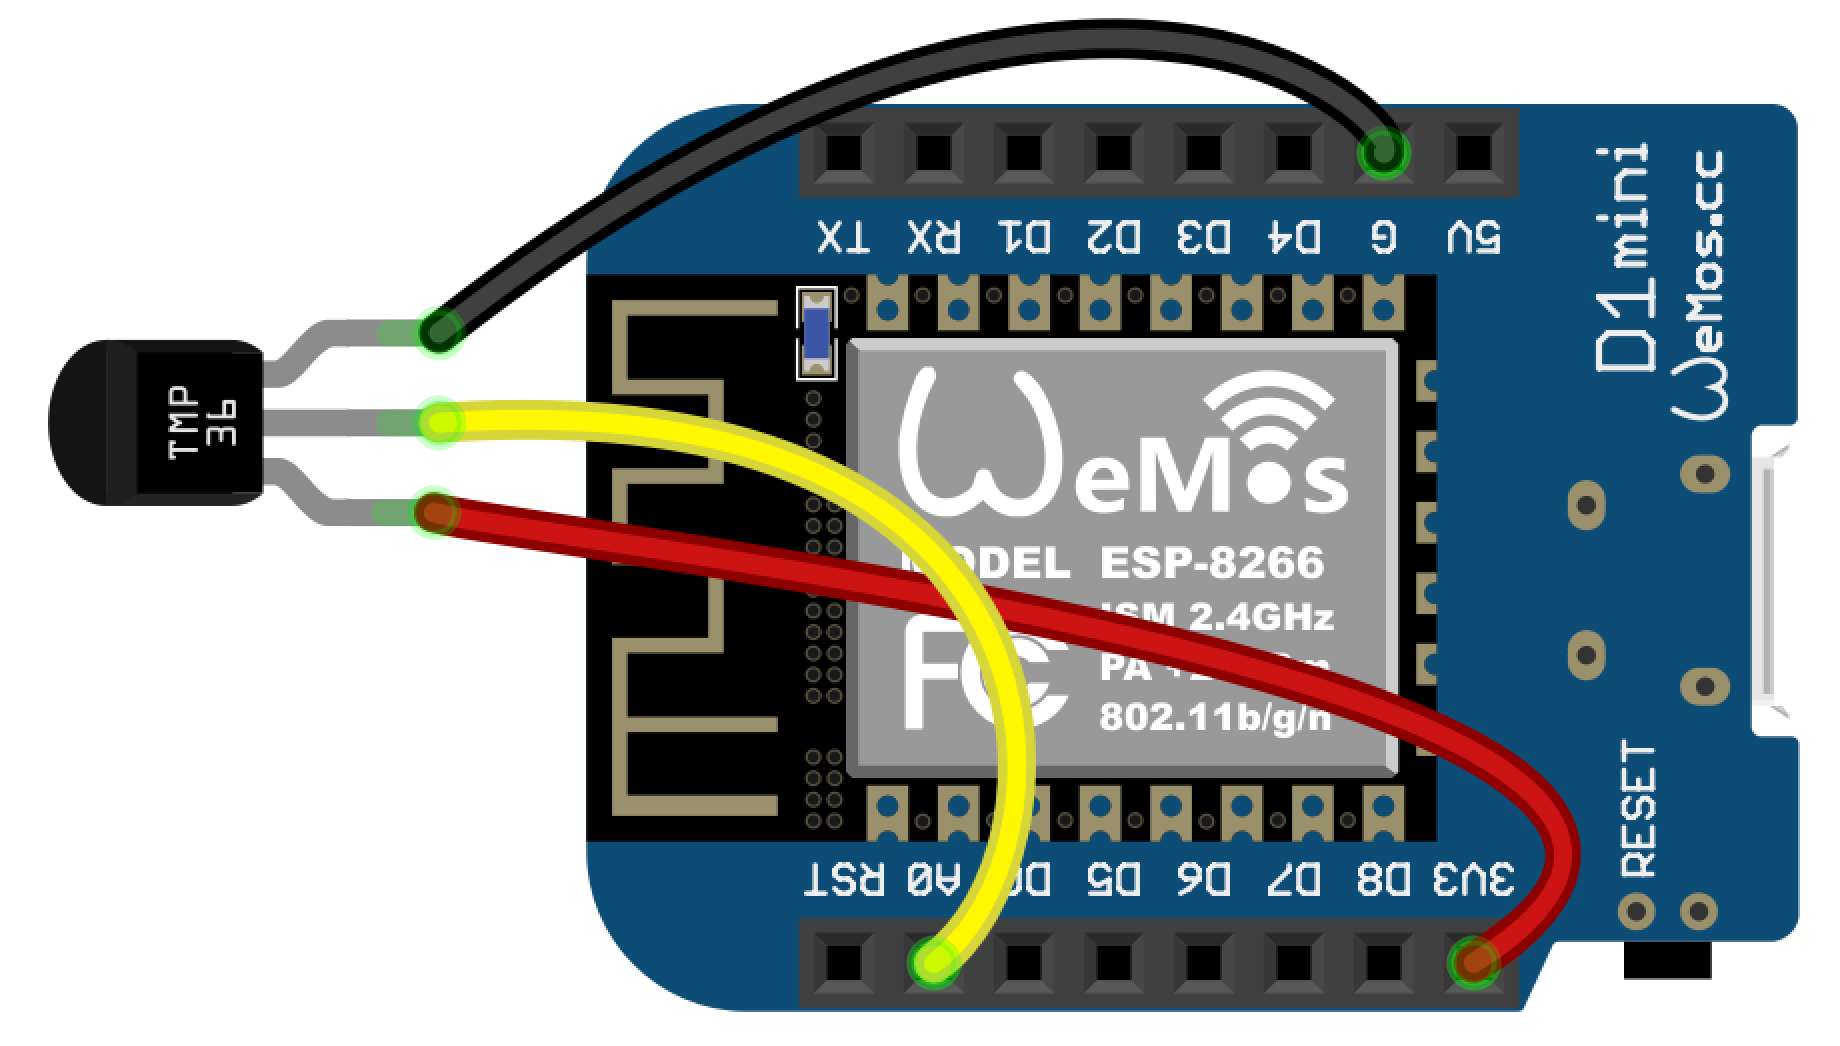
Wiring TMP36 to Wemos D1 mini
I Want To Have a GO!
Hardware
OK. The hardware is simple. For each temperature reporting node, you need a Wemos D1 mini, a TMP-36 and wires to connect them. I’ve found that it’s best not to have the sensor too close to the board because it generates some heat. I’m using 10cm wires. Attach the TMP-36 power pin to 3V3 (it will also work fine on 5V), ground pin to G and signal pin to A0.
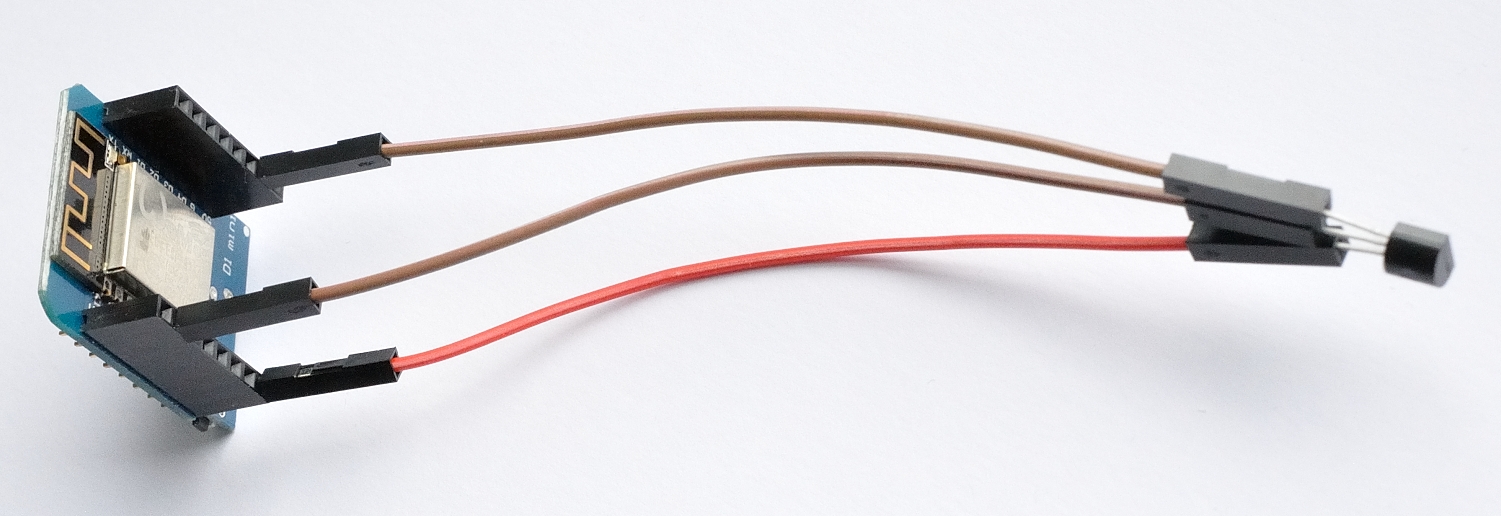
Wemos D1 mini TMP-36 ‘node’
The only other hardware requirement is a computer on your local network running a web server and php. I’m using a Pi3. Because you have to hard code an ip address into your Wemos script, it’s a good idea if the Pi has either a static ip address or you fiddle with the settings in your router to give it a reserved ip address, so it doesn’t change.
Software on the Server
I installed lighttpd on the Pi following instructions I got from here
sudo apt-get -y install lighttpd
sudo apt-get -y install php5-common php5-cgi php5 (obsolete now use next line instead)
sudo apt-get -y install php7.3-common php7.3-cgi php7.3
sudo lighty-enable-mod fastcgi-php
sudo service lighttpd force-reload
The root directory of the website /var/www is currently owned by the “root” user. We must ensure the www-data user account can write files to /var/www directory (or our php script won’t work – this was NOT in the instructions).
sudo chown www-data:www-data /var/www
sudo chown www-data:www-data /var/www/html
sudo chmod 775 /var/www permission to write to this directory
sudo usermod -a -G www-data pi add “pi” user to the “www-data” group
sudo reboot Reboot the Raspberry Pi, your Raspberry Pi web server is ready.
I snagged the following php script from here
<?php
if(!empty($_GET["temperature"]) && !empty($_GET["humidity"]) && !empty($_GET["voltage"]) && !empty($_GET["ipsrc"])){
   $csvData = array($_GET["ipsrc"],$_GET["temperature"],$_GET["humidity"],$_GET["voltage"],date("Ymd"),date("H:i:s"));
   $fp = fopen("order.csv","a");
   if($fp)    {
       fputcsv($fp,$csvData); // Write information to the file
       fclose($fp); // Close the file
   }
}
?>
Save it as /var/www/html/test.php, then
sudo chmod 755 test.php make your file executable
sudo chown www-data:www-data /var/www/html/test.php
I had an unexpected issue with writing to the data file, so I had to…
sudo chown www-data:www-data order.csv

sudo chown www-data:www-data /var/www/html
This may have been because I created the file order.csv manually from the root id or it may have been because I hadn’t “chown”ed the /var/www directory at the time (I don’t remember – sorry!)
Once you’ve done all that you should be able to test the php script using this url
http://ip.of.your.pi:portnumber/test.php?ipsrc=2&temperature=-22.75&humidity=10&voltage=11
It should create a file called order.csv in /var/www/html
The above should create an entry in order.csv looking something like this…
2,-22.75,10,11,20170126,10:10:09
You can obviously tweak the php script to log only the data you want. You can also tweak your Wemos sketch to send only the data you want. (But if you change either, it will probably break the Python script further down, so you will have to tweak it.)
Software on the Wemos
Flash the following sketch to your Wemos. You’ll need to tweak it so http://ip.of.your.pi/test.php?ipsrc=Test2 reflects the correct ip address of your php server and tweak the value of ipsrc to the name of your node. (e.g. Lounge, Workshop, Hall).
// Libraries

#include <ESP8266WiFi.h>
#include <ESP8266WiFiMulti.h>
#include <ESP8266HTTPClient.h>

#define USE_SERIAL Serial
ESP8266WiFiMulti WiFiMulti;

int reading = 0;
int iterations = 10;
float voltage = 0.0;
float temperature = 0.0;

void setup() {

  Serial.begin(115200);      // Start Serial
  USE_SERIAL.begin(115200);
  // USE_SERIAL.setDebugOutput(true);

  USE_SERIAL.println();
  USE_SERIAL.println();
  USE_SERIAL.println();

  for(uint8_t t = 8; t > 0; t--) {
      USE_SERIAL.printf("[SETUP] WAIT %d...\n", t);
      USE_SERIAL.flush();
      delay(1000);
  }

  WiFiMulti.addAP("Router1-SSI", "Router1-password");
  WiFiMulti.addAP("Router2-SSI", "Router2-password");
}

void loop()
{
  analogRead(0);         // chuck the first reading away to clear the ADC
  delay(20);
  reading = 0;           // then read ADC pin 10 times and average
  for (int loop = 0; loop < iterations; loop++)
  {
     reading += analogRead(0);
     delay(20);
  }

  voltage = (reading / iterations / 1023.0) * 3.3;
  temperature = (voltage - 0.5) * 100;
  String temp;
  temp = String(temperature);
  Serial.println(temp);
  Serial.println(WiFi.localIP());

  HTTPClient http;

  USE_SERIAL.print("[HTTP] begin...\n");
  // configure traged server and url
  http.begin("http://ip.of.your.pi/test.php?ipsrc=Test2&temperature="+ temp + "&humidity=1&voltage=1"); //HTTP

  USE_SERIAL.print("[HTTP] GET...\n");
  // start connection and send HTTP header
  int httpCode = http.GET();

    // httpCode will be negative on error
    if(httpCode > 0) {
        // HTTP header has been send and Server response header has been handled
        USE_SERIAL.printf("[HTTP] GET... code: %d\n", httpCode);

        // file found at server
        if(httpCode == HTTP_CODE_OK) {
            String payload = http.getString();
            USE_SERIAL.println(payload);
        }
    } else {
        USE_SERIAL.printf("[HTTP] GET... failed, error: %s\n", http.errorToString(httpCode).c_str());
    }

    http.end();
    delay(60000);   // wait a minute

}
Once flashed, monitor the script’s output using the Arduino IDE’s serial monitor. If your Wemos fails to get an ip address (it will show 0.0.0.0 if it fails) run the WiFiWebserver sketch to get an ip address, then “reserve” it on your router configuration.
The original script didn’t always connect, so I upped the wait time from 4s to 8s.
All being well, now you have flashed your Wemos D1 mini and, when powered up, it will send a temperature reading every minute to your Pi’s php web server. YAY!
Now all we need to do is make the data accessible…
The Python Script on the Pi
The following Python code will take the most recent X readings from your sensor(s) and create an html file which you can access using http://ip.of.your.pi:portnumber/temps.html
The value of X is tweakable in line 6 sensor_qty = 3
#!/usr/bin/python
data_log = open('/var/www/html/order.csv','r')
lines = data_log.readlines()
data_log.close()
sensor_qty = 3 # how many sensor lines to read in from log
html_string = '<html>\n<body>\n<style>\ntable { \n border-spacing: 10px;\n'
html_string += ' border-collapse: separate;\n}\n</style>\n'
html_string += '\n<table>\n<tr align="center">\n<th>Location</th>'
html_string += '<th>Temp</th><th>Date</th><th>Time</th></tr>\n'
for x in range(-sensor_qty, 0, 1):
line = lines[x].split(',')
html_string += '<tr><td align="right">'
html_string += line[0]
html_string += '</td><td align="right">'
html_string += line[1]
html_string += '°C </td><td>'
html_string += line[4]
html_string += '</td><td> '
html_string += line[5]
html_string += '</td></tr>\n'
html_string += '</table>\n\n</body>\n</html>'
html_file = open('/var/www/html/temps.html','w')
html_file.write(html_string)
html_file.close()
Save the above script in /home/pi/temperatures.py, then…
sudo touch /var/www/html/temps.html

sudo chmod 775 /var/www/html/temps.html

sudo chown www-data:www-data /var/www/html/temps.html
chmod 755 /home/pi/temperatures.py, then check that it works (once you have some data in /var/www/html/order.csv )…
python3 /home/pi/temperatures.py
Once you’re happy that it works OK, you can add it to a cron job
crontab -e
add this line…
* * * * * /usr/bin/python /home/pi/temperatures.py
And We’re Done!
That should be it. Now you should be able to access your temperature data using…
http://ip.of.your.pi:portnumber/temps.html
Have fun. If you try it, let us know how you get on.
You can get Wemos D1 mini here and TMP36 here.
Great tutorial :-)
I have been doing something very similar myself but i’m using the Wemos SHT30 sensor and MicroPython
The work being done on MicroPython for the ESP8266 is very interesting.
Also got my eye on the newer ESP32 boards.
Keep up the good work.
Kyle
Thank’s for the nice tutorial. It goes into the direction what I planned to do too. It’s simple and a good starting point.
BUT there is also a downside of your approach: you are writing data with a GET request. The parameter passed within the request are usually intended to give a context (or configuration) what the server should deliver. IMHO a PUT request would fit much better.
Greetings, Iohan
To be honest, as long as it works and doesn’t cause major problems, it makes no odds to me whether it’s a GET or a PUT. It’s a local web server on a Pi, not some major-traffic commercial site where things need to be done “the right way with maximum efficiency and security”.
I’ve never heard of “PUT” before actually. I’ve used POST many times in the past for forms, but never seen PUT. I’ve looked it up and it seems to be for uploading files, which, to be honest, is not what I want here. http://stackoverflow.com/questions/107390/whats-the-difference-between-a-post-and-a-put-http-request
From what I’ve read, it seems POST would be more appropriate than PUT.
Nevertheless. Thank you for mentioning it – I looked it up and found it interesting. :)
But I won’t be changing it.
Since Alex is logging the data, if we are going to be pedantic POST is the correct method to use because what he is doing is appending to a data log not updating a value.
However I would say in this simple application where he’s just passing a few basic values; the advantages you get with GET such as simpler debug and testing, make it the most practical choice for a project like this.
great, love it, exactly 3 days ago my friend asked me if such thing is possible and voila! Big Thanks.
I wondering if opposite direction control is also possible, i.e. from Pi I send http (or some other) command (request) to WeMos, and after that it send the dat ato server, or close some relay etc.
Yes that is definitely possible, but I’m not sure if it’s as stable as the system I have.
Good tutorial, nice litte piece of hardware :-)
Since your temp sensors are meant to be small (and maybe mobile), what power supply do you want to use?
Are there small batteries that will do, e.g. the CR2032 (which btw has only 3V, not 3.3V)?
I’ve been using mains micro-USB PSUs thus far. Although I’ve seen people using a single lithium ion cell on the Wemos forums, which may well be a good solution since they are 3.6V nominal when empty and 4.1V when full, so would be ideal if they last long enough.
Absolutely fantastic. I got a few WeMos D1 Minis awhile ago for the same thing. Though I was looking to use my temperate info to control dampers in my house. The scope of my project became a bit much after figuring out how to pull data from my nest thermostats via a PHP script. I got hung up on how to store the data. Your solution is so simple that I feel like I greatly over complicated everything with trying to do SQL integration.
You should grab one of their 1.5″ OLED screens. For only $6 they’re not only cheap but you configure them to display the data you’re collecting. I used one with a temperature probe to make a small monitor.
Thanks I’ll take a look at those screens :)
hello,
nice project!
how long the batteries last?
thanks
Hi Louis. I’m not using batteries in mine, so I can’t answer that. But I have seen someone on the Wemos forums say that running a similar setup from a single lithium ion cell (I think it was an 18650) it lasted about 3 weeks.
Hi, would I connect the Lifepo4 18650 (or 14500) to the 5v or 3.3v ?
I’d try 5V as it may be slightly too much for 3v3 when fully charged (~4.1V)
Thank you, I did try the 5v pin last night but I only got 5 hours worth of results before the d1 stopped (I am guesssing due to low voltage) I am using a fully charged 14500 “superex” lifepo4 battery. I was expecting days not hours :-(
I have ordered a couple of 18650 to try….
You have to try MQTT!! ;)
How difficult would it be to port it to MQTT?
No idea, since I’ve never used it.
Alex, thanks for a great project post and detailed write-up. I’ve been keen to do something like this for a while and this has spurred me on to make it happen :)
There seem to be a LOT of people selling Wemos D1 mini boards on eBay, and as I’ve got no experience at all; do you know if they’re all equal, or is there something specific to look out for? A link to the seller you bought from would be great ;)
There’s an online shop link at https://www.wemos.cc which takes you to the official wemos shop at Ali Express
I’ve got several of the assorted clones from aliexpress and so far they’ve all worked perfectly well. Not bad for C$3.50 delivered! (Admittedly, very s l o w l y)I have no problem programming them from the Arduino IDE on my iMac and no luck at all with the same IDE on my Pi :-( Helpful suggestions welcomed since I would like to be able to demo using Pi & ESP together at Makerspace kids events.
And definitely go MQTT. Seems much more flexible to me – also I have nearly finished a client for Smalltalk, which means I can add it to the Scratch release some time soon.
I haven’t tried programming them from a pi yet. I also use the latest IDE on a Mac. Are you using the latest arduino IDE on the pi? I think they have nightly builds of the ARM version now, but I’ve never tried anything newer than the one in the apt get install
I have the latest (well, as of a week or two ago) ARM build on a Pi 3/Pi-topCeed. The annoying thing is that it *was* working a while back and then stopped *without* me doing any updates. So.. no idea. This is the case both with FTDI cable connected and usb/ch340 connected versions. Really annoying.
That’s odd. If I can make some time I’ll have a try and see how it goes. I wonder if a fresh installation with a brand new Raspbian would clear it? Have had a very few instances of people saying their duino fails to flash after a while and a fresh install seems to fix it (no idea why though – if only we could explain these things :( )
Brilliant Alex, I finally got it working woohoo. To anyone trying any projects, CHECK YOUR CODE IS EXACTLY AS ALEXS’
Just for reference, here’s my working ESP8266/Arduino code for the sensor using MQTT to report it’s data –
// Import required libraries #include "ESP8266WiFi.h" #include "DHT.h" #include // DHT11 sensor pins #define DHTPIN 5 #define DHTTYPE DHT22 // Initialize DHT sensor DHT dht(DHTPIN, DHTTYPE, 15); // WiFi parameters const char* ssid = "*****"; const char* password = "********"; const char* mqtt_server = "********"; WiFiClient espClient; PubSubClient client(espClient); // Variables to be exposed to the API int temperature; int humidity; char valBuff[7]; void reconnect() { // Loop until we're reconnected while (!client.connected()) { Serial.print("Attempting MQTT connection..."); // Attempt to connect if (client.connect("ESP8266 Client")) { Serial.println("connected"); client.publish("weatherstation/status/sensor", "DHT22 present"); } else { Serial.print("failed, rc="); Serial.print(client.state()); Serial.println(" try again in 5 seconds"); // Wait 5 seconds before retrying delay(5000); } } } void setup(void) { // Start Serial Serial.begin(115200); // Init DHT dht.begin(); client.setServer(mqtt_server, 1883); } void loop() { if (!client.connected()) { reconnect(); } // Reading temperature and humidity temperature = dht.readTemperature(); humidity = dht.readHumidity(); itoa(temperature, valBuff, 10); client.publish("weatherstation/indoortemp/3", valBuff); itoa(humidity, valBuff, 10); client.publish("weatherstation/indoorhumidity/3", valBuff); delay(60*1000 * 10); }Thanks Tim, I’ve masked your wifi creds and also made it so the code is highlighted. (Sadly that can’t be done in comments without admin intervention).
Oops, good point. Not that anyone is likely to get near that particular server since it is only connected to an internal net with …. let’s say ‘aggressive’ protection. And deep in the rain forest on a pacific island… ;-)
Hi,
I have applied the same code for php, but it’s not creating any order.csv file. I have also tried creating it manually and giving it permission, but it didn’t worked.
I wonder if it’s related to this…
“I had an unexpected issue with writing to the data file, so I had to…
“
I have tried it, but had no luck, check it
http://imgur.com/a/M53ZJ
What I would try next is this…
Go into / with: cd /
Become www-data (to pretend you are the webserver): sudo -i -u www-data
Then try and go into the folder and try and create the file and see what happens.
It says this account is currently unavaiable
http://imgur.com/a/M53ZJ
OK thats not very useful :(
Try just touching the file from the www-data user:
sudo -u www-data touch /var/www/html/order.csv
Yes, was able to create order.csv, and was also able to nano it, still not working from php script.
What error do you get in your webserver log files?
Server code: http://ghostbin.com/paste/ttto5
Client code: https://ghostbin.com/paste/zmx2c
Please check if there is any error
Try putting the full path in fopen()
Found the problem,
Data is not passing to get.
replaced ? with space in url
but now its saying undefined index
Your problem is beyond the scope of what can be discussed in the comments system on here.
Are you going to PiWars I can help you there if you are.
Nope, I live in Bangladesh :/
A useful trick I discovered last week – actually, two.
a) you can get the Id of the ESP with ESP.getChipId() which you can then send to your hub. For my MQTT based stuff I send it as part of a status update message like so
client.publish(“weatherstation/status/%08X”, ESP.getChipId()) and then keep a table matching the id to location name
b) you can make the ESP go into deep sleep easily, which both uses much less power so your batteries would last a a lot longer, and stops it getting warm (running a delay loop was actually making my ESPs get warm enough to alter there temperature readings on attached DHT22s).
ESP.deepSleep(microseconds to sleep)
Oh, and *after* programming you connect GPIO16 to reset so the watchdog will wake it up after that sleep.
Oooh that’s interesting stuff. Thanks Tim :)
Alex. thank you for this awesome guide!! soon as i saw the video i got both a wemos and a tmp36… they finally arrived today.
instead of the PHP bit & logging to a file, i’m using openHab. to update an item, i switched out the GET stuff you have with a simple POST
HTTPClient http;
http.begin(“http://cubed.thoughts:8080/rest/items/bedRoom_temperature”);
http.addHeader(“Content-Type”, “text/plain”);
http.POST(temp);
http.writeToStream(&Serial);
http.end();
also thanks timrowledge for the deepSleep tip. i have my wemos now on a cheapo cellPhone portable battery… curious to see how long it will go. in case one else is interested, “GPIO16” is AKA physical pin 4, arduino 0, wake, … and also labelled D0 on the PCB
My latest versions are using ‘official’ Wemos D1 mini pro boards (https://www.wemos.cc/product/d1-mini-pro.html) with their SHT30 temp/humidity ‘hats’ (https://www.wemos.cc/product/sht30-shield.html). The hardware is definitely a bit nicer than the clones but obviously a little more expensive too.
The SHT30 hat is interesting; it is sensitive enough to start picking up heat from the cpu very quickly and you simply can’t leave things running with a delay() loop and expect meaningful data. Supposedly the sensor is precision calibrated and totally wonderful but when you have 6 of them all running in the same place and compare graphs of there received values it becomes clear they will need some offsets working out to all agree. Mostly they track very nicely against each other and against a BMP280 I have, but it looks to me as if there is some odd difference in the offset between the SHT & 280 readings depending on whether the temp is falling or climbing. Several SHTs appear to agree within 0.3C or so, whereas a couple of them are 2+ deg different!
The good news is that my software can easily be extended to keep a calibration offset for each known sensor, though I’m not yet sure how to handle different values for falling & climbing temps!
Ahhh, the old “Give a man a clock, and he knows what time it is. Give him two, and he’s never sure…” ;-)
hey alex. curious if you’ve compared the readings you’re getting with this sketch to anything else ?
i have a bunch of 4 LM75As connected to pis all around the house and they report mid 20s, but the tmp36 is throwing out low 30s. if i put Serial.println(loop) inside the for loop, i see 0 1 2 3 … 10 … so that’s actually 11 readings. and if i divide by (iterations + 1) in the voltage maths i get readings more inline with the rest of my sensors.
You’d only get 11 spins around the loop if you accidentally mis-typed “loop < iterations;" as "loop <= iterations;"
I followed all the steps given above,
But python code while running shows the following error,
Traceback (most recent call last):
File “temperatures.py”, line 14, in
line = lines[x].split(“,”)
IndexError: list index out of range
Please help!
Thank you.
You probably need to change your sensor_qty value.
Hi, one Idea to do it more profesional: install mysql and use the Arduino mysql connector, I did it With Arduino and the ethernet shield, write direct to mysql table and With php read the Database and present a dinámically web page even With graph using the Google graph library,.
Just write me If you need some help.
Yeah, this is the sort of project that could be taken in hundreds of different directions ;-)
Thanks for the tutorial. One little question: why you did a minus 0.5 here? temperature = (voltage – 0.5) * 100;
The sensor I used (TMP-36) gives out a temperature-dependent voltage which is 0.500V at Zero °C
then it goes up or down by 0.01 V/°C
So it’s necessary to subtract 0.5 from the reading to give the correct offset.
Ty very much
I am just about to order a few of these boards as I want to monitor temps in several rooms.
Do they run OK on 5v? I see shields to take a 5v input but are they necessary?
I usually run them from the uUSB input and that’s 5V. No problems here.
it worked :) thanksss
what should i change to the code to i continuously display the result and i dont need to keep on refreshing the html file ?
why the order.csv is not being updated unless i have internet connection ?
You shouldn’t need an internet connection, but your Pi and Wemos will both need to be connected to the same wifi router or how else can they communicate?
Some home routers (like mine) drop the Wifi connection whenever they don’t have an internet connection. Which is especially annoying if it happens when you’re in the middle of a SSH session to one of your (local) Pi3s… ;-)
If your router behaves the same, and you need a “permanent” wifi connection, then your best bet is to probably buy a separate Access Point, set it up with a different Wifi network to your router, and connect both your Pi and Wemos to that instead of to your router’s wifi.
Sorry to be blunt here but if your router drops the WiFi when it doesn’t have an Internet connection I think it would be best to throw it in the bin and replace it. No router should ever do that unless it is either faulty or has very bad quality code. It will not only cause problems with this setup but multiple other devices in your house as well.
Out of interest have you tried a firmware update?
There is no way it should be doing that.
It’s my housemate’s router, so I can’t bin it and I don’t even have login credentials for its control panel ;-P
(I’m guessing that when it loses internet connection it simply reboots itself to re-establish the connection, which is why the wifi disappears too). On the rare occasions where I _need_ a stable connection between computers I just use wired Ethernet.
LOL, OK fair enough.
Interestingly enough, you can run a router underneath another router and have your own LAN + wireless LAN complete with its own IP range. That might be useful if you want a more stable setup.
Yeah, I’ve done that before, but then it gets confusing working out which devices are on which subnet ;-)
my wemos and the pi are connected to the same wifi. I used a routerboard mikrotik. it didn’t work
what is weird and I m not able to understand is that:
my wemos are connected to a routerboard same wifi.
but if I connect my pi to the wifi of my home which has internet access. it works!!
I m not able to understand what it s happening
Thank you for your comments.
I forgot to mention that I was using a pi2 and w wifi adapter. I will try today to use a pi3 eventhough I m able to see the pi ip and ping it without having no problems
Don’t forget on different LAN’s (WiFi networks) you will have different IP addresses unless your Pi and your devices are on fixed IP and subnet.
I’m new to this field, but I said try! I have a mac mini (mavericks), a raspberry pi3b (with static ip address) with the wemos d1 attached and controlling through ssh by mac terminal and an arduino uno with lm35 temperature sensor (from starter kit) attached (I tried the sensor and works perfect).
I’m trying to make this project but there are some problems.
1. I can’t find the wemos ip address
2. I can’t create the order.csv file manually
So when type
http://192.168.2.4/test.php?ipsrc=2&temperature=-22.75&humidity=10&voltage=11
I receive
pi@raspberrypi:/var/www/html $ http://192.168.2.4/test.php?ipsrc=2&temperature=-22.75&humidity=10&voltage=11
[1] 751
[2] 752
[3] 753
-bash: http://192.168.2.4/test.php?ipsrc=2: No such file or directory
pi@raspberrypi:/var/www/html $
I will be grateful for your help
You can’t just type in a URL on the command line – you either need to type it into a web-browser, or you could use curl e.g.
And when using curl you need to ensure you enclose the entire URL in quotes, otherwise the shell (bash) gets confused by the ‘&’ characters.
Thank you for that great instruction. It work very well until October 2017 (I had to modify the wemos script, but no problem). Now I tried to install it again: php is now only accepted in 7.0 not 5 (necessary to install with php7.0 not only 7) and I applied all the chown and chmod on directories as well as files, but all I get ist 403 forbidden (Tested with simple phpinfo()). Any ideas? Thanks in advance, Hans from Germany
Probably solved: You have to install different other parts of php7.0 esp. php7.0-fpm and later run
sudo lighttpd-enable-mod fastcgi
and
sudo lighttpd-enable-mod fastcgi-php
and restart lighttpd-server with
sudo service lighttpd force-reload
I test the pi server are work fine.
but the wemos code not sendign the data to order.csv file. Please help me did I do some wrong or any suggest I can fix my code.
thank you
#include #include #include #define USE_SERIAL Serial ESP8266WiFiMulti WiFiMulti; int reading = 0; int iterations = 10; float voltage = 0.0; float temperature = 0.0; void setup() { Serial.begin(115200); // Start Serial USE_SERIAL.begin(115200); USE_SERIAL.setDebugOutput(true); USE_SERIAL.println(); USE_SERIAL.println(); USE_SERIAL.println(); for (uint8_t t = 8; t > 0; t--) { USE_SERIAL.printf("[SETUP] WAIT %d...\n", t); USE_SERIAL.flush(); delay(1000); } WiFiMulti.addAP("Nguyen-Wifi","**********"); WiFiMulti.addAP("SBG6700AC-772F8", "********"); } void loop() { analogRead(0); // chuck the first reading away to clear the ADC delay(20); reading = 0; // then read ADC pin 10 times and average for (int loop = 0; loop 0) { // HTTP header has been send and Server response header has been handled USE_SERIAL.printf("[HTTP] GET... code: %d\n", httpCode); // file found at server if (httpCode == HTTP_CODE_OK) { String payload = http.getString(); USE_SERIAL.println(payload); } } else { USE_SERIAL.printf("[HTTP] GET... failed, error: %s\n", http.errorToString(httpCode).c_str()); } http.end(); delay(1000); // wait a minute }You seem to have cut out the line…
http.begin("http://ip.of.your.pi/test.php?ipsrc=Test2&temperature="+ temp + "&humidity=1&voltage=1"); //HTTPSince this is the line that sends the data to the Pi, it’s hardly surprising that it’s “not sending data to the Pi”
Just because I’m a pedant… ;-)
It’s actually the
line that sends data to the Pi.
BTW Alex I just spotted that in your code you’ve got
and then
What’s that all about? ;)
It’s all about cutting and pasting other people’s code without optimising it ;p
Hi, I had a go at this project but I too found that the tmp36 gave way off readings, something like 29 /30 whereas the real temperature was more like 23 /24. Checking the voltage on the data pin correlated to the 29 /30 temp so I guess there are some faulty ones. Never mind they were real cheap and I changed them for a more expensive temp sensor and all is well. The wemos is a great little package and the wifi works a treat.
But, maybe too well! I programmed my wemos with the Arduino C and its reliably working away sending temp readings over the wifi. However my ipad suddenly latched on to a network called MicroPython xxxxx and sure enough it was my wemos acting as an access point though I could not do much with it and it did not work with my existing network ip range. Looking around the web I see that the wemos is preloaded with micropython and it will act as an access point out the box. But I don’t actually want an access point and thought it strange that its still bubbling away in spite of my loading the C program from the Arduino which also works just fine.
I could not find out how to remove or disable the micropython from the wemos. Do you have any idea what I can do to make my bunch of wemos’ s work only with the Arduino programming.
Thanks
BG
How close was your TMP-36 to the Wemos? I found, in practice, that the heat given off by the Wemos itself usually bumped up the temperature reading by a few degrees (2-5). So when I use them, I usually make sure the wires are at least 10cm long.
I don’t know about the access point issue.
I had exactly the same problem with a TMP-36 when I used it on a Raspberry Pi in my central heating controller. I figured what was happening was the heat from the Pi was not only affecting the air around the TMP-36 but was literally being conducted down the components legs.
What I did in the end was the same as Alex, I added some wires to distance the sensor from the Pi and also placed the TMP-36 on the outside of the enclosure distancing it by a few mm. I also added a fiddle-factor calibration setting which I used to offset the TMP-36 readings back inline with the real rooms value.
Thanks Alex and Daniel for the replies. I should have said that I did have the TMP-36 wired on a mini prototype board and placed some 5 cm away from the Wemos. I did likewise for a MCP9808 temp sensor (linked to a rpi zero) and also had a temperature reading from my multimeter Later I also hooked up a SHT31-d temp sensor as well. At first, with the last hookup I was surprised that the MCP and SHT showed over a degree of difference, but after an hour or so they were showing a consistent and correct reading. Then I wired up a waterproof DS18B20 to join the party. All but the TMP-36 showed the approx the same readings. Then I found I had a D11 temp sensor to wire in, but this too proved to have erroneous and unreliable readings. Both the TMP-36 and D11 are very cheap sensors and the warning is not to expect too much from them. Checking the real temp against the actual readings and adding a fiddle fact would work well I think with the TMP-36 as it seemed to be wrong by consistent values.
Alex I know you don’t know about the access point issue, but it happens just as soon as a new Wemos is powered up and can be seen by looking at a network scanner. Its quite a powerful signal and it equalled the strength of my router signal when both were a couple of rooms away, and my ipad switched to the Wmeos without a by your leave. If I cant solve this it makes them problematical to use so if any of your buddies have some ideas then please let me know.
Thanks
BG
I had a quick google. Is this link any help?
http://www.esp8266.com/viewtopic.php?p=16816
Yes it looks like you need to add…
WiFi.mode(WIFI_STA);after your…
WiFi.begin(ssid, password);And that should prevent this (although I haven’t yet tried it).
Oh well done, that solved the problem. I was googling micropython related stuff as that was the SID, but it looks like it related more to the ESP8266 itself. Anyway many thanks and I’m now free of the Access Point.
BG
Excellent. I’ll be adding it to my sketches in future then so as to avoid unwanted WiFi broadcasting :)
Hi Alex.
Revisiting this as I am ready to give it a try.
Would a 5v 1Amp power supply be sufficient for the WiMos D1 or would it need a higher current supply?
I have been able to find specs but they only discuss voltage range not current consumption.
I did a quick google and found lots of probably useful stuff, too much to list here without being silly. Try https://www.google.com/search?safe=off&client=safari&rls=en&q=wemos+mini+d1+esp8266+power+consumption&spell=1&sa=X&ved=0ahUKEwjdi5_awr7hAhXG854KHSfSC3cQkeECCCsoAA
The quick answer from scanning a few of those results is that an ESP takes around 100mA to run and ~6mA in sleep, so a 1A psu should be more than enough.
Thanks for that Tim.
Of course I did do a Google search before posting on this forum, however I didn’t put “esp8266” in the search parameters which made all the difference!
Some very interesting information came up, including some great tips about reducing power consumption such as putting the WeMos into deep sleep mode (as you mention) and removing the LED so as to make running the kit on a battery more realistic.
That is something I would like to do as I want to measure the temps in my garden. Also thinking about connecting that setup with a rechargeable battery and a solar panel.
For anyone else interested in low power solutions for the WeMos I include that link below.
Thanks again.
https://openhomeautomation.net/esp8266-battery
Sorry to be such a Noob, (I am) but I see on line 31 of the WeMos sketch
“WiFiMulti.addAP(“Router1-SSI”, “Router1-password”);”
Then on line 32 the same except for Router2.
Why twice? Presumably the first would identify my router and password for the WeMos to connect to but what is the second (line 32) expecting?
Thanks
I think it’s so that if you have more than one wireless router, it’ll try to contact the secondary router if the first router isn’t available? https://arduino-esp8266.readthedocs.io/en/latest/esp8266wifi/station-examples.html
I guess if you only have one router then you don’t need the Router2 line.
Thanks for your reply Andrew.
I am new to this, very little experience with Raspberry and new to Arduino.
Although I have some experience with writing software, I am now delving into Python for the Rasp and at the same time C for the Arduino. So although familiar with algorithms these are new languages.
Just got Arduino IDE installed and about to flash my first blink prog on the WeMos.
Making some progress.
So far I have the Sketch working as far as taking the temp readings.
As I only have one router, I am using WiFi.begin with WiFi.mode. After fiddling around a bit the kit is connecting to the router just fine.
The temperature reading section seems to be working Ok but I am not impressed with the TMP-36 sensors at all.
I have four in my stash, none of which are giving realistic readings. Two are giving temps of around 23 degrees while two are giving readings of around 34 degrees.
I have an old fashioned lab mercury thermometer which has to be pretty accurate and that is showing a temp of 17 degrees so my TMP-36 sensors are WAY off!
Time to try with a DS18B20 I think.
Here is a heads-up regarding the use of WiFi.mode(WIFI_STA) in your code.
Looks from this discussion that if not used it makes the WiFi insecure!
“I can access these servers by simply connecting to the unsecured network and by using the server IP address I can access them without restriction. This sounds like a big security risk.”
Scary stuff!
https://forum.arduino.cc/index.php?topic=501263.0
Ok, got mine working, and thanks for the help guys.
Ran into one main snag, I started with a fresh Stretch Light installation. I then ran into problems downloading php5 which is not supported by Stretch, only php 7.0.
As I was feeling my way through this I didn’t want to be trying to troubleshoot any problems with any differences between the two php versions, just get a vanilla install as described here working.
I was able to get php5 in the end by adding an apt-get reference to the Jessie repo but things would have been easier if I had stated with Jessie.
Now to start tweeking!
Many thanks everyone.
Any idea how to do this using PHP and MYSQL instead to order.csv file?