One of the changes on the Rev 2 Raspberry Pi board, which I haven’t seen anybody write about yet, (apart from Eben in his original announcement) is the addition of two holes for a header at P6. These were added to enable a reset facility. Shorting those two pins together resets the processor.

These are the holes for the P6 header
This was too good an opportunity for my curious mind to pass up, so I decided to add a 2 pin header there and try it out.
As luck would have it
It just so happened that last week I was given an old PC, which I took apart for fun (and parts). One of the salvaged parts was a reset switch connected to exactly the right kind of (2.54mm) 2 pin female socket.

Freshly scavenged reset switch
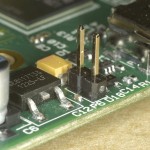
I had a stack of pin headers in stock already. So I just cut off 2 pins’ worth and soldered it into the P6 holes (with leaded solder, to minimise heat to the Pi).

Lovely job :) P6 header installed

P6 reset header installed
Then I pushed on the connectors for the switch, booted up the Pi, logged in and let it settle.

Reset switch in situ
And then I pressed the reset switch. And it worked. The Pi reset and rebooted without a hitch. :)
Will it bring the Pi back from a halt?
So having logged in again and tried it again, I shut the Pi down with sudo halt. Then I thought mischievously to myself…
“I wonder what happens if you press it while the Pi is connected but powered down?”
So I tried it. And…
The Pi booted back up again :) So you can also use this header to bring your Pi out of a shutdown state, provided the power is still connected.
You don’t strictly need a switch
Of course, you don’t need to install a “proper” reset switch. A jumper would do, or even a paperclip. You don’t really even need to put a header on. You could short across the holes with your paperclip (it’s only a momentary connection). I’m not saying you should, but you could. It’s obviously the “preferred way” to use a header. I did consider putting a 2 pin socket there instead – to avoid accidental reboots – but the decision was made for me when I found the ready made reset switch. :)
Excellent stuff, Alex. I’ve not seen anyone blog about that before – will have to get the old solder iron out tonight.
I do wonder, though, what Linux will put up with in terms of resets. Will it _always_ recover?
Good point. Since starting to use better quality SD cards (Sandisk Extreme) I haven’t observed any OS corruption issues – but then, when the other cards were new I didn’t either. It would definitely be a good idea to make sure the SD card R/W led is not flickering when you reset (if possible).
I don’t plan on using it very often. It probably will only be connected if and when I need it, but I knew it was possible, so thought it’d be fun to do it. (And I was right :) )
I wouldn’t think it’s a good idea to use it generally unless your machine crashes to be honest. But it might be more use as a “bring back from shutdown” switch to avoid having to unplug from the micro usb port.
its more gentile then unplugging, thats the whole meaning, and i am glad its possible. I want to use it as an ON switch mainly, since i think it will work as boot after a shutdown, that will save the plug already al lot. Actualy i am surpriced that a part of just 10 cent (bulk+adding in machine) is not featureded by original concept. even the zx spectrum 128 got one since it was a waste on the 48k version, talking 1982/1986 here…. so, i hope it will be normal on 3c version.
Loving your work :) My wife has sequestered my Rev2 boards as Christmas presents…but I shall be routing around in my parts bin for a similar reset swicth ready for xmas day ;)
Thank you. :) Have fun with that. There’s so many obsolete PCs up for grabs these days, it’s amazing.
I’ve taught my son about soldering by removing capacitors from a dead PC motherboard.
The inductors are tricky, but I know a little trick with a blowtorch and a pair of pliers :)
Hi Alex,
I just wanted to say thank you for your videos! They help my pea brain understand things I should not be able to :-D
I would love to see some more of the Gertboard, or possibly even a couple of easy tutorials but I am sure it would bore your socks off. Either way thank you and keep up the great work!
Regards,
Thanks for your kind words. I think it’s highly likely that I will be doing some more videos of the Gertboard, but I can’t promise exactly when. :)
A suggestion for a RPi Reset Solution : https://fbcdn-sphotos-d-a.akamaihd.net/hphotos-ak-ash3/598344_10200292731060072_510011818_n.jpg
Have fun!
Reminds me of a James Bond film. You could have a lot of fun with a “self-destruct” button too ;)
I just found this and I’m so glad about it I’ve offered it to those who’ve purchased a RaspberryPi with my HotPi kickstarter. http://www.kickstarter.com/projects/582604098/hotpi
[…] https://raspi.tv/2012/making-a-reset-switch-for-your-rev-2-raspberry-pi ← Raspberry PI som tidsserver (NTP) med hjälp av en GPS-puck. […]
[…] พอดีไปเจอเว็บที่แนะนำการทำปุ่ม reset มาครับ ลองดูที่รูปของ Pi rev 2 ครับ […]
I’ve been looking for a way to wake a Pi back up after a halt!
Thanks Alex :)
For shutdown I would write a bit of code which checked for a GPIO push and executed a halt command rather than just power off or reset the Pi. Linux will normally recover like you say but its definitely not a good idea.
I agree – it’s not for routine use. In fact I would only attach the switch if the Pi hung, which it doesn’t very often. I did this for fun because nobody else had done it yet. :)
Have a look at the most recent post and vid. I take it a stage further and use a relay instead of a switch. You could use one Pi to bring back another from halt.
But on that one I do a flush first. I’m just pushing the boundaries here. I wouldn’t recommend people use this to reboot unless there’s already a problem.
You can’t use it to shutdown anyway as it forces a reboot.
The “secure restart feature” might be worth a little hardware extension:
– A simple push on the reset button will be caught and directed to a GPIO PIN (or another not-so-often-used pin). This will be detected by an installed driver, which performs a secure soft restart.
– Only a long button press (5 sec) goes directly to the CPU reset P6 pin and forces a hardware reset.
As soon the button driver is loaded, the hardware extension must be contacted to prevent a direct hardware reset. If the driver is present, the hardware extension performs the 5s buffering.
This way the button always performs a P6 reset, if there is no driver present (or the raspi is powered off).
Sounds interesting. What hardware would be involved in your idea?
Thinking further, if you have a GPIO pin to spare, you could have one button for soft reset (via GPIO) and another for hard reset (via P6). :)
Just thinking out loud with my high-school understanding of electronics, but if you just had a time delay circuit (resistor in-line with a capacitor) to delay the shorting of the P6 header, couldn’t you still detect when the button is closed via GPIO and issue a soft “shutdown – h”, and only trigger a hard reset when the button is held down long enough for the capacitor to charge up?
Yep, I reckon that would work if you got the recipe right.
Thanks for this info, it helped me with making a wireless power on button so I can turn on my Pi from across the room. The resetting is not that important but resuming from a halt was amazing.
Here is my thread where I got the wireless button working. If you’re interested.
http://www.raspberrypi.org/phpBB3/viewtopic.php?f=44&t=29339
I agree. Since I did this, I have had to reset my Pi precisely zero times, in fact I don’t even leave the button on there. Resume is of more practical use. Did you catch the next article with the relay? A couple of other people have used momentary switches and transistors to achieve the same effect. :)
[…] Raspberry Pi Rev 2.0 guide to making a reset switch Share this:TwitterFacebookLike this:LikeBe the first to like this. Categories: How To, Raspberry pi Comments (0) Trackbacks (0) Leave a comment Trackback […]
Very sharp and beautiful pictures! What camera and lens do you use for it???
Thank you. Macro photography is a hobby of mine. :) Circuit boards don’t move about like insects do, which makes them seem relatively easy. The camera is relatively old (6MP) Nikon D100 I picked up off ebay a couple of years ago for about £150. The lens, on the other hand is a professional quality macro lens. Sigma 105mm EX DG. I also have an old Nikon SB-21 macro flash. I always shoot RAW and process to JPEG on the computer. It’s more work, but the results are worth it. :-D
The old adage of buying the best glass you can afford certainly applies. I’d love to see what this lens could do with a higher res camera. :)
I did this on the weekend with my Pi. Also have not used it for resetting, but have for power-up. One issue that I have is making holes in my beautiful case for a switch, or a wire to come out. I just had an idea now while reading the comments. I could wire a reed switch onto P6, then do a power up by bringing a magnet close to the box. Best part it, people who don’t know how the magic works, won’t be able to make it work :)
That’s a nice idea as long as your environment won’t give you a load of false resets. :) Should be OK as long as you don’t live near any large magnets ;)
Magnets are also (usually) how laptops detect if the lid is open or closed – but in this case they use a hall effect sensor rather than a reed switch.
what is the difference between this and a swith on powering cable?
This method resets the Broadcom chip without removing the power. It’s known as a soft reset I think, like the reset button on your desktop PC. Killing the power is a hard reset and is not very advisable on the Pi as it can cause file corruption on the SD card, data loss etc.
!!
AFAIK using this reset button instantly resets the CPU and has just as much chance of causing file corruption on your SD card as pulling out the power cable.
I’m not sure where your “soft” and “hard” reset terminology has come from, but according to this this page I guess the RasPi equivalent of a “hard reset” would be writing a freshly-downloaded OS image to your SD card ;-)
It might cause file-system corruption, but the SD card will still be given a chance to finish writing its own blocks, so at least your SD card won’t be broken (i.e., you can still format it).
That is what I think will happen. That way, nothing is damaged permanently.
(Ditto for any USB hard drives, flash drives, etc.)
forumisto, the difference is that you are not power cycling the power supply. When you turn on a computer the inrush current to the power supply is a major source of power supply failure. This is such a common cause of failure that is you started flicking on and off a computer at the power you’ll probably cause the power supply to fail after a few hundred cycles.
If you are doing low level development it is pretty easy to lock up a computer. The RESET line allows the computer to restart without needing to restart the power supply. Thus we don’t need to provide developers with a stack of spare power supplies :-)
As far as the computer is concerned a RESET is a power-on. When you power on a computer a circuit waits for the power supply lines to settle to their correct values, and then asserts the RESET line. This ensures that the computer starts from a known state, rather than having issues with corruptions which happened when the computer was under operating voltage.
A system-on-chip like the RPi will include the power-on reset circuitry, but exposes the RESET line on a pin so that the SoC can be used within a larger system or can be reset during software development.
With that knowledge you can deduce the effect of a RESET on the SD card.
The SD card has two broad power-related failure modes.
Firstly, the filesystem can be corrupted by inconsistent data from not writing an entire transaction. This is exactly the same situation as with hard disks. There are various techniques: designing write orders so that the transaction is always interruptable (BSD’s soft updates), a log file similar to those used by databases (the journaling file systems like IBM jfs, Linux ext3, etc), a data structure which is always consistent (Sun ZFS uses techniques from virtual memory, Oracle BTRFS uses a property of B-trees).
Secondly, removing power when updating a cell. A cell can only be written in its entirety, so to change one byte the card has to read the whole cell and then write back the whole cell with that one byte changed. That can take some time. Add a wear levelling algorithm on top of that and it can take a very long time. Wikipedia has a good article on “wear amplification”. This has the effect that dropping power can corrupt a substantial number of cells, not just one. Moreso, it may corrupt them permanently (ie, the cell can’t even be moved from those values by a disk re-format).
So answering your question is simple. Using RESET will make no difference to the corruptions caused by reason (1). Using RESET will make a difference to corruptions caused by reason (2) if the SD card remains powered during the reset.
Looking at the schematic you’ll see that power is maintained to the SD card throughout a RESET of the SoC. You can see that the RESET line doesn’t lower the board’s 3.3V line. You can see that the SD card’s Vdd runs to the board’s 3.3V line.
does this option execute the halt command?
No. See previous answer. It executes a soft reset. :)
The RESET line is a hard reset: the processor and any controllers immediately begin their power-on sequencing. There is no opportunity to save program state.
A “soft reset” is a different beast again. That’s done by the CPU issuing an instruction to reset. Because this is under CPU control the system can be cleanly halted prior to the reset. In traditional UNIX the “reboot” command issues the reset instruction. “reset” would be the last program called by “shutdown -r now”. Things are a bit more user-friendly these days.
Thank you Glen, for three excellent replies :)
Thanks a lot for this awesome guide !
I followed it and it works perfectly.
Now I’ll be able to tell my parents “Press the button with the blue/white wire” instead of “disconnect the micro usb cable – wait, which one ? – the black ! – all of them are black !”: :laugh:
I was a bit afraid to solder on my brand new raspberry but fortunetly it all went fine :)
Regarding the paper clip method. The old swedish computer magazine DMZ once had an article that described how you reset the C64 via the use of a paper clip. Lets just say that this article became very popular among shops that specialized in repairing broken commodore 64:s :)
Yup tried it! The only problem is in some states it can corrupt your SD card I’ve found out through web searching. So be warned!
Oh yes, resetting is not something you should do lightly. Did you catch the followup blog about a self-resetting Pi? In that there’s a script that does it more safely. Basically, if you sync the file system first it’s a lot safer. But let’s face it, the reset switch is there to reset the Pi when it crashes, so your only other option if “ssh and shutdown remotely” doesn’t work is to yank the power – which is also risky for the card. Since my Pi’s hardly ever crash, this is much more useful to me for bringing them back up when they’re shut down. ;)
Hi,
Nice hack, but my version of the board purchased from farnell doesn’t have this unpopulated header on it :(
J
Must be a Rev. 1 board. This header was introduced in Rev. 2 in September 2012.
I guess so as I ordered mine in February 2012 and got it in June.
J
The Pi also has some hardware watchdog timer capabilities that can be used to automatically reset in some conditions – might be a good first step for those doing unstable prototyping but less comfortable with taking an iron to their Pi, or just if the Pi isn’t accessible. This page has the basics:
http://www.megaleecher.net/Watchdog_for_Raspberry_Pi
Oddly enough I think I was reading about those somewhere the other day. I think it might have been on Gadgetoid. :)
A big thanks for this perfect tuto, that’s make me happy :)
First, thanks for a solution for a true soft-reset button!
For posterity: if you are looking for a switch just to bring back Pi from halt, there might be an easier solution which doesn’t require any soldering. According to these links, now you can connect a switch to 5th & 6th GPIO pins (from edge, same ones used for Safe Mode), and short them in order to wake up the halted Pi. I tested this using a button/switch from an old PC case and current raspbmc build, and it works great! You can leave the halted Pi plugged in, and just wake it with the switch when you need it.
Thanks so much for posting this! I was wondering whether or not there was a way to bring the Pi out of a halt state. I’m going to add this header and a switching mechanism so I no longer have to unplug/plug the unit to cycle power. Ideally I’ll find a way to mount that switch inside my case as well. This video was exactly what I was looking for!
Great Stuff,
i but on there an on / off Button.
Just wondering, could this be used as a power switch? so not just a reset switch, but actually turn it on or off? if those two pins are connected that would be off yeah?
No. With those pins connected, the Broadcom is constantly resetting itself (although I don’t know the frequency) it’s not OFF. It’s very easy to hook up a button to GPIO for shutdown though, then you can use this one to bring it back up again.
“It’s very easy to hook up a button to GPIO for shutdown though”
How so? Are there links to this? I’m quite new to all of this, sorry for the noobish style questions
There’s a whole thread on it here…
http://www.raspberrypi.org/phpBB3/viewtopic.php?f=63&t=18677
I haven’t read that whole thread, but you may also find these links interesting:
http://www.pi-supply.com/
http://www.raspberrypi.org/phpBB3/viewtopic.php?f=37&t=48455
With the pins joined, I believe the CPU would be held in a reset state, it wouldn’t be “constantly resetting itself” ;-) The CPU only starts booting once the pins have been released.
Oh OK, fair enough. :)
Oh, I’ve just been looking for a way to “wake up” a halted Raspberry Pi XBMC, and this looks pretty promising. I think I’ll just add a transistor and connect it to +5 to prevent anyone from accodentally resetting the Pi while it is running…
I don’t think that’ll work – even when it’s in its “halted” state, the RaspberryPi is still outputting +5V on its header pins.
And if you check the schematics http://elinux.org/RPi_Hardware#Schematic_.2F_Layout you can see that P6 merely connects GND to the RUN signal, so I guess if you did want to prevent accidental-resets-while-running you could use a normally-closed relay driven by a transistor, driven by a GPIO pin, and then drive the GPIO pin high during bootup (which would open the relay, and thus disconnect your button from the RUN signal). I haven’t tested, but the GPIO pins may automatically go low when entering halt state, but if not you’d need to drive the GPIO pin low during shutdown (which would turn off the relay, reconnecting your “wakeup” button).
An alternative approach might be http://www.pi-supply.com/product/pi-supply-raspberry-pi-power-switch/
All the P1 GPIO pins are low on halt state except for pins 3 & 5 SDA and SCL which are both pulled up high.
(Note I said GPIO pins – Andrew is correct in that the 5V pins are still 5V, also the 3V3 pins still 3V3 and GND is still GND)
On boot, SDA & SCL stay high and CE0 & CE1, along with Txd are also high, the rest stay low.
(At least that’s the case on my current SD card with SPI enabled by default and the UART terminal login disabled to allow the pins to talk to an ATMEGA).
Thanks everybody, this looks like the way to go. I’ll keep you posted about my progress… :-)
/sascha
Thanks for this great instruction.
I implemented it with my RaspRadio classic:
http://www.flickr.com/photos/rigasw/sets/72157638612312533/with/11796456476/
There it is used to restart the radio after it had been shutdown properly. (This is done with a seperate button that initiates a “shutdown -h now”)
Schwabinger
Useful information and video – thanks.
Just curious: does this reset technique shut the pi down cleanly? In the video it seemed to go down very quickly.
No. It’s the same as hitting the reset button on your PC (because that’s exactly what it is).
Understood. Think I’ll wait until ACPI support is there until I use a hardware switch to bring down my pi. Too much risk of corruption on the SSD. Until then I’m using the “RasPi Check” Android app to bring things down cleanly from my mobile – which seems to work well.
DF
The Pi will never have “ACPI support” – the hardware simply doesn’t support it.
However there are a number of addon options such as https://raspi.tv/2013/pi-supply-atx-style-power-switch-for-raspberry-pi-review which provide an alternative solution to powering on/off your Pi with the push of a button :)
I have a prolific usb to serial adaptor on my raspberry pi r2, and if my pi crashes or gets stuck, I pull this out, then plug it in and the pi resets. This also works with my wifi adaptor. (The recommended one)
Yeah, common problem, as described here https://raspi.tv/2013/wake-up-your-pi-with-wifi-dongle
It’s because the sudden rush of current to the newly-plugged-in USB device causes a voltage drop, which causes the CPU to brownout and reset itself. I guess the easiest workaround (if a more powerful PSU doesn’t help) would be to use a powered USB hub.
If Ctl+c doesn’t work, this always does.
Yeah, because as far as the CPU is concerned a brownout is no different to un-plugging and the re-connecting the power supply. That always works too ;-)
Yes you can’t really hot-swap USB devices on the Pi, sadly. You could on the early ones that had extra poly-fuses, but these were deleted from spec on Rev 2 because they caused voltage drop issues which were a bigger problem.
The ideal solution would possibly have been to put in a low value resistor instead of a polyfuse. Not enough to cause a large voltage drop, but just enough to stop the USB issue. Some people modified their Rev 1 Pis like this by bridging the polyfuses with 1 or 2 Ohm resistors and it solved both problems.
I use it if my pi crashes and won’t obey ctl+c. I haven’t had to use it a lot.
Thank you for this!
I thought of adding a reset switch to my Pi as well, now i have a great start for that.
The only thing im not finished with yet is how to build my custom case :D
Thanks for your post.
Added a reset / on button in no time at all.
[…] Featured above is one of the recommended tutorial videos for the Model B P6 pads created by Alex of RasPi.TV: […]
[…] eu l'idée d'ajouter un bouton poussoir, et après coup j'ai vu que je n'étais pas le seul. J'ai souhaité que cet interrupteur ne soit pas directement soudé mais amovible, pour pouvoir […]
[…] 2-pin header and Power/Reset SwitchThese were used to add a reset/power switch to the Pi (which can be soldered onto Rev 2 Pi – See Tutorial) […]
Happy to share that the pi2 also has holes for a header to do the same thing.
This time it is labelled RUN. Right next to the LEDs
…exactly the same as on the A+ and B+ :-)
what about a pi rev 2 board with the 1g mem it has a 2 pin header but is not labeled as listed here and the board layout is different. Can it be reset in the same way
You’re talking about the Raspberry Pi 2 model B? You must be as that is the only Pi to date with 1 Gig RAM. Be aware that is not the same as a model B Rev 2, which is what this article is about.
However the answer is yes. The 2 pin header on the Pi2B is a reset header.
Very useful.
I put Kodi (XBMC) in the raspberry pi, and everything was OK until the software froze, but after reset the Pi desconnecting the power after two or three times the SD got corrupted. If I had a reset intalled probably would not had this problem…
Conclusion: Good idea to add this reset optionallity.
Thanks
Using this reset switch *would* cause SD corruption, because as far as the OS is concerned, pressing the reset switch is identical to simply disconnecting the power. Read through some of the other comments on this same page…
Does this same feature exist on the new RPi 3?
Yes
Where can I buy those pin headers and switches that you are using?