
Today we’ll take a closer look at the PiJuice and how to use it. We’ll also do a bit of testing of the PiJuice HAT and the 6W/40W solar panels. This carries on from the previous post where I had an initial look at the PiJuice.
It’s mostly a video review, but there will be some extra information here in the blog.
Calculations
Before running the testing I did some calculations to predict how long the PiJuice battery might last.
The BP7X battery has 1820 mAh and a nominal 3.7V. Multiplying these gives 6734 mWh or 6.734 Wh
Since we know how much power a Pi3B uses when at idle (there’s this guy on the internet who measures power usage of each new Pi) we can work out how long it should last.

Pi3b uses 230 mA at 5.2 volts when at idle
230 * 5.2 = 1196 mW
So, (at 100% efficiency) when full, the PiJuice battery, at 6734 mWh, should be able to power a Pi3b at idle for…
6734/1196 = 5.6 hours
We need to consider that the PiJuice is converting 3.7V to ~5V, so there will be some conversion losses. This is normal. I would expect conversion losses of, say, 10%. Also, you rarely get the full capacity out of a lithium battery because they are usually tested to destruction when their rating is measured. In use, they are discharged sustainably, which means less. So let’s knock off another 10% to take that into account.
So, being quite conservative and knocking off 20% overall, we’d expect 0.8 * 5.6 hours = 4.5 hours on a Pi3B at idle. I did these calculations before I ran any tests.
Test Procedure
I fully charged the PiJuice battery by connecting it to an official Raspberry Pi 2.5 Amp 5.2 Volt PSU for five hours. The blue LED indicator was solid blue for at least the last 2 hours. So I’m confident it was as charged as it was going to get.
It was then connected to a Pi3b, which had only a keyboard dongle and HDMI screen attached. It booted fine. I then checked the battery status, switched off the monitor and left it overnight.
I was running the following script every minute from cron to log the uptime. It writes the output of the ‘uptime’ command to a file called ‘uptest.txt’ every minute. This will survive when the PiJuice ‘conks out’ and we’ll be able to look up how long it lasted when we next power it up.
import subprocess
uptime = str(subprocess.check_output("uptime",
             stderr=subprocess.STDOUT, shell=True))[3:-3]
uptime += '\n'

upfile = open('/home/pi/uptest.txt', 'r')
lines = upfile.readlines()
upfile.close()

if len(lines) > 20:
    upfile = open('/home/pi/uptest.txt', 'w')
else:
    upfile = open('/home/pi/uptest.txt', 'a')
upfile.write(uptime)
upfile.close()
I originally had it in mind to just run the ‘uptime’ command directly from cron and ‘tee’ the output to a file, but then I realised that as soon as I boot the Pi it will overwrite that file (doh). So I knocked up the above little Python script to be a bit more robust. Also, I don’t like scrolling through large files in nano, so I had it restrict file length to a maximum of 21 lines. This means I should be able to see my ‘uptime’ result on the first page or so of the file. (If you are slow and unlucky you could lose this data on next boot. I usually disable the cron line as soon as the Pi boots to avoid overwriting the data. There is a 1 in 21 chance that you could lose your data if the last file had 21 lines – but that’s easily adjusted.)
The output looks something like this and shows you how long the Pi has been ‘up’…
17:51:01 up  1:18,  2 users,  load average: 0.01, 0.02, 0.00
17:52:02 up  1:19,  2 users,  load average: 0.00, 0.01, 0.00
17:53:01 up  1:20,  2 users,  load average: 0.00, 0.00, 0.00
17:54:01 up  1:21,  2 users,  load average: 0.00, 0.00, 0.00
17:55:01 up  1:22,  2 users,  load average: 0.00, 0.00, 0.00
Results
1st iteration. The last entry in the file says the Pi was up for 4:09
01:08:01 up  4:06,  2 users,  load average: 0.04, 0.05, 0.01
01:09:01 up  4:07,  2 users,  load average: 0.01, 0.04, 0.00
01:10:01 up  4:08,  2 users,  load average: 0.00, 0.03, 0.00
01:11:01 up  4:09,  2 users,  load average: 0.00, 0.02, 0.00
2nd iteration was a bit shorter 3 hrs 50ish
14:25:02 up  3:47,  2 users,  load average: 0.06, 0.03, 0.01
14:26:01 up  3:48,  2 users,  load average: 0.15, 0.06, 0.01
14:27:01 up  3:49,  2 users,  load average: 0.05, 0.04, 0.01
14:28:01 up  3:50,  2 users,  load average: 0.02, 0.03, 0.00
Could this be because it was in the workshop at about 16 °C whereas the other one was inside at about 21 °C?
3rd iteration.
For test 3 I also had a look at the PiJuice software and noticed that the wrong battery profile was selected. So I corrected that as well as running the test in the warmer office environment. Getting the correct battery profile is an important step both from the point of view of charging safety and battery longevity (number of cycles).
02:11:01 up 4:14, 2 users, load average: 0.05, 0.03, 0.00
4:14 – the longest duration so far
4th iteration was also done inside, same as 1 & 3.
02:57:01 up  4:06,  2 users,  load average: 0.00, 0.00, 0.00
02:58:01 up  4:07,  2 users,  load average: 0.00, 0.00, 0.00
02:59:01 up  4:08,  2 users,  load average: 0.00, 0.00, 0.00
03:00:01 up  4:09,  2 users,  load average: 0.00, 0.00, 0.00
4:09 again.
So we had 4:09, 3:50, 4:14, 4:09. But the 3:50 was in a colder environment (workshop, ~16 °C) and the others were in the office (~21 °C). So you can safely say that at ~21 °C the PiJuice with the BP7X 1820 mAh battery will power a Pi3b at idle for about 4 hours and 10 minutes.
If you don’t need the Pi running constantly, you could make this last longer by periodically waking the Pi up when needed (using the PiJuice wakeup features).
Solar Panels
I hacked an Anker USB cable by removing a portion of the outer insulation and shielding to reveal the four power and data lines (with their insulation intact).
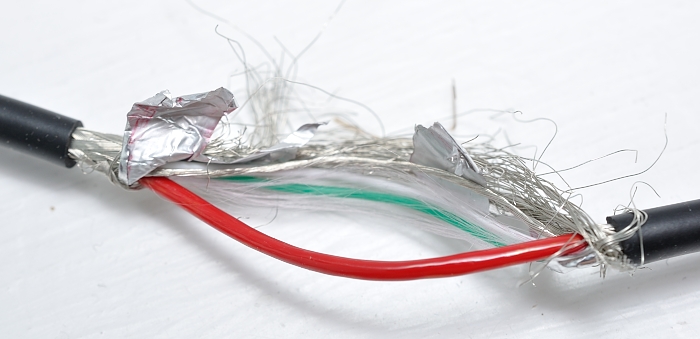
Anker USB-uUSB cable opened up to enable clampmeter current measurement
A clamp meter was used to measure current being fed into the PiJuice from the solar panels. It’s all on the video, but the weather was pretty overcast, so optimal results were not achieved (in terms of current output).
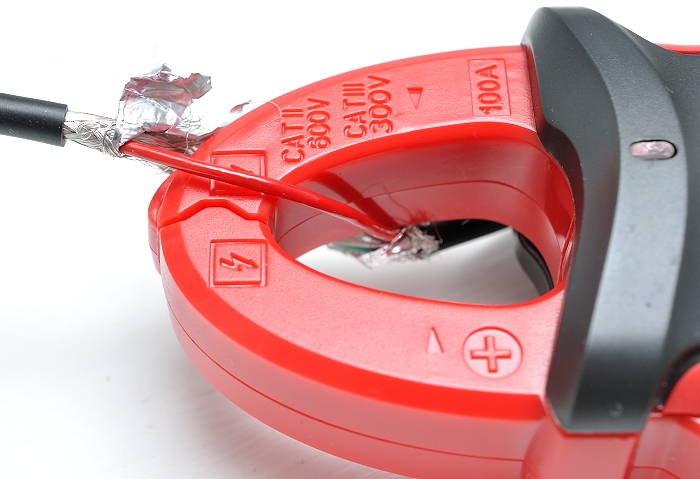
Clamp meter used to measure current non-invasively
But, in my limited testing, I did manage to get 0.3A from the small 6W panel and 0.9A from the 40W panel. The latter was almost certainly limited by the PiJuice charging circuitry. The 6W panel should be able to deliver an Amp in ideal conditions and the 40W panel should be able to deliver several Amps. It has two USB outputs so you can use it with multiple devices simultaneously.
Even in overcast conditions the 40W panel was able to charge the PiJuice battery at a reasonable rate.
Supplementary Information
- The PiJuice DIP switch is there to change the battery charge profile. By default it should be set to the correct position for the battery.
- The i2c address can be changed from the software/ firmware. If you forget what you set it to you can also reset to factory settings.
- The MCU is an ARM Cortex-MO STM32-F0. The RTC and hardware watchdog timers are built into that chip. There is an external crystal (X1).
- The little chips are the battery fuel gauge (U8) and battery charge chip (U2)
- The little clips M1 to M4 are clips for an RFI shield that can be used as a heatsink for the charge chip. This has been added for cases where PiJuice might be used in hot climates or environments. The shield likely won’t be standard issue though.
- The 2 pin header (J3) is for plugging in a solar panel separately straight into vsys for charging from a lower mA and bypassing the 5v circuitry. (More efficient but more fiddly.)
- The two pins available on top (J4) are for an external power source.
- The 6 pin header on top is a breakout for 2 IO pins on the STM32-F0 and gnd, vsys, vcc 5v0, and 3v3
- There are headers to connect an off board switch as well as a non-microUSB solar panel (J5)
- The little flap on the 6 watt solar panel can be used as a kickstand using the thin velcro strap attached to the flap.
- The projects listed in the guide have not yet been completed. They are planned but we were waiting on these final samples to complete them. Additionally a couple of them are waiting on the Maker Kits. See latest PiJuice KickStarter update for more about that.
It’s Going to be a Nice Product
This brings my PiJuice review series to an end. It’s time to send the PiJuice and solar panels on to the next reviewer. I think the final product will end up being very nice. There’s still a few aspects to finish off but it’s getting pretty close now.
Do you measure direct current with current clamps? You are a wizard?
Not a wizard, but yes this clamp meter can measure DC Amps. Did you not think that was possible or something?
the only “DC” that the clamp may not measure is from a battery.
My clamp meter measures DC from a battery fine…
Why would DC from a battery be any different?
Most if not all non battery “DC” have a AC in them. One diode, PWM, or some other noise.
Yep and you can change between measuring the AC component and the DC component of that flow with the switch on the meter.
I guess klint-k is talking about “DC” generated from an AC->DC switch-mode power-supply? In which case yes there would probably be some slight AC ripple on the DC output, depending on how good the filtering is.
But I’d expect the power-output of a solar panel to be fairly constant DC?
Disclaimer: this is all my uninformed opinion, I’m not an electronics guy ;-)
Yes, I know about this possibility, but with this method of measurement, a very big mistake.
I have one of those clamp meters, they are pretty accurate, certainly good enough for what hes testing. A few times I’ve compared this exact model clamp meter to a proper calibrated inline current meter and the difference usually just a few mA, so small that most of the time its not worth setting up the proper meter.
In the text above Alex quotes 0.3A from the small 6W panel and 0.9A from the 40W panel. According to the manufacturers specification for the meter (which is the worst case scenario) at 0.3A the accuracy of the meter will be +/-9mA and at 0.9A +/-21mA. For the purposes of this experiment, the readings probably fluctuated more than that from clouds moving in the sky so its largely irrelevant.
That PiJuice software looks super-comprehensive – very nice! (and easy to install too, which is always a bonus)
Thanks 🙂
Just updated the documentation on GitHub too – https://github.com/PiSupply/PiJuice
More updates to come soon
Is it already known what is expected price of PiJuice set?
I guess that’s a question for https://www.pi-supply.com/
£48 all in ATM.