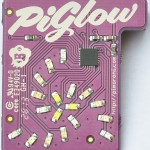
Pimoroni released the PiGlow in August while I was away in Poland. It’s a small, purple board (that fits inside a PiBow) with 18 LEDs in 6 colour groups, arranged in a 3 armed spiral formation. It has an 8 bit, 18-way PWM controller that can be used to control the brightness of the LEDs (0 = OFF, 255 = Fully ON). (More on PWM here)

PiGlow in action
Although I was abroad when it came out, there was plenty of banter about it on twitter. In a few short weeks, various people have written Python classes to make it easier for us to use the PiGlow board with Python.
- Pimoroni published some code to get us started
- Jason “Boeeerb” Barnett wrote a Python class on top of it
- Ben Lebherz forked and tweaked it and added gamma correction
- Simon “Cymplecy” Walters has added Scratch support
- Gordon Henderson has added WiringPi2 support (in C)
- Phil “Gadgetoid” Howard has incorporated this into WiringPi2 for Python (but it’s not mainstream yet)
Once I can get the latest WiringPi2 Python up and running, I’ll give it a shot with that, but for the time being, I thought it’d be fun to code around Ben Lebherz’s “PyGlow” class and combine it with some RPi.GPIO interrupts, some buttons and a couple of my own PCB prototypes.
One Header to Rule Them All
One obstacle to overcome, if you want to use GPIO and PiGlow at the same time, is that PiGlow covers all the P1 pins if you attach it in the “normal” way.

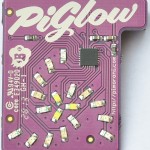
Underneath the PiGlow showing the 26 way female connector
Actually, it’s a pet peeve of mine that so many Pi boards, which only use a few of the GPIO pins, cover up the whole lot and prevent you from using the rest. I know it’s a design compromise, and it makes it much less likely that people will damage their Pi, but I find the restriction quite frustrating. So I’ve designed a board that reclaims the Pi’s flexibility, while enabling use of add-on boards like PiGlow and many others. It’s still a prototype, so I’m not going into details on that today. But you’ll see it in the video between the Pi and PiGlow.

The test setup for PiGlow with GPIO
Mr Brown, upside down1
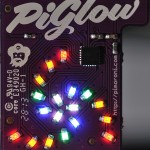
So I’m using one of these prototypes to stand the PiGlow up. Because of the nature of PiGlow’s female header, it had to be upside down. It doesn’t make much difference to the LEDs, but the logo is updside down :( Oh well, you won’t even see it once you’ve been using your PiGlow for a while. The LEDs are VERY bright.
Have a look at the video, and if you’re interested in the Python code, leave a comment below and I might put it on GitHub.
Bottom Line?
PiGlow is a really nice product. It’s a simple idea done really well. It’s an LED board with a twist (pun intended). You can get one here for £9.
1 Obscure Dr Zeuss reference. (Hop on Pop).
Here’s some more photos
-
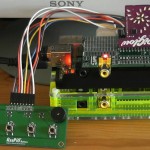
- The test setup for PiGlow with GPIO
-

- Weird out of focus effect #1 in a series to cut out and collect
-

- Weird out of focus effect #2 in a series to cut out and collect
-
- PiGlow in action
-
- PiGlow board
-
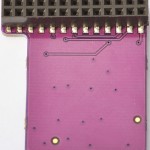
- Underneath the PiGlow showing the 26 way female connector
-
- PiGlow
-
- PiGlow from Pimoroni
Excellent demo of the capabilities – might even get one myself. And as for the preview of the other board – that suddenly makes all the other GPIO boards you can get make sense!
[…] Watch the video and read more here […]
Would the PiGlow, on a Raspi B+, be compatible with this? http://mausberry-circuits.myshopify.com/products/illuminated-led-shutdown-switch would there be any way to make it easy to do so?
I don’t know what ports that board needs, but the PiGLow hogs the first 26 pins. If you can use alternative ports (you may have to tweak the software) you should be OK to use some of the B+ extra pins