This blog is about the very much improved version 2 of the RasPiCamcorder. I originally built a quick and dirty free-standing camcorder two days after the Raspberry Pi camera was launched. I was in a hurry, as there was a Cambridge Jam two days later. Major novelty factor. It worked ok and it looks like this…

Raspberry Pi camcorder Mk 1 front
Now we need buttons
Later on I thought it’d be nice to have one that booted straight into camcorder mode and had buttons to control it with, so you don’t need an additional device to use it. I’ve also used a different case and written some Python software to drive it. This Mk2 model is still a prototype, but it’s a lot more polished. I’ve also hot-glued a filter ring on the front so that I can attach close-up lenses as I intend to use this as a second camera in my workshop videos, or for time-lapse photography of small things like plants growing.

RasPiCamcorder Mk 2
So what’s in the case?

The innards of the RasPiCamCorder Mk2
The components needed are…
- Raspberry Pi model A – It works fine with either A or B, but the A uses less power, so better for battery powered applications.
- Edimax wifi dongle – not strictly necessary, but quite useful. Can be unplugged, when you’re out and about, to save power.
- 10cm ribbon cable – shorter than the standard one
- Switching Voltage regulator – takes the 12.6 V, 3-cell lipo battery voltage down to 5V to power the Pi. Works with any supply from 5V to 35V. The reg is sitting on two balsa feet so it’s not touching the Pi’s SOC.
- Bluetooth serial adaptor – allows you to log in and control the RasPiCamCorder with your smartphone or tablet if something goes wrong, or you want to do something other than just filming. So no need for wifi when out and about. Uses very little power (~5 mA)

Bluetooth serial adaptor
- Cyntech Case. I cut a slot in it and used two of the screw-holes, on the underside, to route wires for buttons, led and battery.

Cyntech case with slot cut for camera ribbon cable
- Two control buttons

Control buttons (and led) for RasPiCamCorder Mk 2
- An led and resistor. There is an led on the front of the camera, but you don’t want it on if you are facing a window – you’ll have a red reflection in your shot. So I put another one on the back, and you can choose either, neither or both to be on when recording.
- A lipo battery. Lightest, smallest power source available.
- Battery connector. I use Deans type connectors on all my lipos.
- Wires and connectors. 4×2 angled female header connector for the bluetooth serial adaptor, 2×1 & 3×1 female connectors for power and button control connections.

Header connections for power and control
- Very much optional, a 52mm filter ring hot-glued on the front to add attachments like a close-up lens or a lens hood (or both in this shot)

Lens hood fitted to RasPiCamCorder Mk 2


The camera board is attached with white tack, but once finalised, I’ll blob some hot glue down.
(Updates: This is now done as you’ll see in the video, we also now have two filter rings and the hot glue attaching the filter rings is much neater. I’ve used a micro SD card adaptor to avoid a jutting out SD card as well).
How does it work?
It boots straight into camcorder mode. Pressing the blue button starts recording, pressing the black button stops recording. By default, both leds are lit while recording.
A long press (>1.5s but less than 3s) of the black button closes the camcorder program. A very long press >3s shuts the Pi down, when you’ve finished. You can fire it up again by disconnecting/reconnecting the battery.
It records on the SD card and copes well with 1080p @ 25 fps.
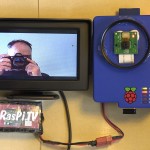
Can you see what you’re shooting?
Optionally, a small, low res, car reversing screen can be attached using the Pi’s RCA socket to give you a preview of exactly what you’re shooting. (You can use any hdmi screen instead.)

Recording while I take a photo of it.

Waiting for a button press (I’ve now found out how to increase the font size)
Here’s the video
Any sound?
Not at this point.
What next?
- The above photos are already slightly out of date (only a few days), but the observant will have spotted the differences in the video. The RasPiCamcorder fell off the desk a couple of days ago and had to have surgery, as the SD card slot broke. I fitted an Adafruit microSD card adaptor, which involved routing out a 1mm deep x 15mm x 15mm square from the lower part of the case.
- A separate stills mode is planned for future development. (Actually this is more or less done including DropBox upload – as seen in the video)
- Live video streaming works if controlled via command line and Bluetooth/Wifi, but getting it to work with GPIO (i.e. buttons) has proven problematic (to do with root priviliges needed for GPIO control not playing nicely with streaming software. Update: I just figured out a workaround for this and got it working.)
- It would be lovely to have a really small, say 2 inch, LCD screen running off spi, but there isn’t currently a way of getting the camera module to output to the framebuffer. (Nobody’s figured out how to do it yet. It’s either a Broadcom person’s firmware fix, or it’s simply not possible). That’s a bit of a barrier to creating a true camcorder, but hey, most camcorders can’t upload to DropBox, although Samsung appear to be on the case with their latest DSLR. ;)
Are you interested in a kit?
I’m considering putting together a kit of parts for this. Let me know if that’s interesting to you, either in the comments below, or by email (alex AT raspi.tv)
There was not enough interest in a kit to pursue this, so the idea was dropped. I have published the full suite of software on GitHub though (click here).
Alex, this is fantastic – really nicely done :-) I think I’ve got all those bits… except the adapter and the lenses!
Can’t quite believe you broke another SD card slot :p
Thanks Mike. I put it down on a sloping pile of papers and it slid off onto the floor – the battery pulled it to the ground – crunch. But since it’s a permanent installation, the micro SD card slot is a big improvement anyway. I always intended to use it, but when I realised I would have to rout out part of the case, I didn’t bother. This forced me to do it and I’m pleased with the result. It wasn’t that hard with Dremel and engraving bit.
[…] Read all about how he did it here […]
Hi Alex – more great stuff! I would definitely be interested in a kit – including all the optics and TV (or at least pointers to where you can get them).
I’ve seen three methods of changing the console’s font and its size: editing /etc/default/console-setup.txt,
sudo dpkg reconfigure console-setup, and setfont /usr/share/consolefonts/[one of the fonts in that directory].I haven’t tried any of these myself yet so I can’t report on the individual advantages and disadvantages, but which one did you use? Also, would it be possible to write a Python program to change the font size based on what type of screen(composite or HDMI) is connected?
sudo dpkg-reconfigure console-setupIt works a bit like raspi-config (blue screens with red selection – ncurses – I think)
Really good as it takes effect immediately and no reboot required. So if you get the wrong size, you can tweak it until you’re happy with it.
It probably would be possible to write a Python script, but it would have to use one of the other methods because the dpkg method requires user input
Decided to give
sudo dpkg reconfigure console-setupa try, but kept getting an enigmatic message that had nothing to do with fonts. I finally figured out it was missing a hyphen:sudo dpkg-reconfigure console-setup.Wasn’t sure what encoding to use so I went with UTF-8, then I let the RPi “Guess the optimal character set” as I didn’t see any that mentioned English. At first I left choosing the font up to the RPi too, but after I finished I think it chose Terminus which I didn’t like. So I re-did it several times and it seemed like “VGA” was the original font.
All this experimenting has helped me get an idea of what sort of font I might like when using a composite display.
Good stuff. Experimenting is what it’s all about. Even when you mess up, with the Pi, the OS is only an SD card reflash away.
Hi Alex,
I’m finalising a LCD driver core for Guzunty(https://github.com/Guzunty/Pi/wiki). Works with the excellent LCD driver design from notro (https://github.com/notro/fbtft).
Might be just what you’re looking for.
That sounds interesting Derek :)
Good job,
I like several of the components you put together, both in hardware and software. Have you already or are you going to publish the software? I can’t seem to find a reference or link to it.
Tks, Paul
I am, but it’s not quite ready for public scrutiny yet.
[…] great still and motion image camera build by Alex Eames via raspi.tv: This blog is about the very much improved version 2 of the RasPiCamcorder. I originally built a […]
Alex build, I am working on a robot, what command line do you use for streaming video?
I wrote a whole blog post about this, I’ll dig you up a link…
Here is is https://raspi.tv/2013/how-to-stream-video-from-your-raspicam-to-your-nexus-7-tablet-using-vlc
You don’t have to “receive” the stream on a tablet, can be any device with VLC. It won’t run as super user though.
Very neat :-)
Rather than poke the ribbon cable through and have the camera board glued to the outside of the case, could you have cut a small square hole and glued the camera to the inside of the case, or would that make things “too cosy” inside? Or would it put the PiCamera lens at the wrong distance from the screw-on lenses?
If you’ve not done so already, it might be worth sticking some velcro to your RasPiCamCorder and batteries, to make more of a ‘single handheld unit’.
And in terms of button presses, it might be more intuitive to have it so that a quick press of blue starts a video, or stops the video if it’s currently being recorded, and a quick press of black takes a picture if video isn’t currently being recorded?
I guess it should also be fairly easy to adapt this into a wireless security camera by hooking up a PIR sensor to one of the GPIOs and have it automatically take (and upload/email/tweet) a picture whenever the PIR gets triggered? :)
ncurses interfaces tend to be monochrome, I think the blue and red screens are using whiptail.
IIRC the
tvservicecommand might be able to detect whether composite or HDMI is connected?IIRC
dpkg-reconfiguresimply edits other settings files elsewhere (which is why the change persists after a reboot). So if you can figure out what files dpkg-reconfigure is changing, there’s no reason you couldn’t write your own script to also do those same changes (without requiring user input) :)With the regulator and Bluetooth adaptor already in the case, there really isn’t anywhere inside for the camera to go.
Re the button presses, I had the same idea initially, but had some problems getting interrupts toggling the variables correctly.
I also wanted to have one program to manage stills and video, but they didn’t play nicely together and I couldn’t find an explanation for why. As soon as I took the stills parts out again, the video part started working properly.
And don’t get me started on streaming and GPIO. Using VLC for streaming, you can’t trigger it with GPIO without a workaround (VLC can’t be run as root, but GPIO needs it). I have a workaround I’ll be documenting later.
Re root required for GPIO: WiringPi can operate GPIO as a normal user.
Have you got that working with Python? I know also that the Quick2wire libraries can do it.
Maybe because the button interrupts weren’t being properly debounced?
Weird! :-S
I didn’t actually mention streaming ;)
Once you’re already running as root it’s easy to run commands as other users with ‘sudo -u ‘ e.g.
andrew@localhost:~$ whoami

andrew

andrew@localhost:~$ sudo bash

root@localhost:~# whoami

root

root@localhost:~# sudo -u andrew whoami

andrew

root@localhost:~# exit

exit

andrew@mithh:~$ whoami

andrew
And yes, you can use it with pipes too, e.g.
andrew@localhost:~$ sudo bash

root@localhost:~# whoami

root

root@localhost:~# echo hello | tee root-user

hello

root@localhost:~# ls -l root-user

-rw-r--r-- 1 root root 6 Jul 12 14:28 root-user

root@localhost:~# echo hello | sudo -u andrew tee normal-user

hello

root@localhost:~# ls -l normal-user

-rw-r--r-- 1 andrew andrew 6 Jul 12 14:29 normal-user
I tried with and without the built-in debounce and with one I wrote manually as well. It may well have been that, but it’s staying how it is for now.
Streaming, you didn’t mention, but you did mention security camera. For that application you’d want recording and live view capability, so I inferred the streaming from that.
As regards running processes as other users, I wasted about a day piddling about with it. Tried everything, and came up with my own workaround.
If I revisit that, I’ll be back to you for some help :)
The camcorder project has been fun, but, without a “proper” preview screen and without sound, it’s rather an academic exercise, when CPC sells an HD camcorder with sound and screen for about £35, and most people have this capability on their smartphones as well.
Sheesh, they’re that cheap now?! I remember being amazed when I was able to buy a ‘camcorder’ that recorded VGA-quality video straight to a CompactFlash card for _only_ £100 ;-)
_Some_ people *cough* don’t have smartphones.
The other (slightly advanced) option for sending data between processes running as different users would be using named pipes. The camera-app would write data to the pipe (appears as a file on disk), and VLC would read data from the pipe.
Alex just found your project look great will have to give it a lot more reading.
I have just finished a portable Pi camera with 3 switches ,WiFi if required internal NiMh can be recharged in situ.will have to look into Bluetooth , USB & Video out DC or charger input.
The 3 switches software re-written by a friend gives me start timelape, start still or video and shutdown to HALT. I was going to fit a 37MM to front of box then it would be nearly waterproof. all inside of a Maplin waterproof box.
Also fitted a RTC module BQ32k chip can talk to it but cannot get hwclock to work
Have had success with a Webcam HD timelapse put it onto Vimeo.
Just found panel mount 1pole center off toggle momentary make switch
so will allow more software options Terry Rowe
[…] Raspberry Pi Camera Add comments Aug 052013 I wanted to be able to upload photos from my RasPiCamcorder straight to DropBox. So I did a little research and came across an absolute gem of a program called Dropbox-Uploader, […]
A great raspberry pi camera design. I built a box similar to yours for time lapse photography. I had not thought of using a 11V LiPo with a regulator or bluetooth though.
Any possibility of looking at your Python scripts? Particularly the switch GPIO part?
Yes, I’ll be releasing them within a few days when I’ve got the documentation sorted :) The nice thing about this reg is that it’s a switcher, so it works with anything above 5V up to about ~35V (according to the spec). I mostly use it with 2 cell or 3 cell lipos though.
[…] https://raspi.tv/2013/raspicamcorder-2-standalone-raspberry-pi-camcorder-with-buttons-screen-and-drop… […]
Hi Alex
This is a brilliant project and I wonder whether you would consider doing a crowd funder approach to building the kit please? I would gladly help. If not would you consider doing a one-off please?
Thanks
Rich
Hi Alex – don’t forget I’m interested too!
Not enough other people were, but it wouldn’t be too hard to modify a HDMIPi to do this and you’d have a nice big screen as well (although you might end up looking like the Japanese tourists I saw at the Eiffel tower filming it with their ipads.) :)
RaspberryPiSpy has also done something similar, if people are looking for ideas… http://www.raspberrypi-spy.co.uk/2013/06/gromit-unleashed-field-testing-the-raspberry-pi-camera/
Kit Plz
Hi Alex. This is good work. This is exactly what i want to do with a card computer like raspberry or beaglebone black. After i saw your work, i decided to buy raspberry. But i am new to linux and this kind of programming. Anyway i think i will setup this camcorder. But i want raspberry to begin recording to sd card after i power it up, is it possible? Again, it is very good work.
Yes it should be possible to make pretty much anything you want happen on boot.
Alex Did you ever do the Bluetooth interface for this project in your scripts.
No. The bluetooth is in hardware. It’s a serial port bluetooth interface that slots on the UART GPIO ports.
All you then need is an android app (or ios if you prefer fruitier devices) to enable you to login.
Thanks I know it is hardware are you saying Bluetooth module are automatic install/supported by Raspbian software.
Yes and no. As long as you haven’t changed from default, the serial port is active by default.
But, you WILL have to set up your Bluetooth adaptor. The link was in the original raspicamcorder post.
https://raspi.tv/2013/how-to-make-a-standalone-camcorder-from-your-raspberry-pi-and-raspicam
But specifically it’s here…
http://blog.miguelgrinberg.com/post/a-cheap-bluetooth-serial-port-for-your-raspberry-pi
[…] of parts designed to work with Raspberry Pis; the most important being the camera module. A quick Google search told me it possible to build so I took it from there. The first prototype I built used an […]
Alex, thanks for all the information. Question though, how would I go about boosting the range of the bluetooth? I would like to get around 50 – 100 meters away from the camera and still control/view from my phone. Is this affordable and possible?
I thought Bluetooth was designed as a short range technology?
But it is a radio signal, and maybe something like this will help…
http://www.instructables.com/id/Increase-and-extend-the-range-of-a-USB-Bluetooth-d/
That’s perfect, that’s exactly what I needed. But I think your right, so maybe I’m asking the wrong question. Would there be another way to extend the range allowing my phone and the camera to communicate? Basically I want to view the video of the camera at long distance in areas where there will not be WiFi nor cell service.
Can you not use a portable router? Or even your phone as a router?
Or, depending on what USB WiFi dongle you’re using, it’s also possible to set up your Pi as an Access Point, and have your phone connect directly to that.
If you’d be happy with just photos, rather than video, another alternative would be http://www.raspberrypi.org/pi-in-the-sky-2/ which allows you *very* long range transmission ;-)
Hi, Thank you for presenting very cool project. I wonder to know how to connect pi with another microcontroller device via Bluetooth V3.1+EDR for live VGA streaming? if possible, if not what about Wifi?
Thanks
Great work. What type of lipo battery did you use?
Just a small 2 cell 2000 mAh I had lying around.
dear alex
what would i need to change to make the camera automatically start filming when powered up? i then only would need a single control button.
thanks for your advice, roman