Continuing with our theme of 7-segment displays driven directly from the Raspberry Pi’s GPIO using Python, I was asked for an explanation of the code from the previous post. In order to explain something, you first have to fully understand it, so I took some time to have a good look at the ‘business end’ of Bertwert’s code and figured out exactly how it works. I’ve now put a full code walkthrough of that script in the comments section of the previous post. Having done that, and having had a tweet from David Meiklejohn saying […more…]
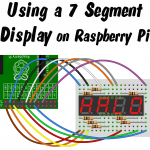
Last week I bought some 4-digit, 7-segment displays to experiment with. Strangely enough it was something I’d never tried before, so I was interested to see how they work. I googled around looking to see if someone else had done this before. It seems there are several different sorts of 7-segment displays, so you have to find a good match for the one you’ve bought. You can get them in various guises including: i2c backpack; 12 pins; 16 pins; resistors built-in; common anode; common cathode etc. The ones I bought are 12 pin, bare, no […more…]
CamJam Edukit 3 robotics kit is launched today. It’s an entry-level robotics kit aimed at beginners, but I’ve had quite a lot of fun with it, and haven’t even used all the bits yet. It’s been put together by Jamie Mann from the PiHut, and Mike Horne and Tim Richardson from CamJam. As with other CamJam Edukits, there is a progressive series of worksheets to help guide you through how to make the various pieces do what they’re designed for. You can find those here. Here’s what the kit looks like straight out of the […more…]
Last Thursday I decided I needed to do the “Analog Inputs Video” for RasPiO® Duino. All the other basic functionality was well covered in the previous assembly/setup/tutorial videos. There’s also the 47 page user guide (FREE Download – good intro to Arduino programming) and a GitHub repository with the example sketches in. But I wanted to complete the basic set of videos, so at midday I started planning. I filmed in the afternoon and cut the video in the evening. At about 2230 I was done, so I started uploading it to YouTube (~2.4 Gigabytes […more…]
You may remember I ran a KickStarter campaign in August for the RasPiO® GPIO Ruler. The KickStarter rewards were all sent out in the first week of October. (We finished shipping 3 weeks early.) So now it’s time to launch the product officially and make it available to all on general sale. If you missed out on the KickStarter, now you can buy one. In case you haven’t seen it before, this is what it looks like… What Is The RasPiO® GPIO Ruler? It’s a coding crib-sheet for RPi.GPIO, a port ID guide, a multi-scale […more…]
Giving GPIO Zero (Beta version) a test drive might make you feel a little insecure, but I’m aiming to throw some light on the situation. I decided to try out some of the built-in features of GPIO Zero by working up a little hardware project. I looked at the current feature set and decided to try and combine MotionSensor, LED and LightSensor all at once. What sort of project uses that kind of technology? Why a PIR-controlled security light of course – if you swap the LED for a relay and 12V lamp! The video […more…]
If you’re a RasPi.TV regular, you’ll know that one of my very favourite things is hacking around with the GPIO ports on the Raspberry Pi and sharing my findings with the world. Sometimes this involves documenting a new feature, sometimes it involves making a new project, using a new chip or just getting something working that I haven’t tried before. But it nearly always involves Python programming and the brilliant RPi.GPIO Python library by Ben Croston. I’ve written all sorts of tutorials (~16) on RPi.GPIO because it is one of my favourite things. You may […more…]
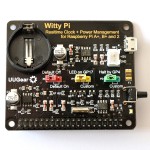
Back in July I did a mailbag video and got you guys to vote on which item I should do a more in-depth review of. WittyPi got about 50% of the vote by the time I had to make the decision. So here is the UUGear WittyPi review. WittyPi is an A+/B+/Pi2B add-on that gives you a safe on-off switch and enables timed shutdowns and startups of your Raspberry Pi. It has a battery-backed realtime clock (RTC) that controls the startup times and allows your Pi to retain the correct time even if not connected […more…]
Another new RPi.GPIO feature that I discovered last week is GPIO.getmode(). This appeared in RPi.GPIO 0.5.11 and allows you to query RPi.GPIO to see whether GPIO.setmode() has been set up as BCM, BOARD, or UNSET mode. This could be useful if you are running a suite of scripts or modules which work together. GPIO.getmode() returns… -1 if GPIO.setmode() is not set 11 if GPIO.setmode(GPIO.BCM) is active 10 if GPIO.setmode(GPIO.BOARD) is active Below you can see a live python session showing what you get when you use GPIO.getmode() with different modes set… Why Did You Bother […more…]
In RPi.GPIO 0.5.10 (we’re now on 0.5.11) Ben Croston ‘deprecated’ GPIO.RPI_REVISION, which used to be the preferred way to find out what kind of Raspberry Pi board a program was running on. This was a useful feature to make it possible to write software that will work on any Pi, regardless of how its GPIO pins are arranged. To date, we’ve had three different GPIO pin header layouts for the standard Raspberry Pis (four if you count the compute module). But GPIO.RPI_REVISION has been deprecated (fallen out of favour) because there is now something better. […more…]